In this topic, we will load some text files to a Kafka topic.
1. The Source File
Create a file, named “payment.txt,” to contain the following content:
# fixed-width of 19 | delimited by , | delimited by ,
05/03/2021 12:30:30 account0000001, 1000
05/04/2021 16:34:10 account0000002, 100
05/03/2021 02:05:23 account0000001, 5000
05/03/2021 06:45:30 account0000003, 2000
05/04/2021 16:35:30 account0000002, 100
05/03/2021 12:30:30 account0000001, 1000
05/04/2021 12:30:30 account0000001, 1000
The first line is a comment, and the data starts from the second line. Each line is a payment record. It includes information about timestamp, account, and amount.
Upload this file to the cloud storage. In the tutorial, the location is
gs://mybucket/testdata/finance2/log1
You can place this file anywhere in your own bucket.
Next, we will design a reader to load from this location.
2. Design of the Reader
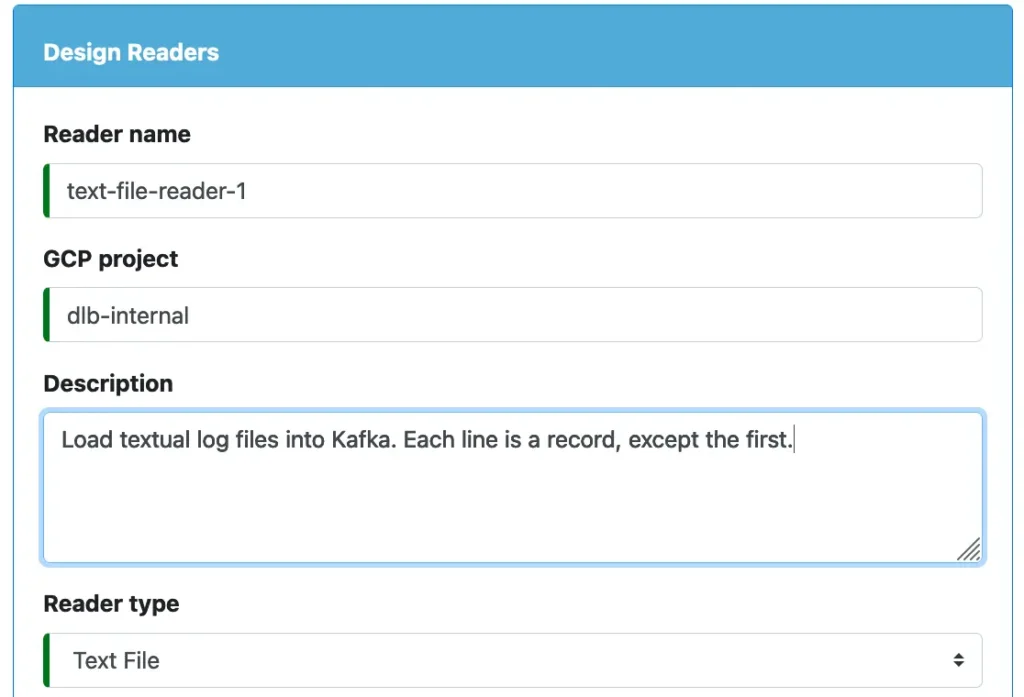
Use Calabash GUI, click on the “Reader” heading to make the Reader page current. Then set the data system to “lake_finance.” After that, click on the big green button labeled “Create Reader” to create a reader in lake_finance.
Select “Text File” as the reader type. See below.

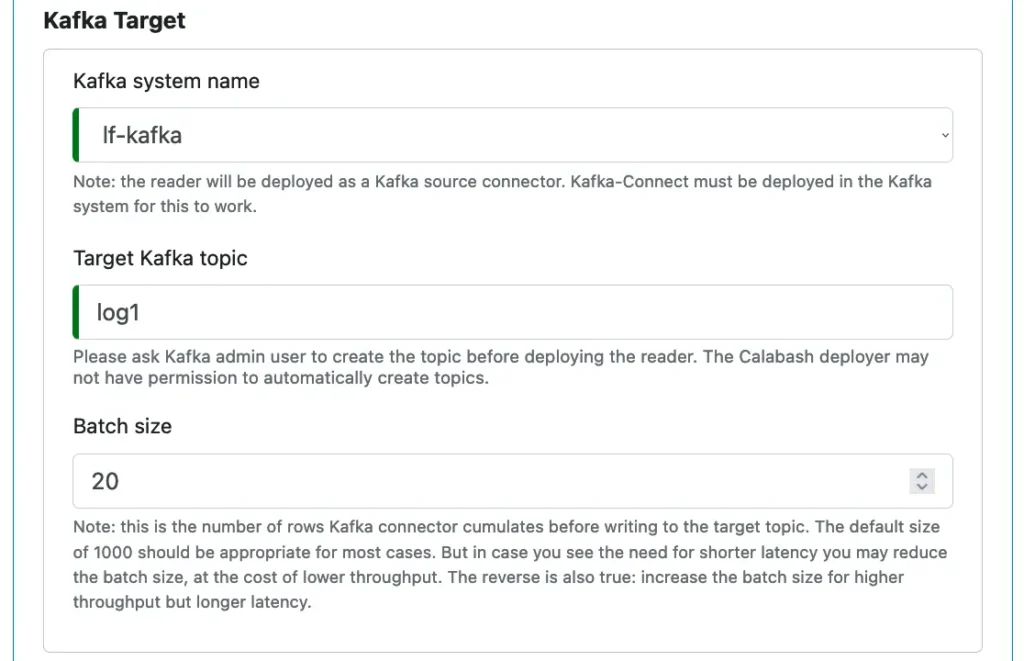
Next, define the loading target, i.e., a Kafka topic. In our tutorial, we name the target topic “log1.” We can also optionally change the batch size. Please read the notes in the following screenshot.

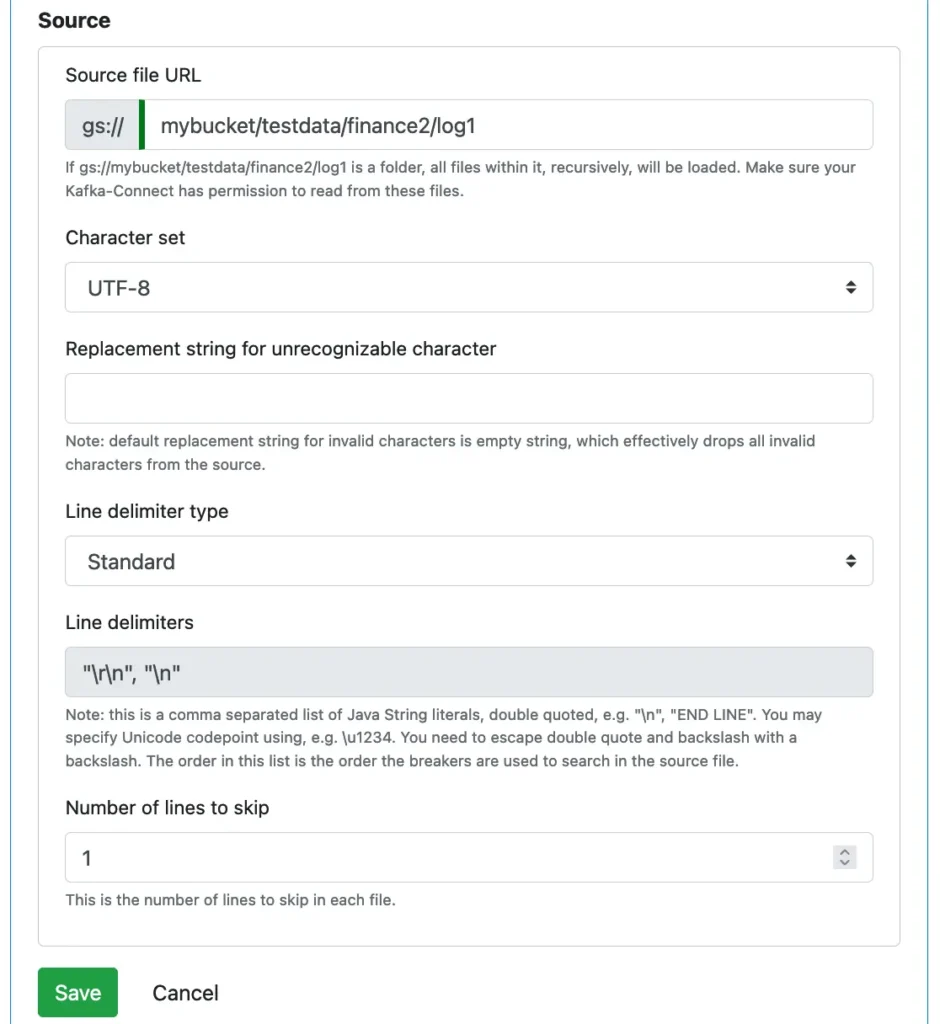
After target definition, we define the source. Enter the location of the source folder on the cloud storage. We will upload the “payment.txt” file there for the reader to read later.

We also need to provide information about how to read characters from the source file. By default, UTF-8 is the character set. Calabash text file reader supports all character encodings.
Since the first line is a comment, we set the number of lines to skip to one. Click on the Save button to persist the reader metadata.
3. Create Topics
We will need to create the target topic “log1” and assign some permissions.
First get into the KCE as follows.
% gcloud compute ssh lf-kce --zone us-central1-f
########################[ Welcome ]########################
# You have logged in to the guest OS. #
# To access your containers use 'docker attach' command #
###########################################################

user1@lf-kce ~ $ docker ps
CONTAINER ID IMAGE COMMAND CREATED STATUS PORTS NAMES
24711da647d9 gcr.io/dlb-public-245218/kce:3.0.9 "/app/run.sh" 40 seconds ago Up 37 seconds klt-lf-kce-ylpr
user1@lf-kce ~ $ docker exec -it 24711da647d9 /bin/bash
root@lf-kce:/# cd /app/bin
Now create topic “log1”:
root@lf-kce:/app/bin# ./create_topic.sh jdoe log1
Created topic log1.
After that, we assign user “april” permissions to consume from topic “log1”:
root@lf-kce:/app/bin# ./create_acl_for_consumer.sh jdoe april log1
Adding ACLs for resource `ResourcePattern(resourceType=TOPIC, name=log1, patternType=LITERAL)`:
        (principal=User:april, host=*, operation=DESCRIBE, permissionType=ALLOW)
        (principal=User:april, host=*, operation=READ, permissionType=ALLOW)

Adding ACLs for resource `ResourcePattern(resourceType=GROUP, name=*, patternType=LITERAL)`:
        (principal=User:april, host=*, operation=READ, permissionType=ALLOW)

Current ACLs for resource `ResourcePattern(resourceType=TOPIC, name=log1, patternType=LITERAL)`:
        (principal=User:april, host=*, operation=READ, permissionType=ALLOW)
        (principal=User:april, host=*, operation=DESCRIBE, permissionType=ALLOW)

Current ACLs for resource `ResourcePattern(resourceType=GROUP, name=*, patternType=LITERAL)`:
        (principal=User:kc_consumer, host=*, operation=ALL, permissionType=ALLOW)
        (principal=User:bk, host=*, operation=ALL, permissionType=ALLOW)
        (principal=User:kc, host=*, operation=ALL, permissionType=ALLOW)
        (principal=User:april, host=*, operation=READ, permissionType=ALLOW)
We will use “april” to observe the loading progress in topic “log1.” To do that, issue the following command:
root@lf-kce:/app/bin# ./consume.sh april log1 g1
The script will not return. It opens a real-time session to the topic “log1” as user “april.”
As soon as our text file reader puts a record into topic log1, the script consumes it and displays one line on the screen. The last argument is the group name for the consumer session. Since we have not deployed the reader yet, the script generates no output right now.
Just leave the script running. We will deploy the reader next, and you will see the output in real-time later.
4. Deploy the Reader: Prepare SSL Files
Use Calabash CLI to deploy the reader.
You may first issue “list r” to check the reader status:
Calabash (tester:lake_finance)> list r

Reader Name     Project         Description                    Type                           Status
--------------- --------------- ------------------------------ ------------------------------ ------------------------------
text-file-reade dlb-internal    Load textual log files into K  Text File                      >>> Updated at 8/22/2021, 4:26
r-1                             afka. Each line is a record,                                  :46 PM
                                except the first.
Make sure the reader is not deployed.
To deploy the reader, issue the”deploy r” command:
Calabash (tester:lake_finance)> deploy r text-file-reader-1
Deploy to cloud? [y]:
Please enter a dir for the security files:
Calabash can deploy a reader to either the cloud platform or on-premise. In the above example, we hit the RETURN key to take the default, i.e., to deploy to the cloud.
The deploy reader command then asks for a directory containing security files. The deploy command must send a POST request to the Kafka-Connect using TLS (SSL). It needs local files for the TLS (SSL) key and certificate. But we still do not have them yet.
So, type “Control-C” to abort the above command. We must now set up the local TLS (SSL) environment. First, start a terminal window, and in it, type the following to establish an SSH tunnel to the PCA VM:
% gcloud compute ssh lf-pca --zone us-central1-f -- -NL 8081:localhost:8081
The above command allows you to access the PCA as localhost.
Next, issue the set-up-ssl command, specifying the PCA:
Calabash (tester:lake_finance)> set-up-ssl lf-pca
Is the PCA in the cloud? [y]:
Please enter a dir for the security files: /Users/tester/my_ssl_files
Deleted file tester-key.pem
Deleted file tester.jks
Deleted file tester-cert.pem
Deleted file trust.jks
Deleted file rtca-cert.pem
Deleted dir /Users/tester/my_ssl_files
mkdirs /Users/tester/my_ssl_files
SSL certificate supported by PCA lf-pca for user tester is created in /Users/tester/my_ssl_files
You may place the generated security files in any directory. The “set-up-ssl” command will first delete and recreate it if it already exists. It then generates TLS (SSL) key and certificates in this sub-directory:
/Users/tester/my_ssl_files/lake_finance__lf_pca/tester_security
Go into this directory, you can find these files:
% ls
rtca-cert.pem	tester-cert.pem	tester-key.pem	tester.jks	trust.jks
Among these files, you can find the keystore (named “tester.jks”) and the truststore. They will be used by the deployer.
5. Deploy the Reader
Now deploy the reader again:
Calabash (tester:lake_finance)> deploy r text-file-reader-1
Deploy to cloud? [y]:
Please enter the local dir containing the key and trust stores: /Users/tester/my_ssl_files/lake_finance__lf_pca/tester_security
Deployed to Kafka-Connect @ https://104.198.9.204:8083
If the deploy is successful, the reader kicks into action immediately. In the KCE window you should see data popping up:
root@lf-kce:/app/bin# ./consume.sh april log1 g1
"gs://mybucket/testdata/finance2/log1/payments.txt-95"|"05/03/2021 12:30:30 account0000001, 1000"
"gs://mybucket/testdata/finance2/log1/payments.txt-176"|"05/03/2021 02:05:23 account0000001, 5000"
"gs://mybucket/testdata/finance2/log1/payments.txt-135"|"05/04/2021 16:34:10 account0000002, 100"
"gs://mybucket/testdata/finance2/log1/payments.txt-217"|"05/03/2021 06:45:30 account0000003, 2000"
"gs://mybucket/testdata/finance2/log1/payments.txt-257"|"05/04/2021 16:35:30 account0000002, 100"
"gs://mybucket/testdata/finance2/log1/payments.txt-298"|"05/03/2021 12:30:30 account0000001, 1000"
"gs://mybucket/testdata/finance2/log1/payments.txt-339"|"05/04/2021 12:30:30 account0000001, 1000"
In the output, each line is a record of key and value. The key and value are separated by a vertical bar. The key contains the unique “coordinates,” including the record’s file URL and its ending offset in the file (non-inclusive). For example, the first record in the above is from the file “gs://mybucket/testdata/finance2/log1/payments.txt,” starting from offset 0 to 94. The second record is from offset 95 to 134. Note that the records may be displayed out of offset order.
The value is just a string verbatim from the input file.
6. The Real-Time Behavior
Let us create another text file (named “payments2.txt”) with the following content:
# fixed-width of 19 | delimited by , | delimited by ,
05/06/2021 12:30:30 account0000001, 1000
05/06/2021 16:34:10 account0000002, 100
05/07/2021 02:05:23 account0000001, 5000
05/07/2021 06:45:30 account0000003, 2000
Note that the first line must be a comment line. We have designed the reader to skip one line in each file.
Now upload this file with the following gsutil command:
% gsutil payment2.txt gs://mybucket/testdata/finance2/log1/a/b/c/payments2.txt
So the file is uploaded into the source folder of the reader. Although the new file is several subfolders deeper than the source folder, the reader can detect the new file and load it.
After a short while, the KCE window should look like this:
root@lf-kce:/app/bin# ./consume.sh april log1 g1
"gs://mybucket/testdata/finance2/log1/payments.txt-95"|"05/03/2021 12:30:30 account0000001, 1000"
"gs://mybucket/testdata/finance2/log1/payments.txt-176"|"05/03/2021 02:05:23 account0000001, 5000"
"gs://mybucket/testdata/finance2/log1/payments.txt-135"|"05/04/2021 16:34:10 account0000002, 100"
"gs://mybucket/testdata/finance2/log1/payments.txt-217"|"05/03/2021 06:45:30 account0000003, 2000"
"gs://mybucket/testdata/finance2/log1/payments.txt-257"|"05/04/2021 16:35:30 account0000002, 100"
"gs://mybucket/testdata/finance2/log1/payments.txt-298"|"05/03/2021 12:30:30 account0000001, 1000"
"gs://mybucket/testdata/finance2/log1/payments.txt-339"|"05/04/2021 12:30:30 account0000001, 1000"
"gs://mybucket/testdata/finance2/log1/a/b/c/payments2.txt-217"|"05/07/2021 06:45:30 account0000003, 2000"
"gs://mybucket/testdata/finance2/log1/a/b/c/payments2.txt-95"|"05/06/2021 12:30:30 account0000001, 1000"
"gs://mybucket/testdata/finance2/log1/a/b/c/payments2.txt-135"|"05/06/2021 16:34:10 account0000002, 100"
"gs://mybucket/testdata/finance2/log1/a/b/c/payments2.txt-176"|"05/07/2021 02:05:23 account0000001, 5000"
The last four lines are from the new file.
You may also do one experiment: add a line to any one of the above files, and you should see your records be loaded. The reader watches for new data in the source folder. Anything new will be detected and loaded. These include both new files and new records in existing files.