You need just one Private Certificate Authority (PCA) in each data system. The PCA will automatically sign all TLS (SSL) certificates in your Kubernetes and Kafka systems. The PCA is secure. No one (including you, the creator of the PCA) and no processes can access the private key of the PCA.
The PCA will run on one VM. There is a minimum requirement on CPU and memory because the PCA is active only occasionally (to sign a certificate), and it will consume almost no disk space. So a machine with a minimum configuration (such as “n1-standard-1”) is all you need.
Design the PCA
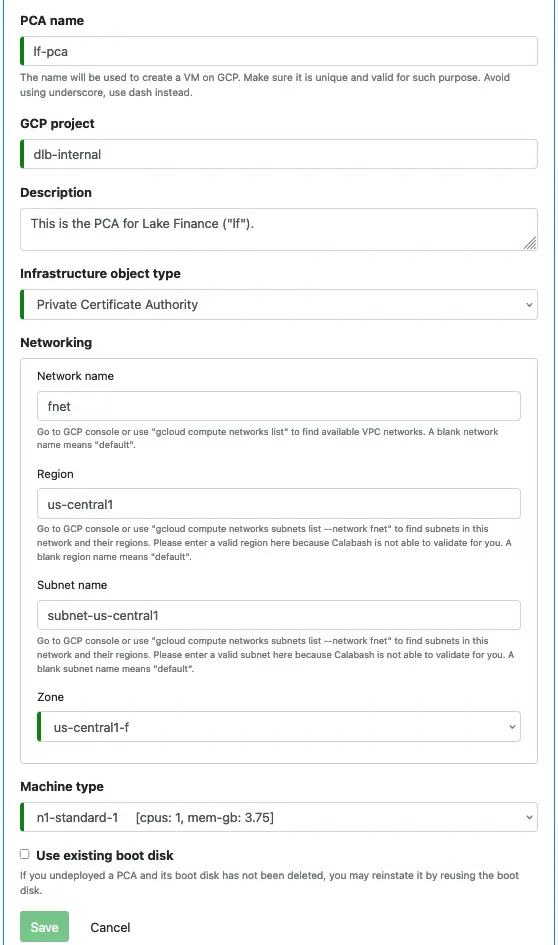
Use Calabash GUI to create an infrastructure object and fill in the following information.

Deploy the PCA
Use Calabash CLI to deploy the PCA:
Calabash (tester:lake_finance)> deploy i lf-pca
Creating vm lf-pca ...
Deployed to 10.128.16.9:8081 (internal) 34.135.32.93:8081 (external)
After the deployment is complete, you can check the status of the PCA:
Calabash (tester:lake_finance)> list i

Obj Name             Project         Description                              Type                           Status
-------------------- --------------- ---------------------------------------- ------------------------------ ----------------------------------------
fnet                 dlb-internal    This is the VPC network for Lake Finance VPC Network                    Deployed at 8/15/2021, 10:21:37 AM >>> U
                                     .                                                                       pdated at 8/14/2021, 9:52:10 PM
lf-pca               dlb-internal    This is the PCA for Lake Finance ("lf"). Private Certificate Authority  Deployed to 10.128.16.7:8081 (internal)
                                                                                                             34.135.32.93:8081 (external)  at 8/16/20
                                                                                                             21, 9:54:24 PM >>> Updated at 8/16/2021,
                                                                                                              3:17:20 PM
Calabash (tester:lake_finance)>
You can also test if the PCA is working using the gcloud commands. First issue the flowing command in one terminal window.
% gcloud compute ssh lf-pca --zone us-central1-f -- -NL 8081:localhost:8081
This command creates an SSH tunnel to the VM where the PCA runs. The PCA is a service listening to port 8081. The tunnel maps that port to your localhost:8081. This command will not return. As long as it is running, you have the tunnel working, and you can access the PCA at localhost:8081.
Then in another window, use curl (or any other HTTP client tool) to get the public certificate of the PCA. This is the root certificate of this certificate authority.
% curl localhost:8081/cacert
-----BEGIN CERTIFICATE-----
MIIDjTCCAnWgAwIBAgIUWsKhjDNUbTE3Ub70ngmiHQX4VcwwDQYJKoZIhvcNAQEL
BQAwVjELMAkGA1UEBhMCVVMxCzAJBgNVBAgMAkNBMQswCQYDVQQHDAJTRjEMMAoG
A1UECgwDQW55MRAwDgYDVQQLDAdSdW50aW1lMQ0wCwYDVQQDDARydGNhMB4XDTIx
MDgxNzA0NTUwN1oXDTMxMDgxNTA0NTUwN1owVjELMAkGA1UEBhMCVVMxCzAJBgNV
BAgMAkNBMQswCQYDVQQHDAJTRjEMMAoGA1UECgwDQW55MRAwDgYDVQQLDAdSdW50
aW1lMQ0wCwYDVQQDDARydGNhMIIBIjANBgkqhkiG9w0BAQEFAAOCAQ8AMIIBCgKC
AQEA5TSduwF9TcfeAX9n4nIy2p6niYISqf7lJLDylL5nhFPpZBg7rPZ0hGk2z90l
dHjoOVpuTE5sR7bBO37rmz3WxZmNJ7u+luXovgTmI/CAIZgEMp2/HLjsrsD5rYtX
5wTAFEARpy1GIayh10DxtddTEIrPxNgVkZy28EtyiAqI/wy8fucqvVPszNiuU/M7
bI8/NEUoBh+IK2CrPrAP5WrwrmOkwEEpyj+de63PGPktbEe9GTsondwiwC6PtWmi
pVhPFgTcQpzj9+fOL7icYMEU1ERtWOos4PJWjll+GOnNdp5bMnAcUnzSH2QFzQ/u
o8ERQu95g/kjusqw2d/54BxAQwIDAQABo1MwUTAdBgNVHQ4EFgQUZfXwNBM/aY7u
fpGiW0K83VkNfpMwHwYDVR0jBBgwFoAUZfXwNBM/aY7ufpGiW0K83VkNfpMwDwYD
VR0TAQH/BAUwAwEB/zANBgkqhkiG9w0BAQsFAAOCAQEAjI6u2xLuWmy5ELrvok1z
/T5tX4fSLRLP7CBwb7cK2AZnkh6ieQAR9tY5I+DmnAE5gzvEtkQjnCw2BJ9rFTsB
TZxdTbxDKnZfhLyjee5VDHEMDNsjEDaBpqVWt+p/IgIce8lngzXZW6XjOstJm5uB
4GwfsaW0rZkeWVt3lI3a8RwChVCnXeRQmYoK6oy3Qv/m63gZ4D5ZEhOFe6iOfY5Y
z0xXi3UMLFR1i/a5/hzG3cf15fZhA0B5OrfqYGcz8w2ospTY8yt7D9T38+44FCtu
phW2zGp3dGk1wGxZo/g0aBFqrh6X7ZVbCVZILXmKw5oq8wgvLF16KrD8WSXH+SPO
dA==
-----END CERTIFICATE-----%
You will see how to use the PCA to sign a certificate in a later tutorial.
Project Metadata
A working PCA announces its service using GCE Project Metadata. The GCE Project Metadata is a key-value table for sharing configuration information among processes in your project.
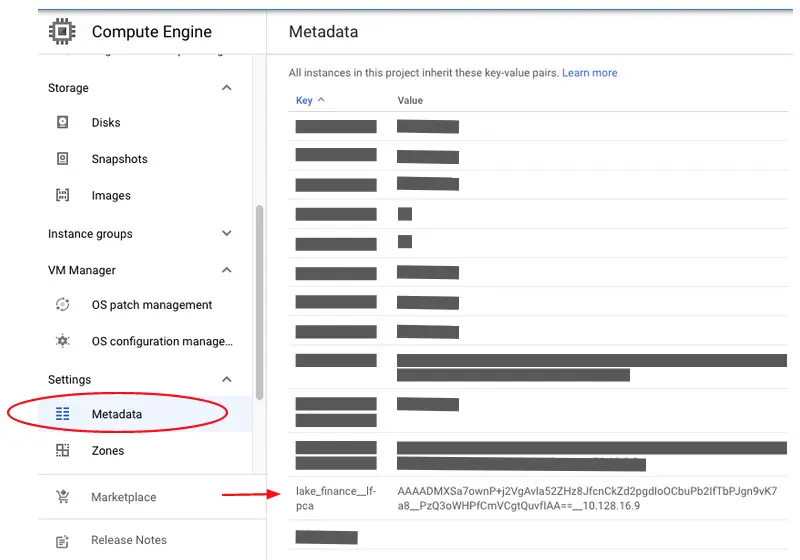
Go to the GCP console and the Compute Engine section. In the navigation menu, click on “Metadata.” You will see something like the following screenshot.

Your PCA has created an entry in the metadata table with the key lake_finance__lf-pca. This is in the format
DATASYSTEM__PCA
The value part is an encrypted PCA access token followed by the internal IP of the PCA. Kafka systems and Kubernetes systems created using Calabash will use these to get their certificates signed.
Make sure this entry is never manually modified or deleted.
Undeploy the PCA
Calabash (tester:lake_finance)> undeploy i lf-pca
Undeploy from cloud? [y]:
Deleting project metadata with key lake_finance__lf-pca ...
Undeployed
Calabash (tester:lake_finance)>
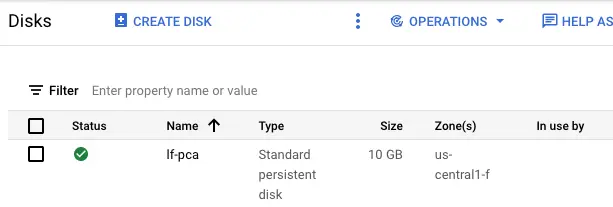
After successful undeployment of the PCA, its VM is deleted. But the persistent disk remains. You can go to the GCP console to see this disk.

The persistent disk has the same name as the PCA. It is now not being used by any VM.
The undeployment command also deletes the project metadata for the PCA.
Redeploy the PCA
The private key of a PCA is its most valuable real estate. If the private key has to be changed, all previously issued certificates become invalid.
The PCA saves its private key on the persistent disk. The key file is encrypted so we can be free from the worry of tampering.
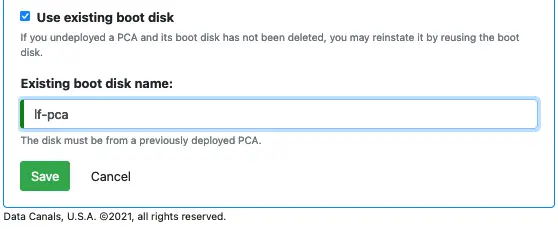
You can redeploy a PCA and ask it to reuse the previous private key. To do that, you must modify your PCA design in the following way.

You must switch on the “Use existing boot disk.” And you must specify the name of the persistent disk. Click on the “Save” button. Then you are ready to redeploy the PCA and continue with the same old private key.
Go back to Calabash CLI to issue the deploy command. But before you do that, it is a good idea to double-check that the PCA design is correct.
Calabash (tester:lake_finance)> desc i lf-pca

name: lf-pca
proj: dlb-internal
desc: This is the PCA for Lake Finance ("lf").
type: Private Certificate Authority
attrs: {region=us-central1, zone=us-central1-f, network=fnet, subnet=subnet-us-central1, mt=n1-standard-1     [cpus: 1, mem-gb: 3.75], useExistingBootDisk=true, existingBootDisk=lf-pca, salt=J3VwBlawLTdO8UgQVsmP8A==}
deployedInfo: null
updateInfo: null
status: Undeployed at 8/16/2021, 9:55:54 PM >>> Updated at 8/16/2021, 10:02:10 PM

Calabash (tester:lake_finance)>
The “desc i” command displays the information of the PCA. In the “attrs” field, you should see
useExistingBootDisk=true, existingBootDisk=lf-pca,
This is the correct design change we made earlier in Calabash GUI.
Sometimes, the Calabash CLI holds old version of the design in its cache. If you see your recent change is not reflected in the “desc i” output, you can force a refresh of the cache by issuing this command:
list i
This command will refresh the CLI cache and display a list of all current infrastructure objects.
After having verified the PCA design is current (i.e., with reuse of the previous disk), you can go ahead to issue the “deploy i” command again. The PCA will be launched using the existing disk.
Go to the GCP console to check on the disk. You can see the PCA VM (named “lf-pca”) is now using this disk.

Best Practice
The boot disk of the PCA is critical because it holds the private key of the PCA. Losing it could be disastrous. If a PCA has issued lots of certificates to your deployed Kafka, Kubernetes, KCE, and pipeline components, losing the PCA may require redeploying all these components.
When a new PCA starts, it will create a new private key, which will be incompatible with old certificates. The existing systems (using the old certs) will continue to work. But members with certs from the new PCA cannot join the party. In emergencies, you can use this fact (i.e., the old system is still alive) to formulate a rescue plan. We will have a tutorial topic about this in Track 8.
It is a good idea to create disk snapshots regularly. Calabash does not have a mechanism to help you do that since it is straightforward using Google Cloud Console. You can check out this link to learn how to do it: Working with Persistent Disk Snapshots.
The Cost
The primary cost is from the VM and its 10 GB persistent disk. The disk snapshots (if you configure to use it) will generate negligible cost since the size of each disk snapshot is only about 5 KB. Also, you will incur no per certificate cost since the PCA is all yours.
If you run the PCA 24 x 7 on an “n1-standard-1”, the cost is about $25 per month. But if you know when PCA is needed, you could keep it undeployed most of the time and only keep the persistent disk. Redeploy the PCA when you need it. The cost of having a 10 GB disk around is merely 40 cents a month.
The cost of running the PCA part-time, at five hours a day and five days a week, is about $5 a month.
For practicing with the tutorial, you can use the Calabash CLI to undeploy the PCA and manually delete the disk on the GCP console when finished.