This article is the user manual on creating pipelines in Calabash GUI.
On the Pipeline page, you can create a data-driven, real-time pipeline. A pipeline always starts with loading data from a Kafka topic (i.e., the “source topic”). The source loader can optionally convert data to a schema you define in Calabash GUI. The loaded data then flows through a series of processors to get processed. The last processor usually dumps the processed data to a “target topic.” Running data pipelines is how we “purify” data in the data lake.
The creation of the processing logic sounds daunting. But Calabash takes away most of the complexity from you. You will use Calabash GUI to describe what you want to do on a high level and leave the implementation to Calabash.
Internally, Calabash generates Kafka Stream Java code. You do not have to know how it works. However, you need to know some rudimentary Java to define calculations and Boolean conditions in your core business domain. In other words, Calabash GUI does not create a new language for expressions. It borrows the Java language.
There are five types of processors you can create. These are Dedup, Filter, Record Transform, Group Transform, and Sink. We will see how to use them shortly.
To begin the pipeline design, go to the Pipeline page by clicking on the “Pipeline” item on the top menu, then click on the green button for “Create Pipeline.” The form for creating a new pipeline appears.
This form asks you to describe two categories of properties.
We will first cover the general properties of the pipeline. Then we will see how to create processors. After that, we will see how to deploy the data pipeline and start the data flow.
1. Pipeline Properties
1.1. Pipeline Name
The first thing you must pay attention to is the name for the pipeline.

As noted in the hint in the screenshot above, the pipeline name will be the application id in the Kafka system. Its purpose is for multiple instances of the pipeline to collaborate on the same load. You must make sure this name is unique in your Kafka system.
1.2. Kafka System
Next, you select a Kafka system. You must create the Kafka system first before working on the pipeline.
You must also define the source topic, such as “log1.” See the following example screenshot.
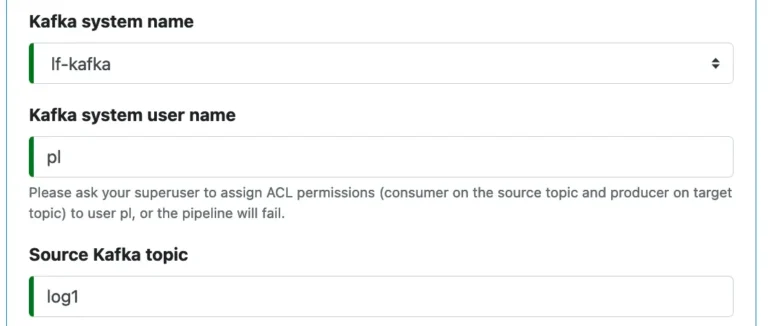
The user name for the Kafka system (“pl” in the above screenshot) can be any string, not necessarily a valid Calabash user. The superuser of the Kafka system will use the user name to manage ACL authorizations for this pipeline. For example, grant consumer (or producer) permissions on source topic to the pipeline user or revoke these permissions.
1.3. Source Parser
Next, you can add a source parser. At this point, you need some understanding of the source parser and know when to add one.
In your work, you will most likely create a chain of pipelines, i.e., the target topic of one data pipeline is the source topic of the next one. It is unlikely you will have only one stand-alone data pipeline.
When a pipeline sinks data to a target topic, the data become structured because they follow the output schemas of the data pipeline. In the immediate downstream data pipeline, you may wish to read data in the structured form. Calabash gives you both choices, i.e., parse the source string into a record or not to parse.
- Choice 1: treat the Kafka topic as containing only raw data, i.e., string record keys and values. This choice is for the case you do not know the structure of the source topic.
- Choice 2: treat the Kafka topic as containing records. This choice is for the case that data in the source topic are from an upstream pipeline.
If you choose Choice 1, do not add a source parser here. Instead, read the data as raw text with source schema “string” for both key and value. You can later add record-transformation processors to call parsers if you want to parse the strings. More on this subject later. The benefit of not converting source strings to records is that the source loader will have no chance to hit any error.
If, however, you want Choice 2, you intend to continue from where the upstream pipeline left off. You must enter the schemas for the source records. You may either enter the schemas one field at a time or copy the input schemas from the sink processor in the upstream pipeline to here. Refer to here for how to copy a schema from one place to another in Calabash GUI.
The following screenshot shows Choice 1: accepting raws.
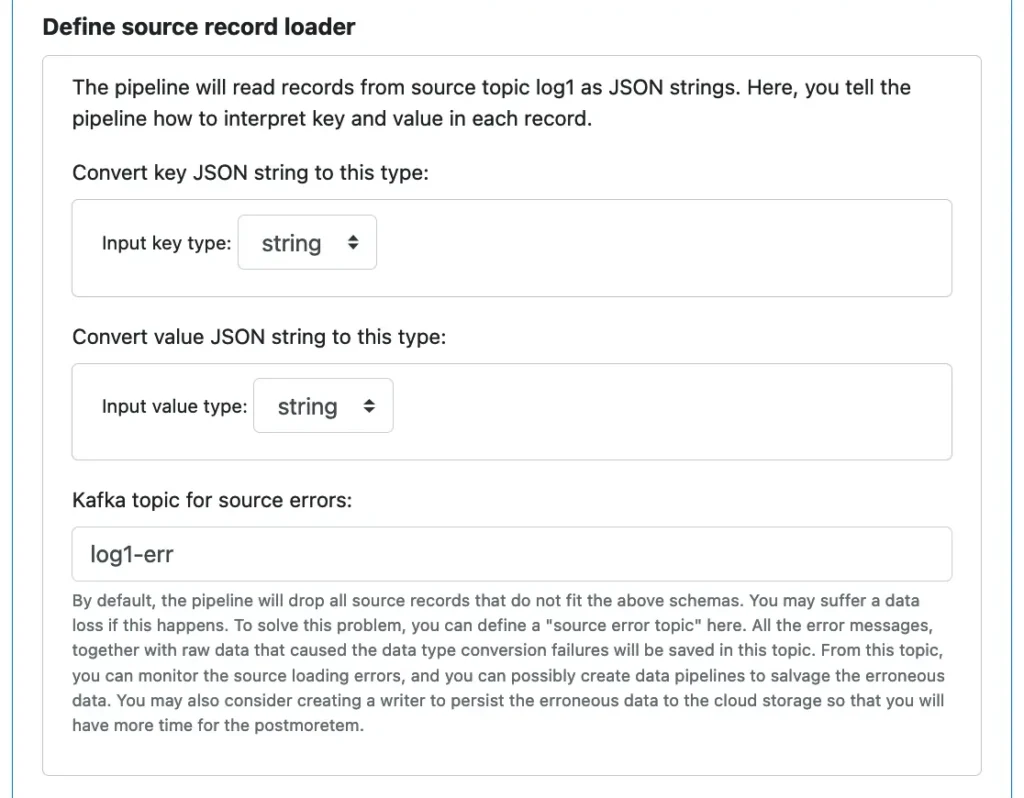
As you can see, we do not enter an error topic because the source loader will not hit errors.
The following screenshot shows an example of defining a source parser with an error topic, i.e., Choice 2.
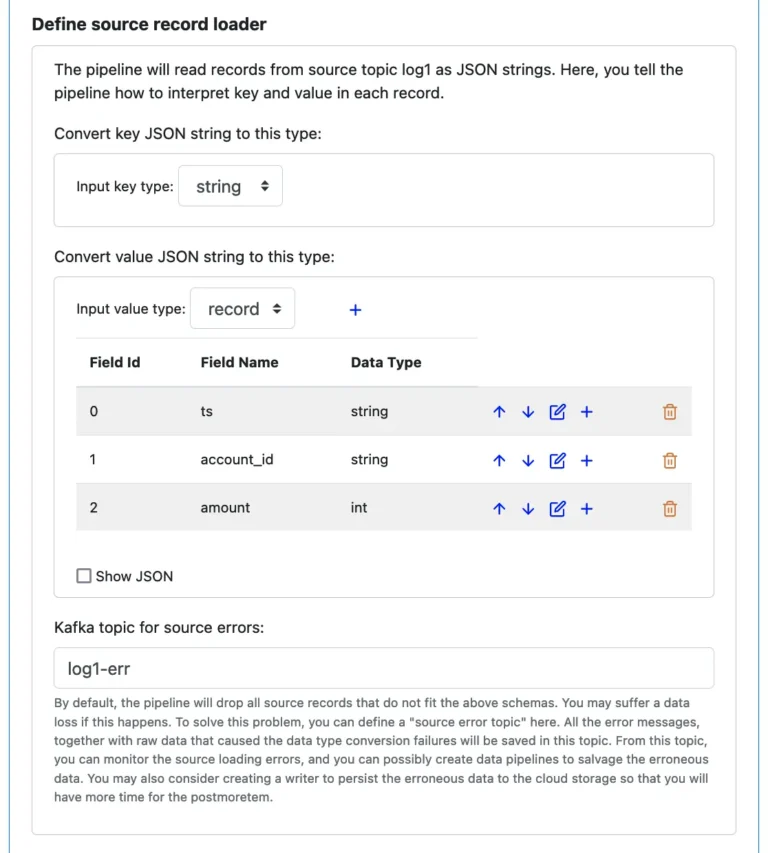
In the above screenshot, we want to take the key as a “string” type. But we want to deserialize the value part (from JSON string in the Kafka topic) to a record.
For Choice 2, even though you know data ought to fit these schemas, it is still a good idea to get prepared for parsing errors. Someone might have manually dropped some invalid records in the source topic. Or, some errand records from other pipelines end up in this topic mistakenly. Should any bad thing happen during the parsing, Calabash would send the error message, plus the raw value string, to the error topic, named “errors-2-load” in the above screenshot.
In general, Calabash gives you opportunities to capture errors using error topics wherever errors are potentially possible.
1.4. Dependencies
The processing part of your pipeline may call parsers and lookups you have defined in Parser and Lookup pages. We will see how to add calls to parsers and lookups later when we define processors.
Now, you must list all parsers and lookups you need to use in this pipeline. It is similar to declarations of functions before calling them. If you do not list them here in the dependencies, there will be reference exceptions at runtime.
The following screenshot shows empty dependency lists.
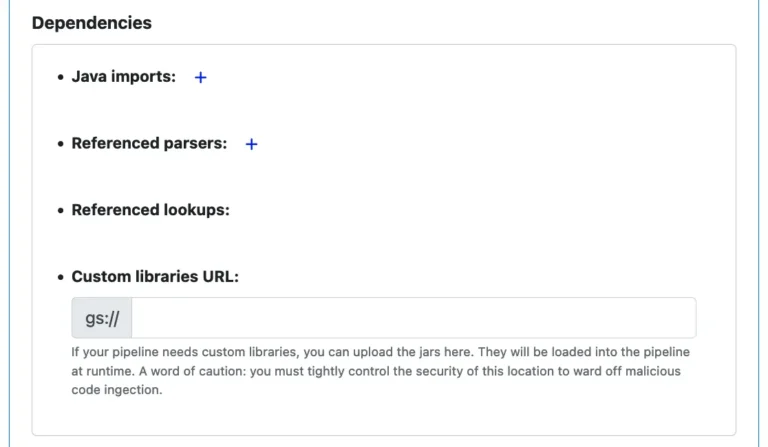
To add a Java import, parser name, or lookup name, click on the blue plus sign next to the “Java imports,” “Referenced parsers,” or “Referenced lookups,” respectively. Then enter the Java import code line or select from the list of names.
The following screenshot shows the add parser dialog. Adding lookups is similar.
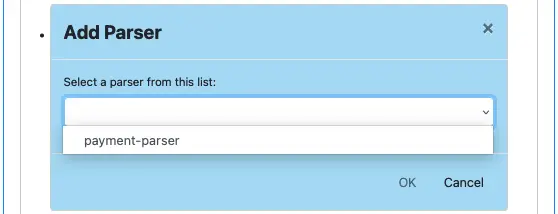
Select a parser name from the list, and click on “OK,” the parser name will appear in the “Referenced parsers” list. Similarly, you can add referenced lookups. You can add more parsers or lookups than what you use in processors. There is no harm other than making compile a bit longer. The following is an example of completed reference lists.
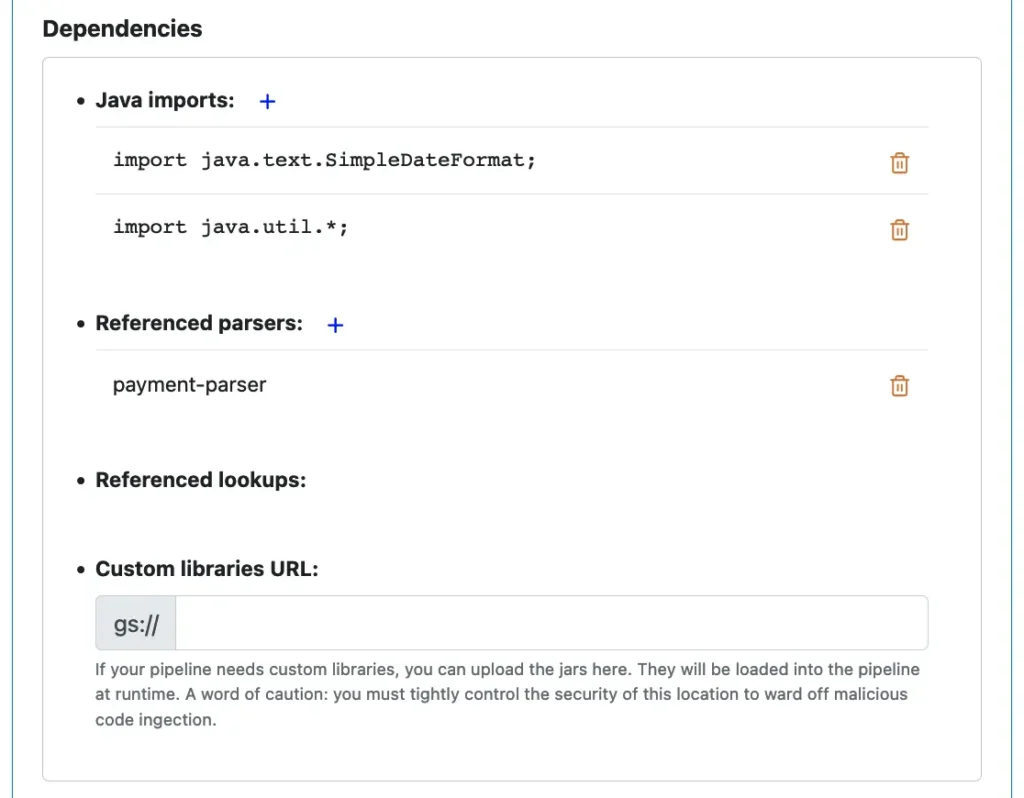
In the above screenshot, we also show the additions of Java import lines. The way to add these lines is similar to adding parser names.
The optional “Custom libraries URL” in the above screenshot points to a folder on Google Cloud Storage where you can upload Java libraries referenced by your processors. For example, if your processor must query a JDBC database, you can upload the driver JAR file to this location.
1.5. Run the Pipeline on VM
Next, you must specify where to run this pipeline.
You have two options: run it on a stand-alone VM or run it in a Kubernetes cluster. The following screenshot is an example of running the pipeline on VM.
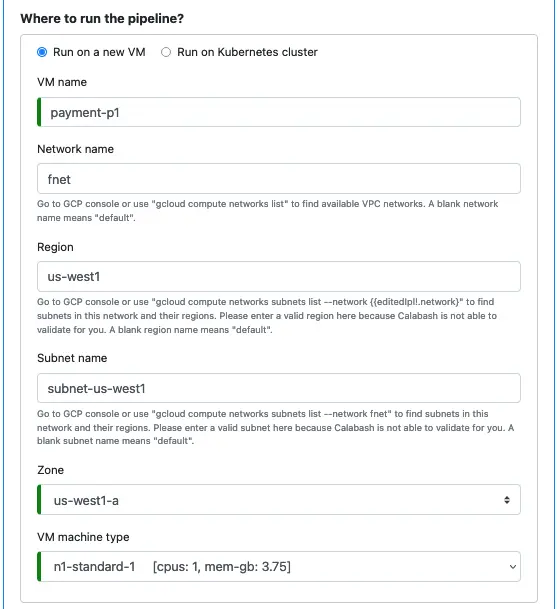
Running pipelines on a stand-alone VM is recommended for testing, as it has a limited impact on your existing data lake.
1.6. Run the Pipeline in Kubernetes Cluster
The following screenshot shows an example of configuring the pipeline to run in a Kubernetes cluster.
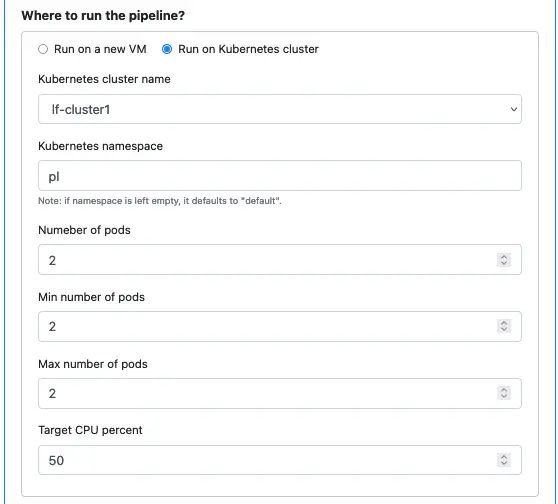
You must have created the cluster in Calabash GUI before you start designing the pipeline. Otherwise, there will be no cluster on the drop-down list in “Kunernetes cluster name.”
Running on a Kubernetes cluster is the suggested way to run pipelines in production because you have the ease of creating parallelism, load balancing, and error resilience.
1.7. PCA
Finally, we still have one more thing to define for the pipeline — the Private Certificate Authority (PCA).

You must have created the PCA before creating the pipeline. Just pick up the name from the drop-down list.
A PCA is mandatory because all TLS (SSL) communications depend on it. And Kafka ACL authorization also looks at information from an SSL certificate.
With the PCA specified, there is no more property you need to define on the pipeline level. But the pipeline still contains an error, as shown in the screenshot above — the processor list is still empty. We look at creating processors in the next section.
2. Define Processors
Right now, the processor list is empty.

Click on the small blue plus sign to start the processor editor.
2.1. Processor Id
The first thing you see in the processor editor is “Processor Id.” Every processor has a unique id. It is also the array index in the array of processors in the pipeline. As such, the id for the first processor is always zero.
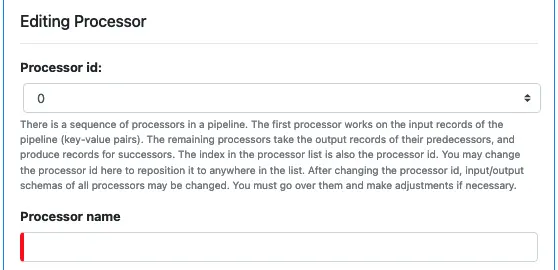
As suggested by the hint in the above screenshot, all processors are in an array. And you can reposition a processor in this array by modifying its id. After relocating a processor, its input and output schemas will change. These changes may cascade to downstream processors. The new schemas in processors may not all be correct because there may be automatically generated fields. It is a good idea to use Calabash GUI to inspect every processor after such a relocation. You may need to do some minor editing.
In the above screenshot, since this is the first processor in the pipeline, we leave the processor id at 0. The processor name must be unique, all lowercase, and free of special characters. You may use – (dash) or _ (underscore). The processor names are the bases for generating variable names in the code generator. You should make sure they are unique within the pipeline.
2.2. Input Schema and Processor Type
The next thing you see is the “Schema for key in input” and “Schema for value in input.” These two properties are read-only here. They are pipeline-level properties copied here for your convenience. In the following example, both input key and value are strings.
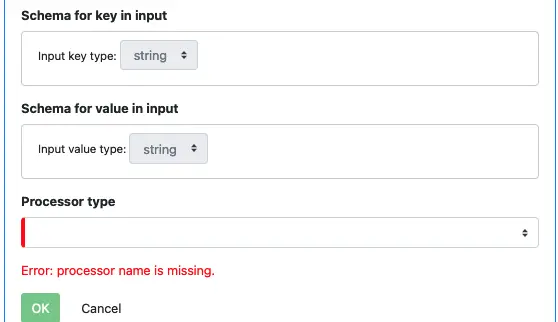
Click on the “Processor type” combo box. You can see a drop-down list of supported processor types.
Here is a summary of all supported processor types. We will examine each of them in detail with screenshots and examples shortly.
- Dedup. This processor deduplicates the key. Among all records with the same key, it randomly keeps one and drops all others.
- Filter. This processor evaluates a Boolean expression for each record. It keeps the ones that satisfy the condition and drops those that fail.
- Group Transform. This processor is a group-by-key-and-aggregate function. It first puts all records with the same key into groups, then calculates aggregation in each group, e.g., sum, avg, first, last, etc. It produces one resulting record for each group. Note that Dedup is a Group Transform. But we make it a stand-alone processor type due to its importance in business logic.
- Record Transform. This processor produces a new record for each input record. The output record may have an arbitrary structure. You do not even have to use anything from the input record. But more often than not, we create the output record according to what is in the input. We can project and map fields from input to output, add expressions to calculate values from the input fields, or call parsers or lookups using the input values.
- Sink. This processor is usually the last in the pipeline. Its functionality is straightforward: save every record to a Kafka topic.
You need to understand the following two facts when deciding if you should add a sink processor.
- A fact about the Group Transform processor: The group-by-key operation does not go across partition boundaries. That is, Kafka takes groups with the same key but in different partitions as different groups.
- A fact about the Sink processor: Writing to a Kafka topic causes automatic repartitioning, resulting in records with the same key congregating into the same partition. In other words, sinking to a topic makes partitioning correct.
Combining these facts, we can conclude:
If you have rekeyed, you must first sink data before using group operations, i.e., Dedup and Group Transform. Otherwise, the partitioning is incorrect after the rekey. You may still see duplicate keys.
The above conclusion is the guiding principle regarding if you should add a sink processor. Note that a sink processor terminates a pipeline because you cannot add more downstream processors.
2.3. Dedup Processor
A dedup processor does not change record schemas. It groups records of the same key and drops all but one in each group. A more precise name for this processor is “dedup by key.”
There is one property you need to specify — the “Window size.” This property is the duration of time the dedup processor looks back. It only processes records within this time frame. In a real-time system, it is not possible to consider all data in history.

Side Note 1. The Dedup processor holds temporary dedup results in a Kafka topic. The name of this topic is in this format:
PIPELINE_NAME-kvstore-PROCESSOR_ID-changelog
For example, “processing2-kvstore-0-changelog” is the buffering topic for dedup in processor 0 in a pipeline named “processing2”.
The best practice is to manually create all topics, including the helper topics, before running a pipeline. You must also ask the superuser to assign all necessary permissions on these topics to the pipeline user.
Otherwise, Kafka will automatically create the helper topics at runtime. That is convenient. However, the pipeline cannot access the helper topics due to a lack of permissions. For example, the above helper topic requires both producer and consumer permissions for the pipeline user.
The pipeline stashes data to the helper topic with the producer permissions. At the end of the dedup window, it will read the buffered data with the consumer permissions.
Moreover, the partitioning degree and replication factor in an auto-created topic may not be what you want. Manually creating all topics lets you decide what is right.
You can now click “OK” to return to the pipeline editor. Then you can see the newly created processor in the processor list.
Warning. At this point, your newly created processor is only in memory. You must click the “Save” button to persist the pipeline in the Calabash repository. Otherwise, all your changes will be lost if you move away from this window.
2.4. Filter Processor
To create a filter processor, you need to enter a filter condition and optionally a topic for errors in the filter processor.
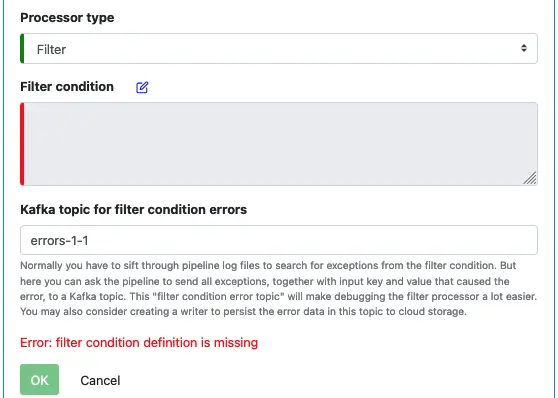
Click on the edit button next to “Filter condition” to bring up the filter function creation dialog.
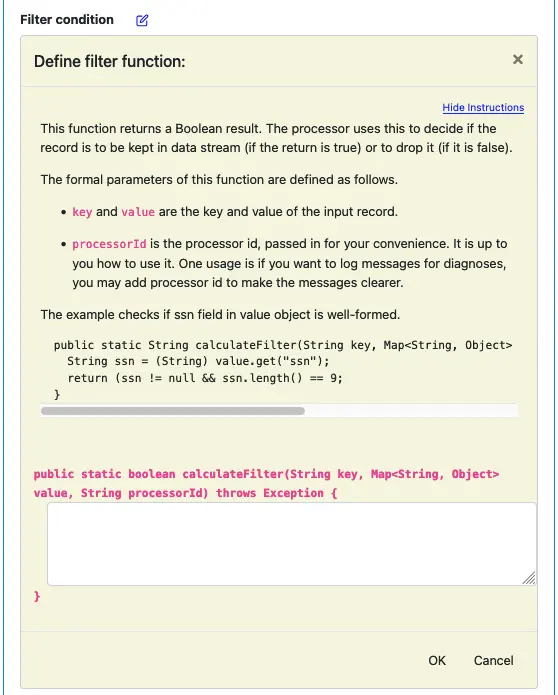
You will be responsible for the Java implementation of the filter function. Please read the instruction carefully to get familiar with the function signature.
When you finish, click on “OK” to go back to the processor editor. Then click another “OK” to go back to the pipeline editor. And click on “Save” to save the pipeline to the Calabash repository.
2.5. Group Transform Processor
A Group Transform processor is the most complicated of all. An example will help you understand the concepts. We assume the key in an input record is a string. And the value in it is a record. See below.
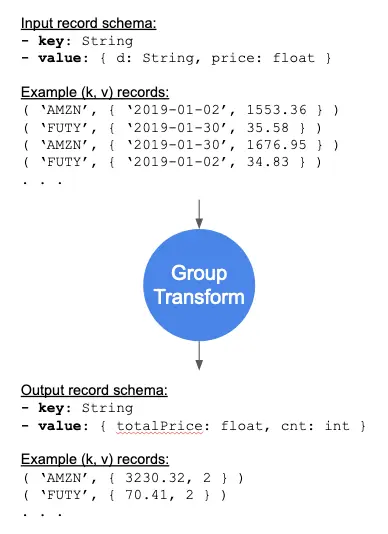
In this example, the input key contains stock symbols, and the value record has the date and price of a stock. We want to create a Group Transform to calculate the price total and the record count for each stock symbol.
The Group Transform is a “group by key” operation. For each group, it aggregates all records into one output record. Calabash GUI allows you to define such aggregate functions.
As soon as you have selected “Group Transform” as the processor type, you will see something like this:
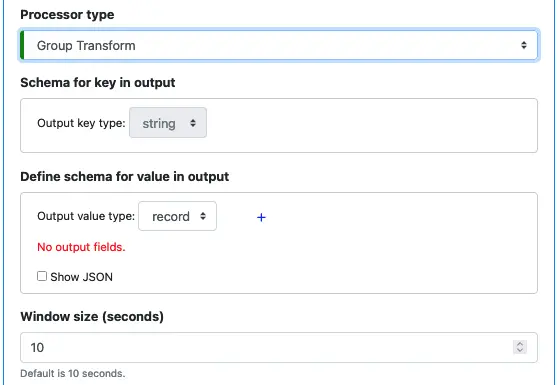
You cannot modify the output key schema because “group by key” does not change the key.
You can define the output value schema. You also need to set a window size for the group operation. Same with the Dedup processor, the Group Transform processor cannot work with all data in history.
Use the schema editor, add fields to the output value schema like this:
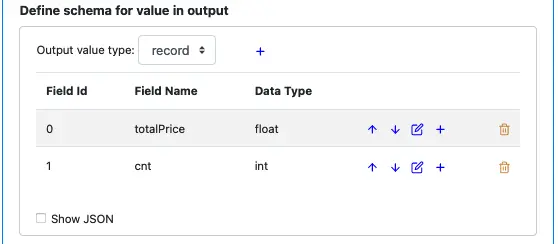
Each field in the output value record is the result of an aggregation. For example, “cnt” will be the total records in the group, and “totalPrice” will be the sum of the prices.
As soon as you have added these fields, you can see these appear in the GUI.
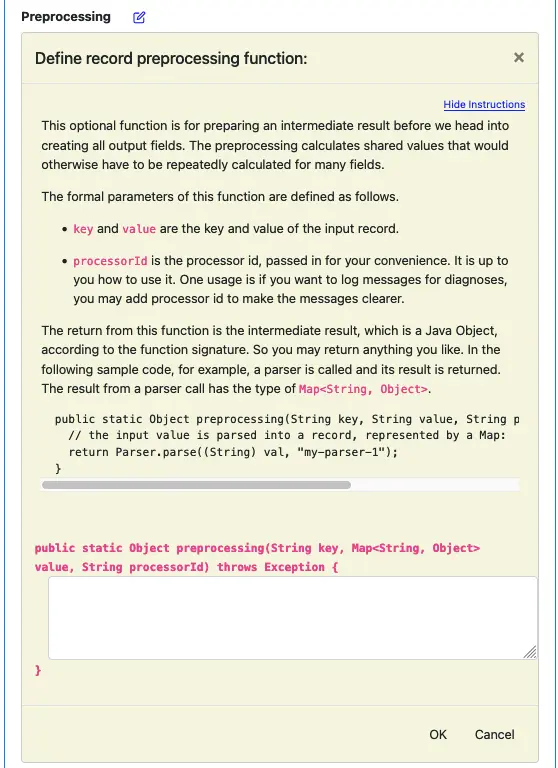
- “Preprocessing” to help you define a preprocessing function and
- “Aggregate functions” for output value fields.
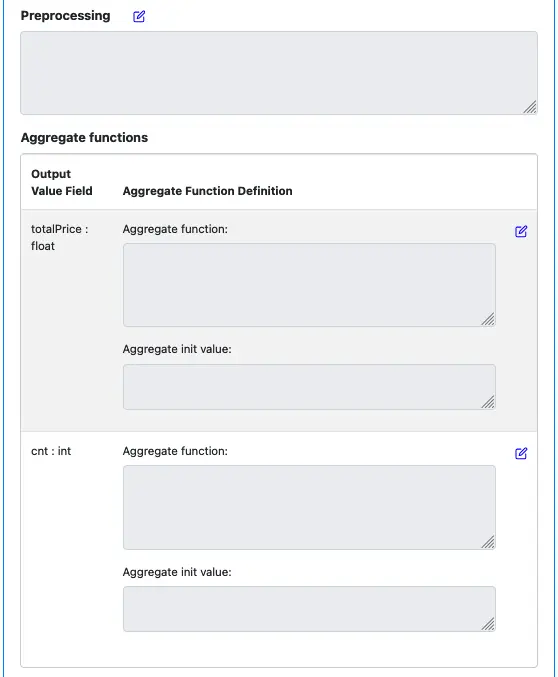
A group transform processor first calls a preprocessing function to prepare an intermediate result. Then it calculates the aggregate values for all output fields by calling the functions in the above screenshot. (They are still undefined right now.) The intermediate result can help remove repetitive calculations during the calculations of output fields. However, preprocessing is optional.
To create a preprocessing function, click on the edit button next to “Preprocessing.” The preprocessing function editor will show up. There is an introduction to this function. Please read it carefully to understand its signature.
In the next section and in Tutorial Track 4, you can see examples using the preprocessing function.
To create the aggregate function for an output field, click on its edit button. The aggregate function editor shows up. Similar to the preprocessing function editor, there is a lengthy introduction. You can expand and close the instruction by clicking on the “Show Instructions” link. Please read the explanations carefully to understand the function signature.
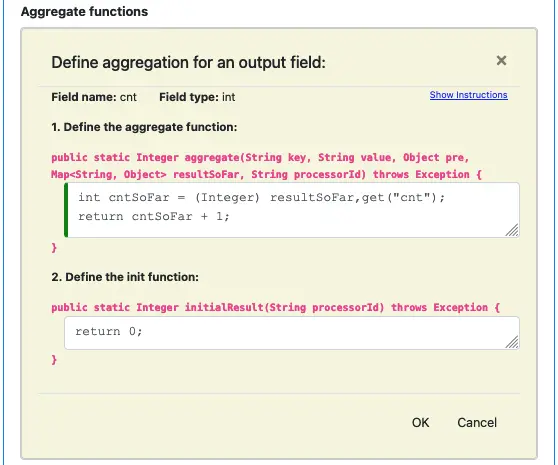
For each field, you need to implement two functions. (See the above screenshot.)
- an aggregate function: the pipeline calls this function once for each record,
- an init function: the pipeline only calls this function once at the beginning of the pipeline.
The aggregate function is required. It maintains the running tally in a variable named “resultSoFar.” The “resultSoFar” is an argument in the aggregate function. See above.
For example, the calculation for the “count” field first gets the current count from “resultSoFar.” Then it adds 1 to account for the current record. The function returns the new total. The pipeline puts the result for “count” in the “resultSoFar” before calling the aggregate function again for the next record.
The init function sets the initial count to zero. But the init function is optional. For numeric fields, the initial aggregate result is zero.
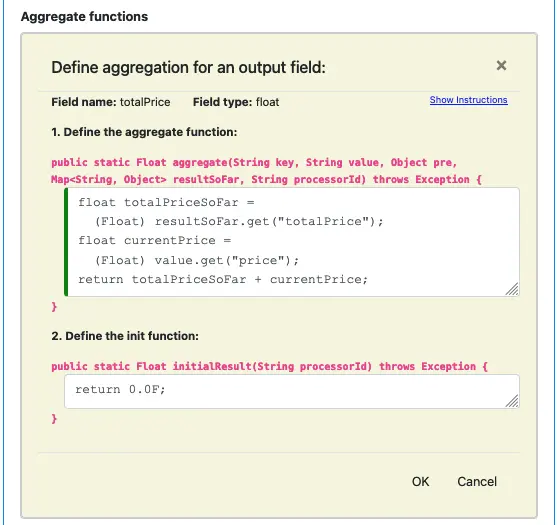
The “cnt” field is perhaps the simplest aggregate field. For more complicated calculations, you will need to access the key and value of the current record. Both are arguments in the aggregate function. The preprocessing result is also passed in, as the argument “pre.” The following screenshot shows the definitions for the aggregate field “totalPrice.” It needs to access the current record.
Side Note 2. The group transform processor holds temporary aggregate results in a Kafka topic. The name of this topic is in this format:
PIPELINE_NAME-kvstore-PROCESSOR_ID-changelog
For example, “processing2-kvstore-0-changelog” is the buffering topic for aggregate in processor 0 in a pipeline named “processing2”.
The best practice is to manually create all topics, including the helper topics, before running a pipeline. You must also ask the superuser to assign all necessary permissions on these topics to the pipeline user.
Otherwise, Kafka will automatically create the helper topics at runtime. That is convenient. However, the pipeline cannot access the helper topics due to a lack of permissions. For example, the above helper topic requires both producer and consumer permissions for the pipeline user.
The pipeline stashes data to the helper topic with the producer permissions. At the end of the aggregation window, it will read the buffered data with the consumer permissions.
Moreover, the partitioning degree and replication factor in an auto-created topic may not be what you want. Manually creating all topics lets you decide what is right.
When you are satisfied with all properties for the Group Transform processor, click “OK” to return to the pipeline editor. You can now see the new processor in the processor list in the pipeline.
Click on “Save” to persist all the changes to the Calabash repository.
Congratulations! You have overcome a tough hurdle in pipeline design. Our next processor type, the Record Transform, is a lot easier to understand.
2.6. Record Transform Processor
A Record Transform processor consumes each input record to produce one output record. The output record can have a different schema than the input.
See the following pictorial example. The input data stream has both string keys and values.
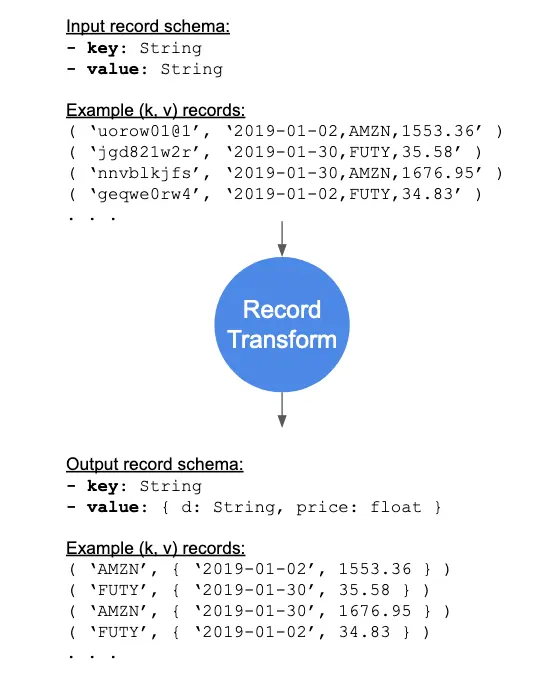
In the input, the keys appear cryptic because they are randomly generated keys. When data enter a Kafka topic for the first time, if their keys are empty, the Kafka system generate random keys. Oftentimes, the randomly generated keys are not what you need.
In the output, the value will be a record of “d” and “price.” The stock symbol will not be in it. The stock symbol becomes the new key. This way, we have made the data stream more meaningful. For example, “group by key” becomes “group by stock symbol.”
Note that the input value is a CSV string. So we need to call a CSV parser to convert it to a record. This example also demonstrates how to call a parser in a pipeline.
Begin creating the Record Transform processor by clicking on the add processor button. Then in the processor editor, select “Record Transform” as the processor type.
The first thing you need to do is add fields to the output schemas. In this example, we keep the output key as “string.” The output value is a record. The following screenshot shows the modified output schemas.
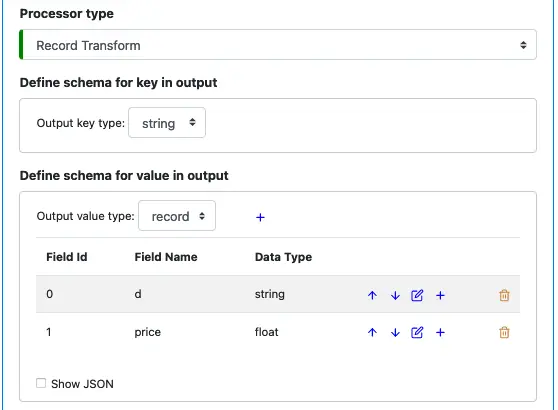
Next, we want to call a parser in the preprocessing code. Right now, the preprocessing code is empty.

Click on the edit button next to “Preprocessing” to bring up the preprocessing editor. Enter the code below for calling a parser.
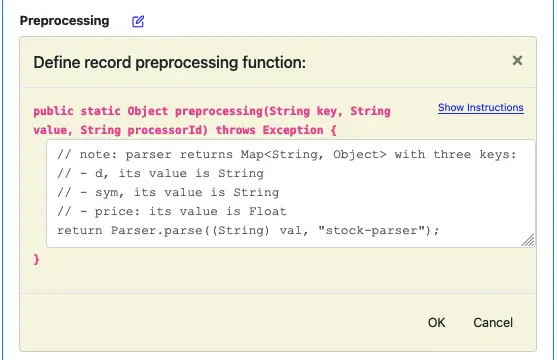
The format for calling a parser is this:
Parser.parser(STRING_TO_PARSE, "PARSER_NAME")
The PARSER_NAME, such as “stock-parser” in this example, is the name of a parser we have created. Please refer to the manual for creating parsers to learn how to create one.
A parser is a function that takes a string and converts it to a record. Calabash uses Java as the implementation base language. So the returned parsing result is a Java Map.
After filling in the above code, click on “OK” to complete the editing preprocessing function.
After returning from the preprocessing editor, the GUI looks like the following. You can see the function body we just added in the text box. You cannot directly modify it, but you can edit it by clicking on the edit button.
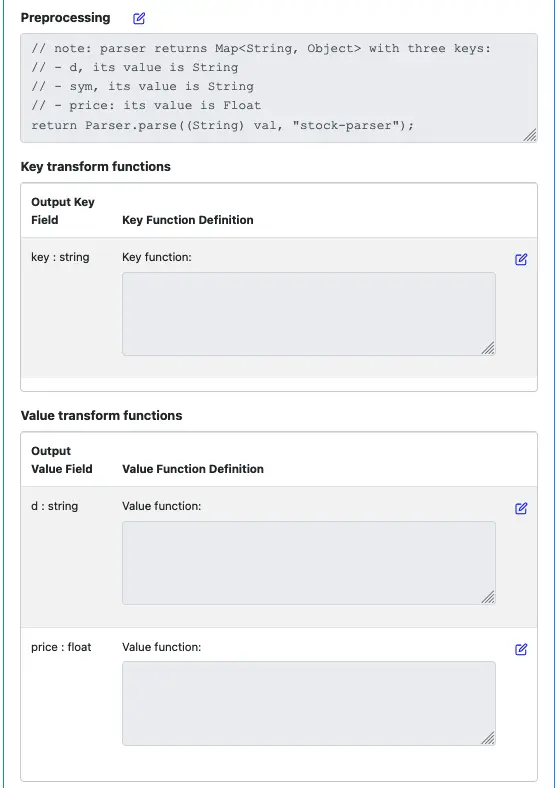
Now the key and value functions are still empty. Click on the edit buttons for the key and value fields to enter the implementation code. After that, the screen looks like this.
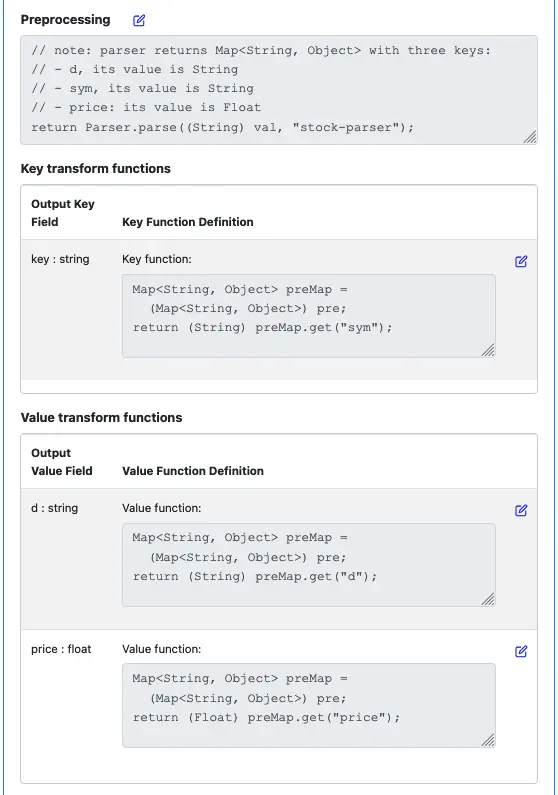
As you can see, we distribute the three fields in the preprocessing result to key and value fields. The preprocessing result variable, named “pre,” is a Java Map.
Not much “calculation” going on. The heavy lifting was really in the parser. Having preprocessing saves us an enormous amount of time. Without it, we would have to call the parser once for each output field.
Finally, there is one more property in the processor editor.

The topic for record transform error is optional but highly recommended. Without it, any errors in the processor cause silent data loss.
After that, Click on “OK” to return to the pipeline editor. Click the “Save” button to persist the pipeline to the Calabash repository.
Side Note 3. Since we changed the key in the above example, this processor is the “rekey operation.” You should not add Dedup or Group Transform processors downstream of this processor without Sink, or you risk generating duplicates in keys and logically incorrect results. Please also read Side Notes 1 and 2.
2.7. Sink Processor
To create a Sink processor, define the target topic and an optional sink error topic. That is all you need to do.
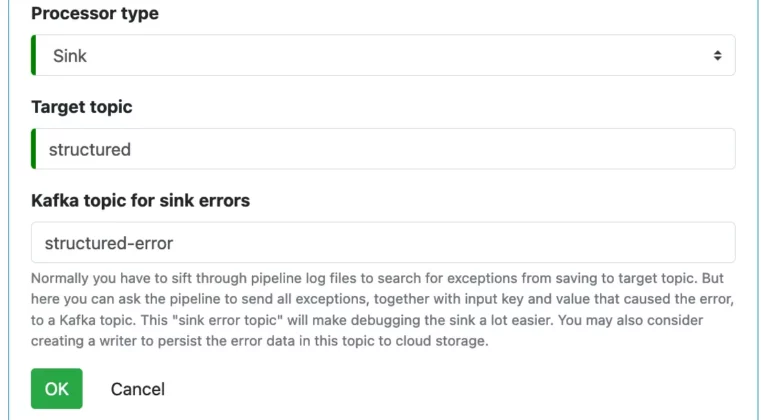
The sink is always the last processor in a pipeline. You will not be able to add more processors after it.
3. Things to Do before Deployment
After designing the pipeline, you want to launch it in the cloud and start the data flow. To that end, you have to complete some preparatory steps described in this section.
3.1. Get the List of Topics
In Calabash GUI, open the pipeline by clicking on the edit button. Then scroll down to the “Define pipeline processors” section. You can see all the processors in the list.
You can also see all the topics used by this pipeline under the columns “Type” and “Error Topic.”
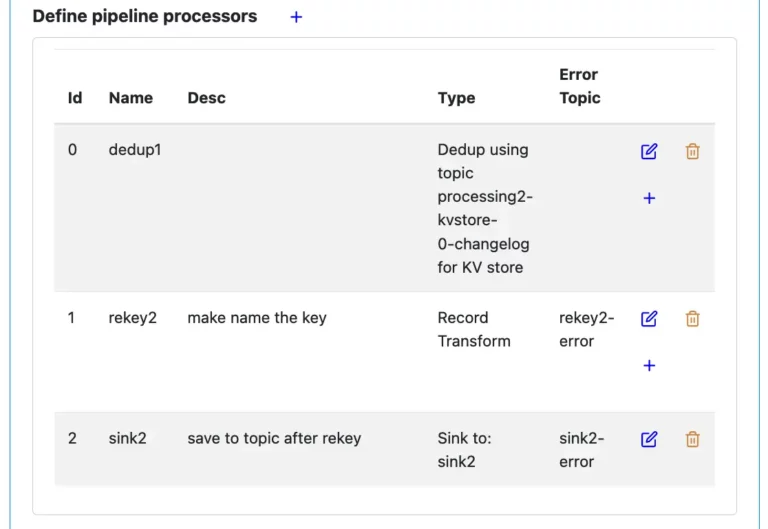
Make a note of all the Kafka topics from all the processors. And add the source topic to this list, too.
3.2. Create All Topics
Use Calabash KCE to manually create all the topics, except the source topic. In this effort, study and configure the replication factors and partition degrees carefully. In general, the replication factor can be set to 2 and set the number of partitions to the number of pipeline instances you plan to launch.
Kafka will automatically create a topic if one does not exist. But you had better manage it yourself for better performance.
If you are the superuser, use Calabash CLI to create ACLs. The following table lists privileges the pipeline needs for each type of topic.
| Type of Topic | Privilege Needed |
|---|---|
| Source topic | Consumer |
| Sink topic | Producer |
| KV store topic | Consumer and producer |
| Error topic | Producer |
4. Deploy the Pipeline
You can use Calabash CLI to deploy your pipeline with just one command. Deployment should follow the object dependency. All the dependent objects, such as PCA and Kubernetes cluster, must be deployed successfully before deploying the pipeline.
You should use the “consume” command from Calabash KCE to read real-time errors from the error topics. You can also read the target topic to observe good data out of the pipeline.
Additionally, you should watch the container logs of the pipeline for any exceptions during the pipeline run. There should be no exceptions.
Here is an outline of steps for checking the container logs if you deployed the pipeline to a VM.
- Use “gcloud compute ssh” to log into the VM in a secure shell.
- Issue “docker ps” to find the container id for the pipeline container.
- Issue “docker logs -f CONTAINER_ID” to see the container logs.
If you deployed the pipeline to a Kubernetes cluster, the steps are as follows.
- Use “gcloud container clusters get-credentials” to set up credentials to the Kubernetes service on your cluster.
- Use “kubectl get pod” to find pod IDs.
- Use “kubectl logs -f POD_ID” to see the logs of the pod. (You may have multiple pods. Check each one.)