1. The Design
Using the Calabash GUI, create an infrastructure object by clicking on the “Create Infrastructure Object” button on the Infrastructure page. Start filling in the form as follows.
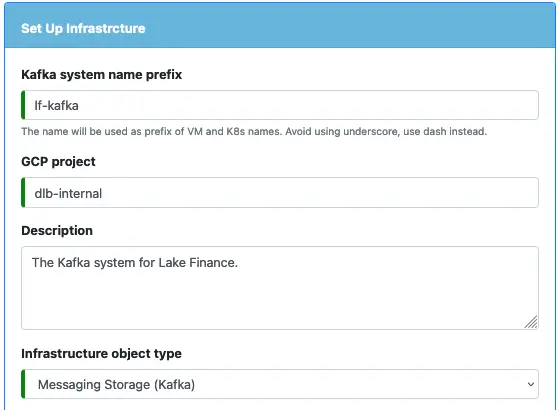
In the above, the project name “dlb-internal” is an example. You need to change it to your own project. Then select the “Messaging Storage (Kafka)” as the object type.
Next, fill up the information about the network and PCA. If you have followed Track 1, a network named “fnet” and a PCA named “lf-pca” should be available in the cloud. You can fill in the information exactly as is shown below.
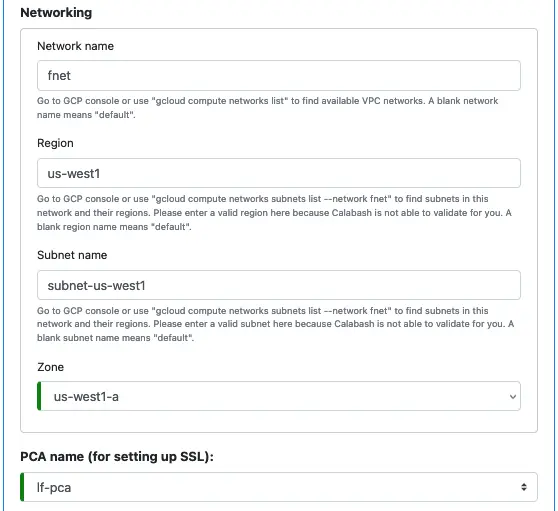
The network, subnet, and zone in the above screenshot are just examples. You can change them to anything. However, the PCA name must be “lf-pca” for the rest of the tutorial.
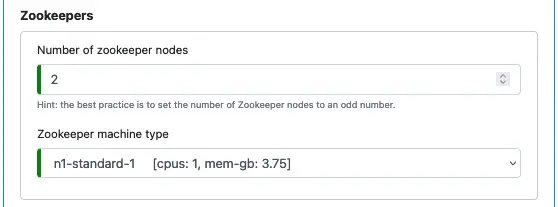
Next, define zookeepers. You need at least two zookeeper nodes, but three or more is the best practice. To stay within the default GCP quota, we use two zookeepers.
For production, the number of zookeepers should also be odd.
A zookeeper node is not memory intensive. So 4 GB of memory is usually sufficient. However, it requires short disk latency. Therefore each zookeeper node automatically uses a 30 GB SSD disk.
Next, define brokers.
Two brokers are sufficient for the tutorial. It helps to stay within the GCP quota limit. But in production, you need at least three.
Three or more brokers is the best practice. It enables maintaining “exactly once” semantic in data pipelines, i.e., the data pipelines can guarantee no loss and no duplicate of records. The “exactly once” guarantee is one of a few advantages of Kafka over other mechanisms, e.g., the Pulsar, which offers “at least once” semantics. i.e., no loss with potential duplication.
Brokers are not CPU intensive, either. But the memory and disk sizes are critical. The memory size must be sufficient to hold backlogged data, i.e., records received by the broker but not yet consumed by a registered client. To predict how much lag a broker must support is a relatively complicated issue. Due to the space limit, we will omit it here. Please check the Apache Kafka documentation for details.
The total disk size from all brokers determines how much data the Kafka system can hold. By default, a Kafka system ages out data with a seven-day lifespan. But if disk space runs out, purging of old data will happen earlier.
In this tutorial, the amount of example data is negligible. So we choose a minimum node configuration for the broker.
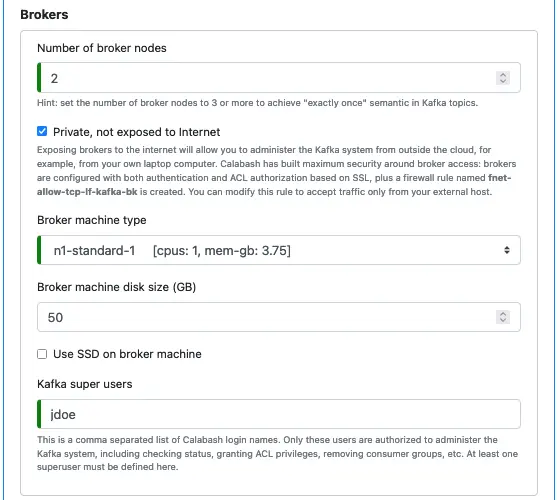
In the above, we also define a superuser, named “jdoe,” for the Kafka system. The superuser will have the authority to manage topics, access control lists, consumer groups, etc.
Finally, we leave the “Deploy Kafka-Connect” box unchecked. We will not deploy Kafka-Connect on this tutorial track. We will work with it on the next one.

When you have completed all the above, the “Save” button should be enabled. Click on it to save the design to the Calabash repository.
2. Deploy the Kafka System
You will need the Calabash CLI to deploy the Kafka system.
First, you must make sure the PCA your Kafka system will use is with a “Deployed” status. Launch the Calabash CLI, and connect to your repository. Then issue the “list i” command to list all the infrastructure objects.
% bin/calabash.sh
Calabash CLI, version 3.0.0
Data Canals, 2022. All rights reserved.

Calabash > connect tester
Password:
Connected.
Calabash (tester)> use ds lake_finance
Current ds set to lake_finance

Calabash (tester:lake_finance)> list i

Obj Name             Project         Description                              Type                           Status
-------------------- --------------- ---------------------------------------- ------------------------------ ----------------------------------------
fnet                 dlb-internal    This is the VPC network for Lake Finance VPC Network                    Deployed at 8/15/2021, 10:21:37 AM >>> U
                                     .                                                                       pdated at 8/14/2021, 9:52:10 PM
lf-pca               dlb-internal    This is the PCA for Lake Finance ("lf"). Private Certificate Authority  Deployed to 10.128.16.33:8081 (internal)
                                                                                                              35.202.55.168:8081 (external)  at 9/5/2
                                                                                                             021, 11:57:54 AM >>> Updated at 8/24/202
                                                                                                             1, 11:44:44 AM
lf-kafka             dlb-internal    The Kafka system for Lake Finance.       Messaging Storage (Kafka)      Undeployed at 9/2/2021, 9:02:13 AM >>> U
                                                                                                             pdated at 8/30/2021, 5:02:24 PM
The status of “lf-pca” shows it is available. If it is not (i.e., the status string does not start with the word “Deployed”), you must first deploy the PCA.
Second, issue the “deploy i” command to deploy the Kafka system.
Calabash (tester:lake_finance)> deploy i lf-kafka
Deploy to cloud? [y]:
Creating metadata lake_finance__lf-kafka__num-zk = 2
Deploying zookeeper lf-kafka-zk-0 ...
Creating vm lf-kafka-zk-0 ...
  ... successful.
Creating metadata lake_finance__lf-kafka__zk-0 = 10.138.16.198
Deploying zookeeper lf-kafka-zk-1 ...
Creating vm lf-kafka-zk-1 ...
  ... successful.
Creating metadata lake_finance__lf-kafka__zk-1 = 10.138.16.199
Creating metadata lake_finance__lf-kafka__num-bk = 2
Deploying broker lf-kafka-bk-0 ...
Creating vm lf-kafka-bk-0 ...
  ... successful.
Creating metadata lake_finance__lf-kafka__bk-0 = 10.138.16.200
Deploying broker lf-kafka-bk-1 ...
Creating vm lf-kafka-bk-1 ...
  ... successful.
Creating metadata lake_finance__lf-kafka__bk-1 = 10.138.16.201
Deployed 2/2 zookeeper nodes, 2/2 broker nodes
Just sit back and watch the progress. In about 5 to 10 minutes, all should be done. You may now issue “list i” again to see the changed status for “lf-kafka.”
The deployment of “lf-kafka” also sets some project metadata. Use Google Cloud Console, go to Compute Engine, and click on “Metadata” in the navigation panel. You can see something like this.
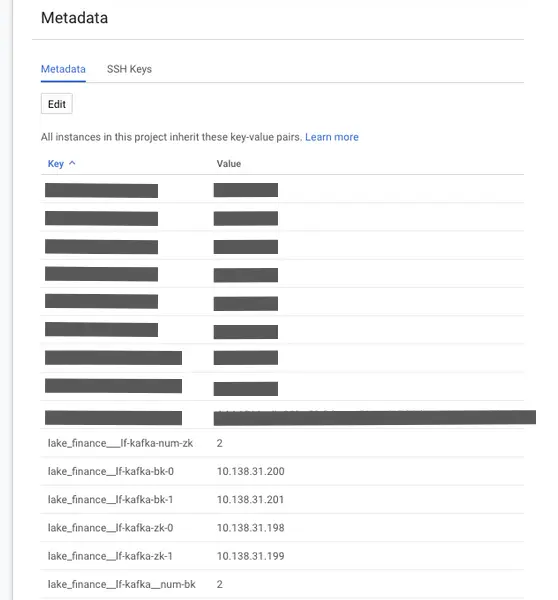
In the metadata, you can find the numbers of zookeeper and broker nodes. You can also find the internal IP addresses of all the nodes. The KCA (which we will create in the next tutorial topic), Kafka-Connect, and data pipelines will all need these pieces of information to connect to the Kafka system. Make sure you never alter the metadata.
3. The Cost
Four “n1-standard-1” nodes constitute all the resources we use for the Kafka system. If running them full-time, the cost is about $120 a month. But you can undeploy the Kafka system and redeploy it anytime.
To undeploy, use the “undeploy i” command:
Calabash (tester:lake_finance)> undeploy i lf-kafka
Undeploy from cloud? [y]:
Deleting broker lf-kafka-bk-0 ...
... successful.
Deleting broker lf-kafka-bk-1 ...
... successful.
Deleting zookeeper lf-kafka-zk-0 ...
... successful.
Deleting zookeeper lf-kafka-zk-1 ...
... successful.
Undeployed
For the tutorial, the whole process of undeploying the Kafka system “lf-kafka” takes less than 30 seconds. As you can see, Calabash gives you a one-button solution to the creation and tearing-down of a highly complicated system. Please practice now to undeploy “lf-kafka.” Then deploy it again.
When a Kafka system is redeployed, it gets back all data and metadata it had before. This is possible because the disks for the zookeepers and brokers are not deleted when the Kafka system is undeployed. (You may check for the disks on the cloud platform console and see they are still there.) The disks are reused when the system is redeployed.
Running the Kafka system part-time will cut the cost significantly because keeping disks around does not cost much. Just make sure none of them is accidentally deleted!