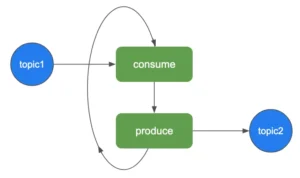
1. The Kafka Client Application
The application we will deploy as a microservice is a straightforward Kafka consume-and-produce program. It runs an infinite loop to read from one Kafka topic, “topic1,” and write to another, “topic2.” In other words, it is an instant replicator.

The entire source Gradle project of this application is on GitHub:
% git clone https://github.com/dc-support-001/calabash-public.git
Cloning into 'calabash-public'...
remote: Enumerating objects: 53, done.
remote: Counting objects: 100% (53/53), done.
remote: Compressing objects: 100% (35/35), done.
remote: Total 53 (delta 3), reused 50 (delta 3), pack-reused 0
Unpacking objects: 100% (53/53), 61.32 KiB | 1.20 MiB/s, done.
%
The code is downloaded to the “calabash-public” directory. You can find the “kafka-app” project in it:
% cd calabash-public
% ls
README.md        helloworld        kafka-app
% cd kafka-app
% ls
README.md	container	gradlew		out		src
build.gradle	gradle		gradlew.bat	settings.gradle
% sh gradlew build

BUILD SUCCESSFUL in 8s
3 actionable tasks: 3 executed
% ls build/libs
kafka-app-1.0.2.jar
You can launch the app with
java -jar build/libs/kafka-app-1.0.2.jar
But if you run it now, it will fail with
Error: cannot find init.properties file.
This application requires some configuration files. We do not have them yet. Specifically, it needs
- an “init.properties” file
- Kafka producer configuration file
- Kafka consumer configuration file
- TLS (SSL) keystore file
- TLC (SSL) truststore file
Calabash provides a container image to help users prepare these environmental files. This container image is available to the public on the Docker Hub at “datacanals/kafka-client:latest.”
Next, we will design our application image to extend the Data Canals image. Doing so will enable us to call utilities in the base image to prepare the client environment.
2. Create an Application Bundle
% cd container
% ls -F
Dockerfile        app/
This directory contains a Dockerfile for building our application container image. The Dockerfile is very simple:
FROM datacanals/kafka-client:latest
COPY ./app /app
CMD ["/app/run.sh"]
As you can see, the application container image is based on the “datacanals/kafka-client” image, and it runs the script “/app/run.sh.” This script contains the following content:
#!/bin/bash
/app/set-up-kafka-client.sh
java -jar /app/kafka-app-1.0.2.jar
The script “/app/set-up-kafka-client.sh” is provided by the base image. It sets up the Kafka client environment with all the files listed in Section 1. After that, our application is launched. It will have all it needs. Before we build a Docker image for our application, we need to copy the jar file to the “app” subdirectory:
% cp build/libs/kafka-app-1.0.2.jar container/appNow we can build a Docker image with:
% docker build -t demo .
[+] Building 0.7s (7/7) FINISHED
=> [internal] load build definition from Dockerfile 0.1s
=> => transferring dockerfile: 114B 0.0s
=> [internal] load .dockerignore 0.0s
=> => transferring context: 2B 0.0s
=> [internal] load metadata for docker.io/datacanals/kafka-client:latest 0.0s
=> [internal] load build context 0.3s
=> => transferring context: 13.73MB 0.3s
=> [1/2] FROM docker.io/datacanals/kafka-client:latest 0.0s
=> [2/2] COPY ./app /app 0.2s
=> exporting to image 0.1s
=> => exporting layers 0.1s
=> => writing image sha256:a2c3a140853e1824ccef3d61f8b1417c0f9db6b8226f1de9913dc5383d5b7d84 0.0s
=> => naming to docker.io/library/demo
But the image built in this way exists only on our local computer. We need to create it in the cloud. This is done through the “application bundle.” An application bundle is a compressed tarball of the container directory. We can create an application bundle this way:
% cd container
% tar cvf kafka-app.tar *
a Dockerfile
a app
a app/run.sh
a app/kafka-app-1.0.2.jar
% gzip kafka-app.tar
% ls -F
Dockerfile        app/        kafka-app.tar.gz
%
The file “kafka-app.tar.gz” is the application bundle. After getting the application bundle, we need to upload it to the cloud storage:
% gsutil cp kafka-app.tar.gz gs://mybucket/apptarballs/kafka-app.tar.gzThis location will be used in the microservice design using Calabash GUI. Later, Calabash CLI will use it to build the application image in the cloud.