One benefit of using Calabash is that it can help secure users’ data systems. Users do not need to be security experts. Calabash will take the heavy lifting.
Even to experienced developers, Calabash can provide relief. Most developers must have collected a set of advanced scripts for setting up TLS (SSL). These scripts are often cryptic and difficult to maintain. (See an example here.) Using Calabash, they can throw them all away. They should be glad to hear that using a simple GUI, they can do all they could do before, plus a lot more!
This article will present examples of creating and using the Private Certificate Authority (or PCA). The PCA is the centerpiece for system security. Calabash offers a simple GUI for anyone to use it.
Yes, anyone! We have “democratized” the highly sophisticated security feature. Under the hood, Calabash goes through a series of complicated steps, calling cryptography and TLS (SSL) libraries, and sorts all things out.
We will first look at what PCA is and why it is so important.
1. Introduction to PCA
The TLS (SSL) is the mechanism for authentication (of both servers and clients) and data encryption on the communication channels. It is a must for any production data system.
Roughly speaking, it works in the following way. A shared CA issues signed TLS (SSL) certificates to all parties in a system. The certificates are used for both node identities and for encryption/decryption of messages.
There are three types of TLS (SSL) certificates.
- Self-signed
- Private CA signed
- Public CA signed
A self-signed certificate is a shortcut. The way commonly used to generate one is an “openssl” command similar to the following:
openssl req -x509 -newkey rsa:4096 -keyout key.pem -out cert.pem -sha256 -days 365It produces a private key in the file “key.pem” and a certificate in the file “cert.pem.” You must keep the key secret, and you can give the cert to all who are willing to accept your connection in their apps/browsers.
As a shortcut, the self-signed certificates may be used for testing but should never be used for production. We will skip the list of potential crimes self-signed certificates could commit.
In production, the CA method must be used. Depending on the purpose of the systems, you may choose between a public CA or a private CA. In the CA method, all certificates must be signed by the CA.
A public CA is for services open to the public on the internet. The trustworthiness of the public CA is what we rely on. Using public certificates is highly secure, but it is inconvenient and inflexible. There has been a common belief which goes like “more security means more inconvenience.” So the pain is largely tolerated.
For internal systems or systems that provide services only within a private intranet, the inconvenience from the public CA is too high to tolerate. Additionally, the cost on time and money may become prohibitive.
With the help of experienced staff, organizations usually create their own private CAs to strengthen security and streamline usability and performance. You may purchase privately signed certificates from the cloud platform as well. However, setting up and maintaining private CAs is highly skill-demanding. It has been mostly reserved for large corporations. But with Calabash, this will change.
There are some drawbacks to private CA.
- PCA challenge #1: The need to protect the CA itself. The CA itself is the weakest link requiring the highest possible protection, including, but not limited to, firewalls and access controls. The root CA keys are usually stored on disks. They need encryption and backup.
- PCA challenge #2: The difficulty of revoking certificates. All public CA provides revocation status of certificates (through CRL or OCSP). But they cannot be used for private CA. Some other means must be found to revoke certificates.
- PCA challenge #3: The inconvenience of rotating root CA key. The only time we have to refresh the root CA key is when it has been compromised. In this case, we must immediately stop the parts of the system that are still using the old certs. Then redeploy the private CA with a new key. Then restart the system to use the new CA. Sure this can be a complicated and painful process. The old saying “An ounce of prevention is worth a pound of cure” applies here. So beefing up the security around the private CA from the start is the best solution. Additionally, Calabash can alleviate the pain by providing easy “deploy” and “undeploy” with Calabash CLI. See later.
In general, there are challenges, but there are also solutions. An organization serious about data security must spend some time planning the PCAs and their protections. The return on this initial investment will be high.
Calabash offers features to meet the above challenges. We will see how easy it is to create a PCA using Calabash.
2. Create PCA Using Calabash
Users of Calabash use a straightforward GUI to design a PCA. Then they use a user-friendly Command Line Interface (CLI) to deploy the design to the cloud platform.
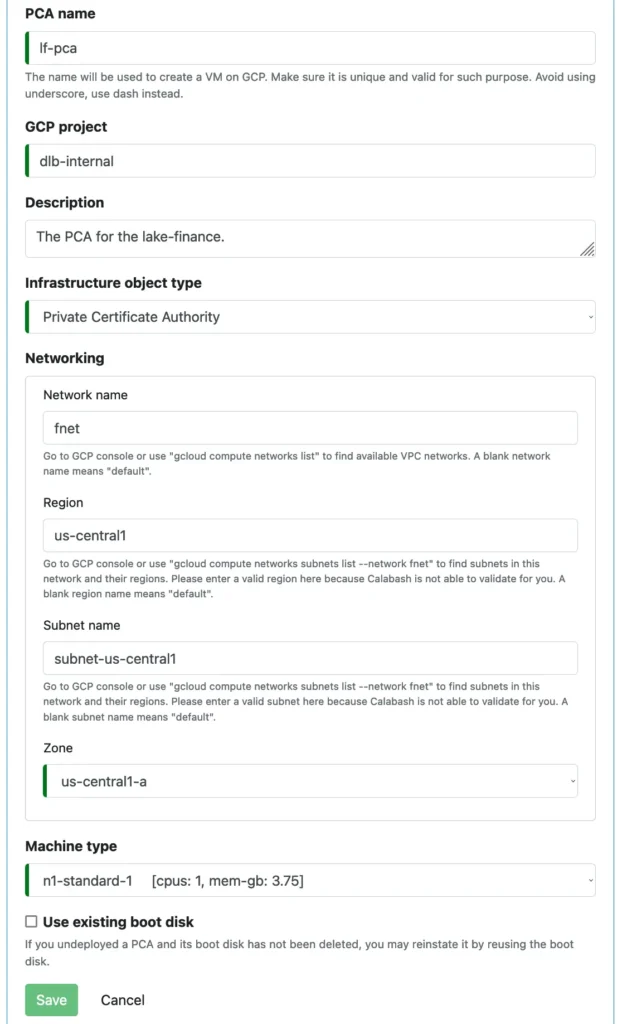
The following screenshot shows the complete design form for a PCA.

Essentially, users just create a name for the PCA and define where it should run. The PCA is light on CPU and memory, so the minimum machine configuration can be used.
To deploy it, issue the “deploy” command in Calabash CLI:
% bin/calabash.sh
Calabash CLI, version 3.0.0
Data Canals, 2022. All rights reserved.

Calabash > connect tester
Password:
Connected.
Calabash (tester)> use ds lake_finance
Current ds set to lake_finance
Calabash (tester:lake_finance)>
Calabash (tester:lake_finance)> deploy i lf-pca
Deploy to cloud? [y]
Creating vm lf-pca ...
Deployed to 10.128.16.9:8081 (internal) 34.135.32.93:8081 (external)
In the above Calabash CLI transcript, the PCA “lf-pca” is contained in a data system named “lake_finance.” We launched Calabash CLI, logged in as user “tester,” and changed the context to data system “lake_finance.” Then issue the “deploy i” command. Here “i” stands for “infrastructure” because a PCA is an infrastructure object.
If successful, the deploy command reports the internal and external IP addresses. Our PCA is now running.
3. How Does It Work?
Here is some brief information about the internals of the PCA created by Calabash.
First, it is run in a VM and listens to port 8081. This port is accessible from nodes within the internal network but hidden from the public internet.
Second, the certificate signing service of the PCA requires an access token, which is only available to authorized Calabash users/nodes. Calabash users can issue a CLI command to retrieve the PCA access token.
Third, the private key of the PCA is stored in an encrypted file on the persistent disk. Only the PCA itself knows how to decrypt it. You will not find the encryption key anywhere else. Users should consider scheduling regular disk snapshots. If the disk is corrupted, you may restore the PCA key from one of the snapshots.
The fact that the PCA keys are encrypted on disks should be considered the last line of defense. Users still need to tighten the security around the VM to avoid the denial-of-service attack. For example, add firewall rules to allow only the trusted IPs to connect to the PCA.
Finally, users can set up firewall rules to block the host IP in a certificate to effectively “revoke” the certificate. Each certificate has “baked” into it the IP address of the certificate holder. The TLS (SSL) handshake will only allow the certificate used on that host.
Therefore, blocking the IP in the certificate using a firewall rule renders the certificate useless, hence revoked. The firewall rule is lightweight and takes effect immediately. It is more efficient than the CRL and the OCSP available in public CAs.
In the next section, we will go over how the PCA created by Calabash may be used in your data system.
4. Use the Calabash PCA
4.1. To Set up Kafka System
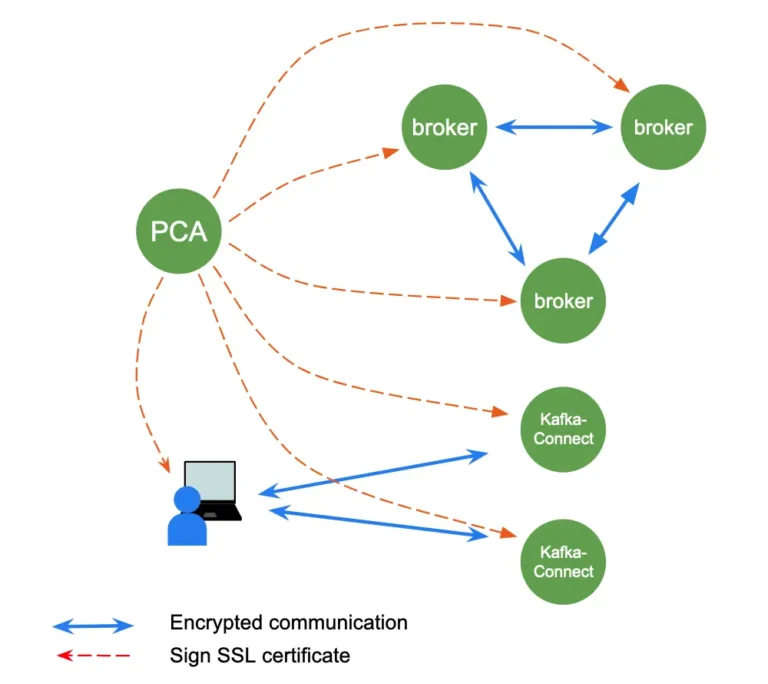
Calabash helps users design and deploy entire Kafka systems, including the Kafka core and Kafka-Connect. The brokers in these systems are configured for two-way TLS (SSL) communication. A two-way TLS (SSL) connection requires certificates at both server and client ends. This is the highest protection. The Kafka-Connect also requires two-way TLS (SSL) connections between its clients and Kafka-Connect nodes. See the following illustration.

At runtime, the broker and Kafka-Connect nodes request certificates from the PCA using the secret PCA access token. The PCA sends the signed certificates to these nodes. Then they can engage in encrypted communication using two-way TLS (SSL) connections.
The users also need certificates to interact with Kafka-Connect. They request the certificates using the Calabash CLI.
This setup is highly complex and tedious. It would be a challenge doing it manually. But using Calabash, users only need to give the name of the PCA in the design of the Kafka system. Calabash will take care of all the rest. In fact, users do not even need to know what TLS (SSL) is. But they get the most secure Kafka systems.
4.2. To Set up REST-Based Reader
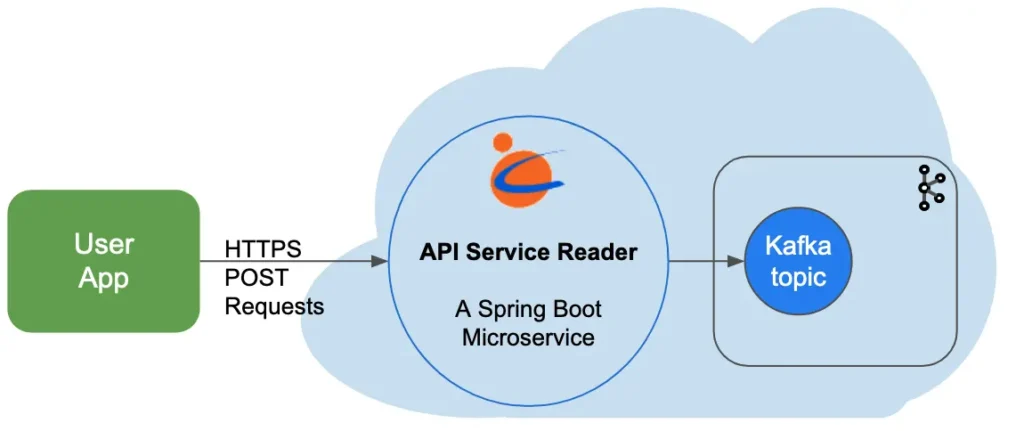
Calabash offers a big help to businesses that need to send data to Kafka but lack expertise in programming Kafka access. Without any help, they would have to use the Kafka client library to write producer code. But with Calabash, they can avoid this complexity by deploying a Calabash “API Service Reader.” See the following illustration.

The API Service Reader is a Spring Boot microservice listening to a port defined by the users. It accepts HTTPS POST messages and immediately turns around to save them to Kafka topics as records.
The API service reader is a wrapper over the Kafka topic. The users do not need to use the Kafka client library anymore. Instead, they use the standard HTTP library. The app development will be significantly simplified. Furthermore, the user app will be future-safe. Should there be a better tool in the future, users would not need to change their app.
The users design the API Service Reader using the Calabash GUI. In the design form, they pick up the name of the PCA. Then the users deploy the reader using the Calabash CLI. When the microservice starts, it will contact the PCA for a signed certificate.
Other than selecting the name of the PCA, the users do not need to do anything else. And a secure API service for Kafka will be created.
4.3. To Set up Kafka Client Environment
Calabash provides a Kafka client environment (or KCE). Using the KCE, users can manage the Kafka system, including topics, access control lists, consumer groups, reader offsets, etc. Users can perform many complicated admin tasks previously reserved for highly experienced IT staff.
This environment can be in a VM or on the users’ local machines. Regardless of where it is deployed, the PCA safeguards the trustworthiness for authentication and authorization. Calabash automatically creates all necessary certificates for the KCE.
Users do various management work using the scripts offered in the KCE. To get some ideas about these scripts, please refer to KCE Command Reference.
4.4. To Set up Local Credentials
Users outside the cloud can also communicate with internal resources using two-way TLS (SSL). The following outlines how to do it.
The users first issue a cloud-platform-provided command to tunnel to the internal network using a secure shell. Once there, the users’ PCs are internal as well. Then the users can use the Calabash CLI to contact the (internal) PCA to get signed certificates.
Now the users can connect to internal resources securely. For example, they can connect to the Kafka-Connect service to start/stop readers or writers.
The internal resource may also be an App developed by the users using the Calabash PCA support (see the next section). The local certificates signed by the PCA will allow the users to connect to their apps securely.
4.5. To Support Secure User App
Providing authentication, authorization, and encryption using PCA is only the means, not the goal. The goal is to securely run applications. If users cannot use the PCA in their apps, the PCA feature has missed an important target.
Calabash provides Docker images for users to initiate TLS (SSL) environment. This initiation process includes generating private keys and getting them signed by the PCA selected by the users. Users may add the Calabash Docker image to their own to use the security feature.
5. Conclusion
In this article, we have seen how easy it is to create a PCA using Calabash. The PCA created by Calabash can be used for many purposes, such as securing Kafka systems and users’ own applications. In summary, it is easy to deploy and is easy to use.
The PCA created by Calabash is highly secure. It resists attacks because the PCA’s private key is encrypted. Even if hackers sneak into the VM where the PCA is running, it is unlikely they can also break the encryption. A private key in the encrypted form is useless to them.
Using PCA is more secure than using public CA because the PCA removes the public surfaces of data systems. Users can also add firewalls for finer-grained internal controls.
In the remote case where the PCA is compromised, users can issue one Calabash CLI command to immediately wipe it out. Then use another CLI command to deploy a new one. All other resources created using Calabash can be deleted/deployed by literally “pressing just one button.”
6. Further Reading
For a summary of all use cases of Calabash, please refer to the article Summary of Use Cases.
For product information about Calabash, please visit the Data Canals homepage.
The Calabash documentation site contains all the official articles from Calabash. The documentation includes extensive tutorials that lead readers in a step-by-step learning process.