Calabash can help users create production-ready Kafka systems without demanding extensive Kafka knowledge and skills from the users.
A production system must have authentication, authorization, encryption, dynamic reconfigurability, and resilience to failures. It is not easy to do them right, even for experienced users.
Specifically, Calabash offers the following features.
- Two-way TLS (SSL) communication among Kafka broker nodes. This makes the communications among brokers safe.
- Two-way TLS (SSL) communication with Kafka-Connect service. This makes accessing the Kafka-Connect service safe.
- Access control lists (ACLs) for authorization. This allows the superuser of the Kafka system to control the operation permissions to other users.
- Restartable Kafka brokers. This allows the Kafka system to resume after system failures as if nothing has happened.
- Auto-restart of Kafka-Connect. This allows the Kafka-Connect subsystem to restart upon detecting configuration changes. This feature is only available in Calabash.
- Redeployable design. This allows the user to make changes to an already deployed Kafka system. The “hot configuration” feature is also only available in Calabash.
This article presents a step-by-step demo of using Calabash to deploy a production-ready Kafka system. Using Calabash, almost anyone can get it working in the cloud within 30 minutes.
1. Design Kafka System Using Calabash GUI
The Calabash GUI designer is online at https://calabash.datacanals.com. It has a 30-day free use of all its features.
Users use the designer to create a blueprint of a Kafka system. Then they use Calabash CLI to deploy it to the cloud. See the next section on Calabash CLI.
Using the CLI, the users can redeploy a modified blueprint to a running system, i.e., the Kafka system created by the CLI is hot configurable. Or the users can undeploy the running system and redeploy a fresh one while still retaining the old data, i.e., it is also cold resumable.
To design a Kafka system, use the Infrastructure design form. The top portion of this form is shown below.
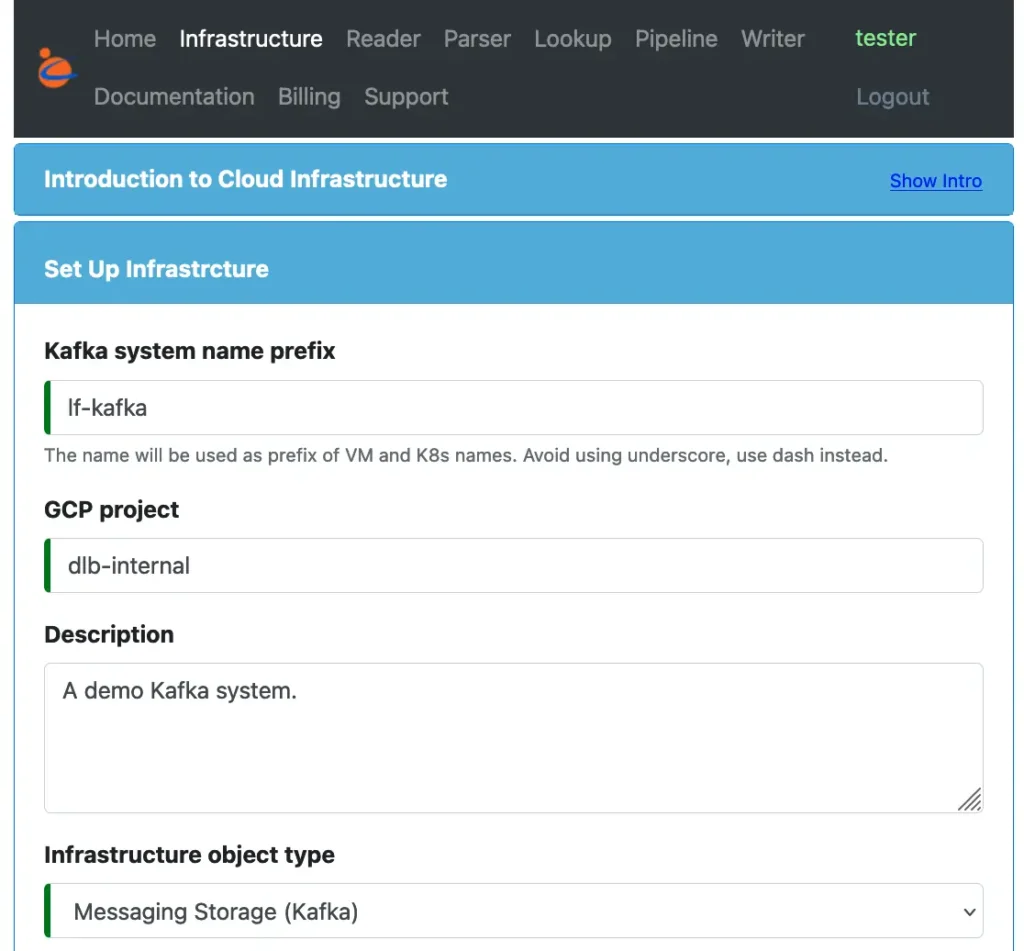
Give a name for the system and set the “Infrastructure object type” to “Messaging Storage (Kafka).” The essence of a Kafka system is a temporary storage of message queues.
In the core of a Kafka system, there are some zookeeper nodes and broker nodes. So we specify some straightforward properties about them. See the following screenshot.
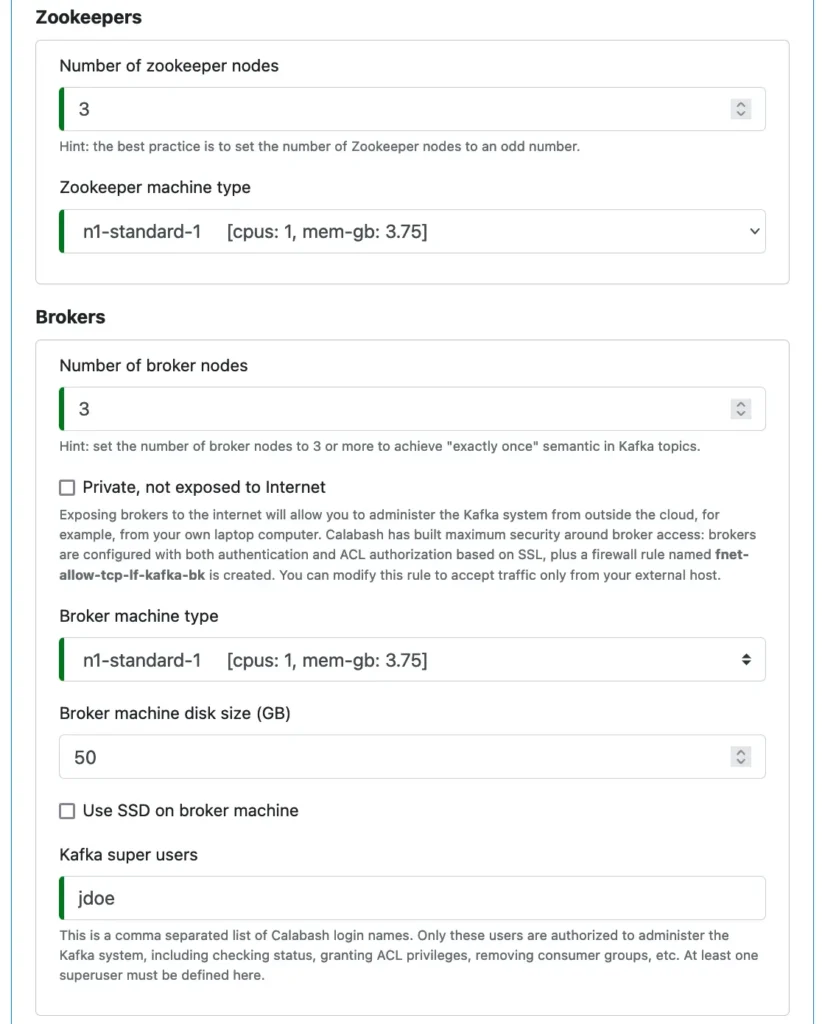
You must designate a superuser for the Kafka system. The superuser name must be a valid Calabash user who will manage the Kafka system using Calabash KCE, including access permissions to other Kafka users. See later.
The Kafka system will be built with TLS (SSL) support using a Private Certificate Authority (PCA). Calabash also supports creating PCAs. However, this article will not cover its details. It can be found in The Use of Private Certificate Authority.
Next, we must select the PCA name from a list of already created PCAs.

At this point, we are done with the design of the core Kafka system. The system will be able to receive data in topics. But the system will not have Kafka-Connect configured.
Kafka-Connect is an optional component. It is for pulling data into Kafka topics and dumping data to other targets in real-time. Using Kafka-Connect, users will never have to write schedulers. And they will never have to waste time diagnosing daily scheduler issues. Users who have experienced those pains will value Kafka-Connect greatly. (Heard of the nightmarish “pager duty?”)
In this demo, we opt for configuring the Kafka-Connect as well.
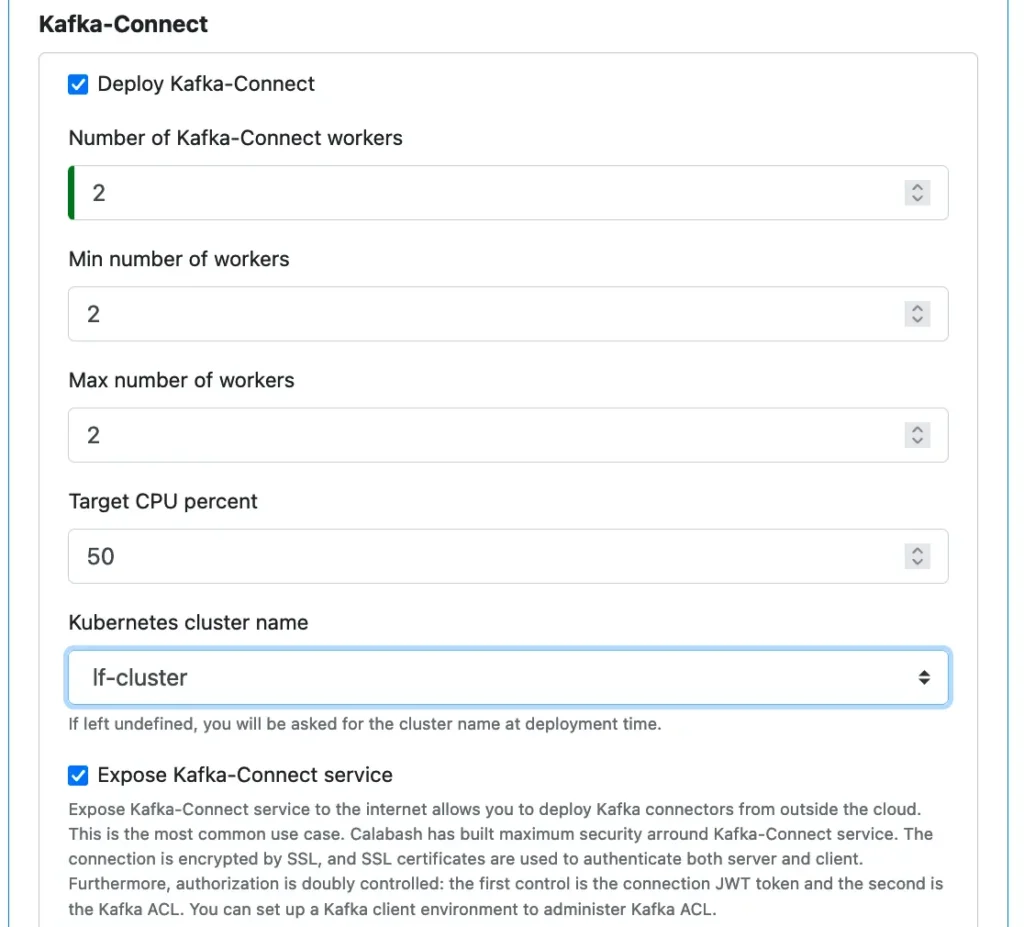
The Kafka-Connect will run on a Kubernetes cluster. So the cluster name must be selected. Calabash also helps users create Kubernetes clusters.
That is all the users have to do to design a Kafka system. As you can see, the users only need to define some straightforward parameters. All the heavy lifting will be done by the Calabash CLI during deployment.
2. Deploy Kafka System Using Calabash CLI
The Calabash CLI can be downloaded from the Data Canals website. There is no need to install. Just unpack the downloaded bundle, and it is ready to be used.
In this demo, we have unpacked Calabash CLI to a directory named “calabash.” To start the CLI, go into this directory and run “bin/calabash.sh,” like this:
% cd calabash
% bin/calabash.sh
Calabash CLI, version 3.0.0
Data Canals, 2022. All rights reserved.

Calabash > connect tester
Password: tester
Connected.
Calabash (tester)> use ds lake_finance
Current ds set to lake_finance
Calabash (tester:lake_finance)>
Once connected to the Calabash repository, we need to set the context to the data system that owns our Kafka system. (Every object we design using Calabash GUI belongs to a data system.) In this demo, the Kafka system we created in the previous section is in the data system named “lake_finance.” Observe the prompt changes to reflect the logged-in user and the current data system.
To deploy the Kafka system, issue the “deploy i” command. The following is a complete transcript of the deployment.
Calabash (tester:lake_finance)> deploy i lf-kafka
Deploy to cloud? [y]:
Creating metadata lake_finance__lf-kafka__num-zk = 3
Deploying zookeeper lf-kafka-zk-0 ...
Creating vm lf-kafka-zk-0 ...
  ... successful.
Creating metadata lake_finance__lf-kafka__zk-0 = 10.138.16.19
Deploying zookeeper lf-kafka-zk-1 ...
Creating vm lf-kafka-zk-1 ...
  ... successful.
Creating metadata lake_finance__lf-kafka__zk-1 = 10.138.16.20
Deploying zookeeper lf-kafka-zk-2 ...
Creating vm lf-kafka-zk-2 ...
  ... successful.
Creating metadata lake_finance__lf-kafka__zk-2 = 10.138.16.21
Creating metadata lake_finance__lf-kafka__num-bk = 3
Deploying broker lf-kafka-bk-0 ...
Creating vm lf-kafka-bk-0 ...
  ... successful.
Creating metadata lake_finance__lf-kafka__bk-0 = 35.230.119.246
Deploying broker lf-kafka-bk-1 ...
Creating vm lf-kafka-bk-1 ...
  ... successful.
Creating metadata lake_finance__lf-kafka__bk-1 = 35.247.102.123
Deploying broker lf-kafka-bk-2 ...
Creating vm lf-kafka-bk-2 ...
  ... successful.
Creating metadata lake_finance__lf-kafka__bk-2 = 34.105.45.117
Waiting 2min for new brokers to come up ...
Continue with Kafka-Connect deployment.
Deploying new ms on k8s ...
Deploying microservice lf-kafka in namespace lf-kafka ...
Namespace created: lf-kafka
Creating service ...
Creating new service lf-kafka
Service created: lf-kafka
Checking service status ... retries left: 19
Checking service status ... retries left: 18
Creating metadata lake_finance__lf-kafka__svcip = 104.198.9.204
Creating new secret lf-kafka-secret
Secret created: lf-kafka-secret
Deployment created: lf-kafka
Deployed 3/3 zookeeper nodes, 3/3 broker nodes, Kafka-Connect deployed to 104.198.9.204:8083
The CLI first asks if we intend to deploy the Kafka system to the cloud. (The other option is to deploy it on-premise.) In the above example, we hit the RETURN key to accept the default, i.e., to go for the cloud.
The deployment process shows detailed progress messages. As you can see, the zookeeper nodes were first created, followed by broker nodes. Then the Kafka-Connect was deployed to a Kubernetes cluster. The log messages also reported the IP addresses of zookeeper and broker nodes. Each of them is a stand-alone VM. The Kafka-Connect is a microservice in the Kubernetes cluster. Its service IP was also reported.
At this point, we have created a secure, fault-tolerant, and complete Kafka system in the cloud, suitable for production use. We accomplished this task with merely one minimalistic command.
3. Wha Have We Built?
The following illustration shows the real estate we have acquired after the successful deployment of the demo Kafka system.
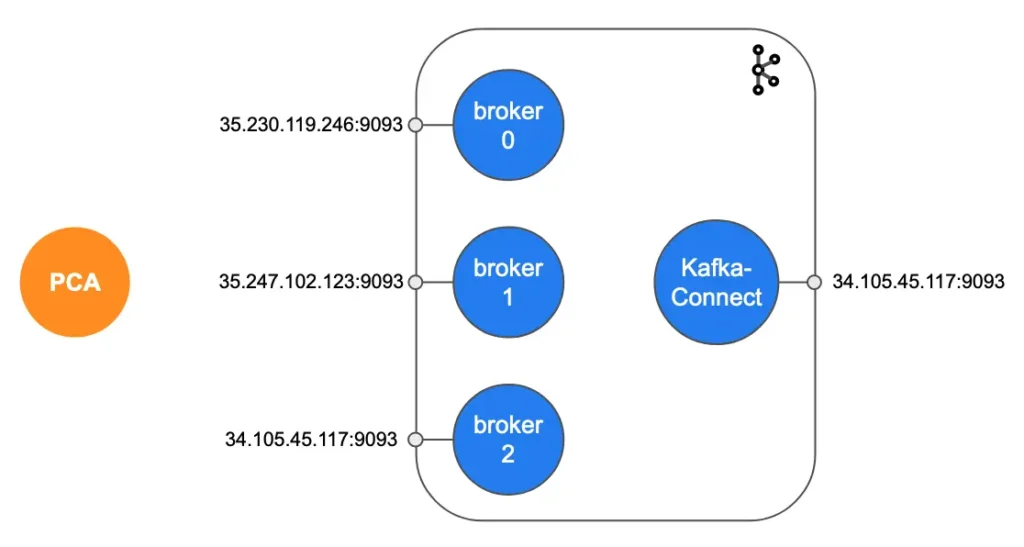
We can use the broker endpoints to manage the Kafka system, such as creating topics, assigning permissions, checking status, etc. And we can use the Kafka-Connect endpoint to manage Kafka connectors, such as starting, stopping, destroying connectors. Kafka connectors are the processes for ingesting (exporting) data into (out of) Kafka.
As you can see in the above illustration, there is also a PCA (Private Certificate Authority). The PCA is responsible for signing all TLS (SSL) certificates in the system. Every communication channel in the system is protected by two-way TLS (SSL) validation, which requires valid TLS (SSL) certificates at both ends of a connection. It is the best possible protection.
The two-way TLS (SSL) channels include
- communications among brokers
- communications between brokers and Kafka-Connect
- communications between any client and broker endpoints
- communications between any client and the Kafka-Connect endpoint
In addition to TLS (SSL) security, the Kafka system also enables the ACL (Access Control List) mechanism for fine-grained authorization. This is how it works.
- The demo Kafka system has defined a superuser named “jdoe.” A Kafka system requires at least one superuser.
- Only “jdoe” (the superuser) can send admin commands to the above endpoints.
- The superuser can create ACLs to allow other users to access Kafka resources (mainly topics and consumer groups).
In the next section, we will demo how to create a superuser environment to manage the Kafka system.
4. Manage Kafka System Using Calabash KCE
The Calabash KCE (Kafka Client Environment) is a directory containing a set of shell scripts. These scripts can be used to manage the Kafka system.
The directory is configured with
- TLS (SSL) keys and certificates
- Kafka client property files.
The KCE can be created either on users own PCs, or it can be created in a stand-alone VM in the cloud. In this section, we will demo how to create it on a local PC.
In Calabash CLI, issue the “set-up-kce” command and providing the name of the Kafka system as the argument.
Calabash (tester:lake_finance)> set-up-kce lf-kafka
Is the PCA in the cloud? [y]:
Enter the directory where Kafka is installed: /Users/jdoe/kafka
Enter producer user names: jeff
Enter consumer user names: april
Enter Kafka client top dir: /Users/jdoe/kce
Enter the optional kafkacat path: /usr/local/bin/kafkacat
Enter the optional jq path: /usr/local/bin/jq
Enter external ip of this machine: 192.168.0.17
Created /Users/jdoe/kce/properties/admin_jdoe.properties
Created /Users/jdoe/kce/properties/producer_jeff.properties
Created /Users/jdoe/kce/properties/consumer_april.properties
KCE is successfully installed in /Users/jdoe/kce
The set-up process first asked us if the PCA was in the cloud or on-premise. Hit the RETURN key to accept the default, i.e., in the cloud. Then specify the location of the KCE environment. As mentioned earlier, the KCE environment is just a directory. It will be populated with scripts, certificates, and Kafka client property files.
By default, the KCE will be populated with all the files needed by the superuser. Additionally, we may ask the set-up process to create files for other (non-superuser) users. In the above example, we asked for the preparation of users “jeff” and “april.” And we asked to prepare “jeff” as a producer and “april” as a consumer.
Once the KCE set-up is successful, we can manage the Kafka system using the scripts in the KCE. In our example, the scripts are located in the directory “/Users/jdoe/kce/bin.” For example, this is how we create a topic.
% cd /Users/jdoe/kce/bin
% ./create_topic.sh jdoe my-topic
Created topic my-topic.
%
There are other highly useful scripts. You may find all the details in KCE Command Reference.
5. Conclusion
A picture is worth a thousand words. The following diagram summarizes what we have demonstrated in this article.
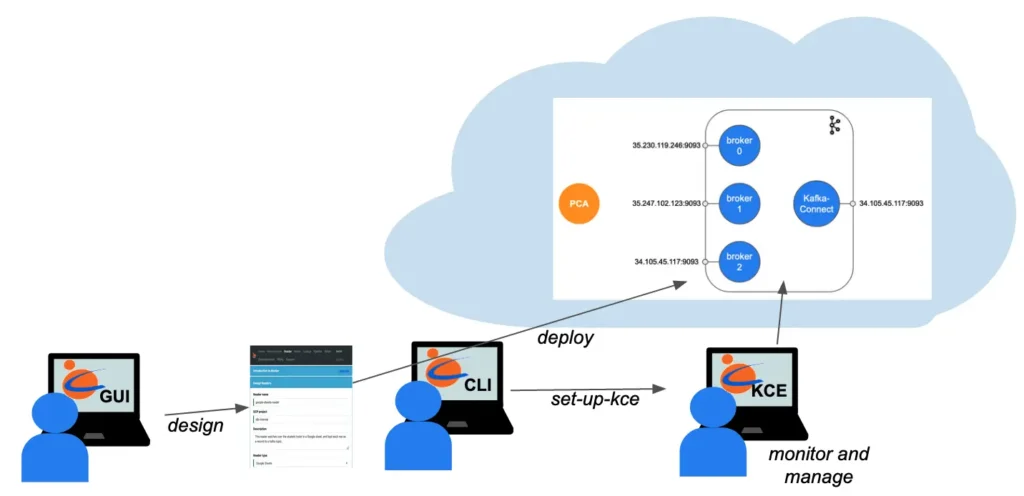
You, the user, design the Kafka system using Calabash GUI. Then you can issue one Calabash CLI command to deploy it to the cloud. A complete Kafka system is built without further user interaction. The system is secured with TLS (SSL) and Kafka ACL. After the creation, you can use Calabash KCE to monitor and manage the Kafka system.
If you are interested in getting further help from Data Canals, please send us an inquiry at the Professional Service Inquiry page.
6. Further Reading
Deploying a Kafka system is only the first step towards building a real-time data system. After creating the Kafka system, the users may want to add data ingestion processes to collect data. These are called “readers.” Calabash can help users design and deploy readers without writing a single line of code. For details, please read Collect Data to Kafka without Writing Code.
Conversely, the users may dump data from Kafka to other locations. These processes are called “writers.” Calabash can also help the users create real-time writers without writing code. For details, please read Saving Data from Kafka without Writing Code.
Users may use Kafka topics as the data gathering points for heterogeneous applications. To that end, you would only need readers and writers. However, that functionality is perhaps less than half of what Kafka can do.
The users can also process the data in Kafka by creating data pipelines in Kafka Streams. Calabash can help users create and manage data pipelines without writing code. For an introduction with a concrete example, please read A Simple GUI for Kafka Streams.
For a summary of all use cases of Calabash, please refer to the article Summary of Use Cases.
For product information about Calabash, please visit the Data Canals homepage.
The Calabash documentation site contains all the official articles from Calabash. The documentation includes extensive tutorials that lead readers in a step-by-step learning process.