This article presents a step-by-step demo using Calabash to deploy a secure application to a cloud platform (such as Google Cloud Platform) or on-premise. The application in this demo is a simple “Hello World!” API service, written in Spring Boot. But you can deploy any app once you understand all the steps in this article.
We will first test the application on our local machine. Then we will containerize it and deploy it to the Google Cloud Platform without TLS (SSL). In this process, we will open your door to the cloud and show you how easy it is to run your app in it.
Then we will beef up the application security using TLS (SSL). The TLS (SSL) security is supported by a Private Certificate Authority (or PCA). A PCA is a service for signing TLS (SSL) certificates. It can also be created using Calabash, and it must be deployed before the application.
Since the focus of this article is on running apps, we will skip the details of PCA. Nevertheless, the PCA is the centerpiece for security. The knowledge of it is required to understand the security part of this demo. Please read another article about the PCA.
In the cloud, we have two options. We may deploy the app to a stand-alone VM or a Kubernetes cluster. We will demonstrate both types of deployment.
Towards the end of the article, we will explain how to create the same service on-premise using the container image provided by Data Canals.
With the help from Calabash, it is easy to deploy (and tear down) applications in the cloud, with or without TLS (SSL), on VMs, or in K8s clusters, in short, in arbitrary ways. You can do this in just a few minutes. We hope the users will feel the cloud can be easier to use than their PCs.
1. The Application
The application in this demo is a simple Spring Boot API service. It returns “Hello World!” upon receiving GET requests.
You can get the entire source code project from the Calabash git repository, in this way:
% git clone https://github.com/dc-support-001/calabash-public.git
Cloning into 'calabash-public'...
remote: Enumerating objects: 53, done.
remote: Counting objects: 100% (53/53), done.
remote: Compressing objects: 100% (35/35), done.
remote: Total 53 (delta 3), reused 50 (delta 3), pack-reused 0
Unpacking objects: 100% (53/53), 61.32 KiB | 1.20 MiB/s, done.
The code is downloaded to the “calabash-public” directory. You can find the “helloworld” project in it:
% cd calabash-public
% ls
README.md helloworld
% cd helloworld
% ls
README.md	build.gradle	container	gradle		gradlew		gradlew.bat	settings.gradle	src
This is a self-contained gradle project. You may build and run the application on your local machine. The build process creates a uber jar in “build/libs/helloworld-1.0.2.jar.”
% ./gradlew build

BUILD SUCCESSFUL in 8s
3 actionable tasks: 3 executed
% java -jar build/libs/helloworld-1.0.2.jar

. ____ _ __ _ _
/\\ / ___'_ __ _ _(_)_ __ __ _ \ \ \ \
( ( )\___ | '_ | '_| | '_ \/ _` | \ \ \ \
\\/ ___)| |_)| | | | | || (_| | ) ) ) )
' |____| .__|_| |_|_| |_\__, | / / / /
=========|_|==============|___/=/_/_/_/
:: Spring Boot :: (v2.3.0.RELEASE)

2021-12-11 00:59:33.217 INFO 47714 --- [ main] com.dcs.HelloWorldApplication : Starting HelloWorldApplication on ...
2021-12-11 00:59:33.220 INFO 47714 --- [ main] com.dcs.HelloWorldApplication : The following profiles are active: dev
2021-12-11 00:59:34.558 INFO 47714 --- [ main] o.s.b.web.embedded.netty.NettyWebServer : Netty started on port(s): 8888
2021-12-11 00:59:34.570 INFO 47714 --- [ main] com.dcs.HelloWorldApplication : Started HelloWorldApplication in 1.804 seconds (JVM running for 2.275)
The service of the application is at localhost:8888. Use a browser, you see it is working:
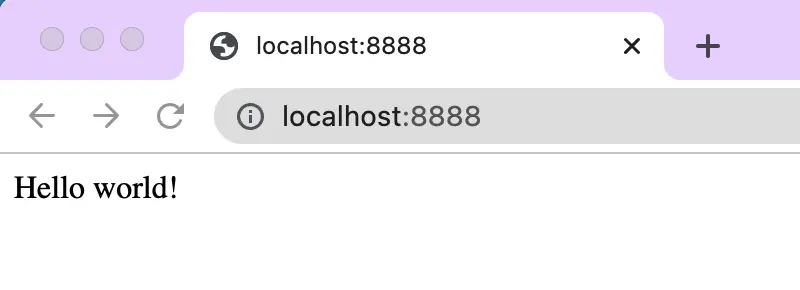
Next, we containerize this application. We use the container support from the GCP to build a container image for the helloworld application. Then launch it in a virtual machine (VM) in the cloud.
Unavoidably, we have to write something for containerization. For this demo, it is already done in the above-downloaded code. Files for containerizing the application without using TLS (SSL) can be found in the directory “helloworld/container1.”
There is a Dockerfile and an “app/run.sh” file in this directory. This is the framework for building a container, but it does not have the application content yet. We will need to copy the uber jar we just created earlier (i.e., “build/libs/helloworld-1.0.2.jar”) into this framework. See below.
% cd container1
% cp ../build/libs/helloworld-1.0.2.jar apps
Now this directory is ready for building the container image for our application. The “Dockerfile” for that purpose contains the following content:
FROM adoptopenjdk/openjdk11:latest
COPY ./app /app
CMD ["/app/run.sh"]
Issue the following command to build the Docker image:
% docker build -t demo .
A Docker container image labeled “demo:latest” is created. To run the application in a Docker container, issue this command:
% docker run -d -p 8888:8888 demo
f2011360ad3a24bab6e1d7352885c9fe2fd2406dde8e6323e55c10fc6f88bbe9
The service at “localhost:8888” is now working again. But this time, the application is running inside a container.
2. Run the App in the Cloud
We now move the Docker container to the cloud platform. To that end, use the Calabash GUI to design a “microservice.” Then use the Calabash CLI to deploy this microservice to the cloud with just one command.
The Calabash GUI is available at https://calabash.datacanals.com. Users need to register before using the GUI. There will be no cost to sign up, and there will be a 30-day free use of the full features of the product.
To design the microservice, use the creation form for the infrastructure object in Calabash GUI. See below.
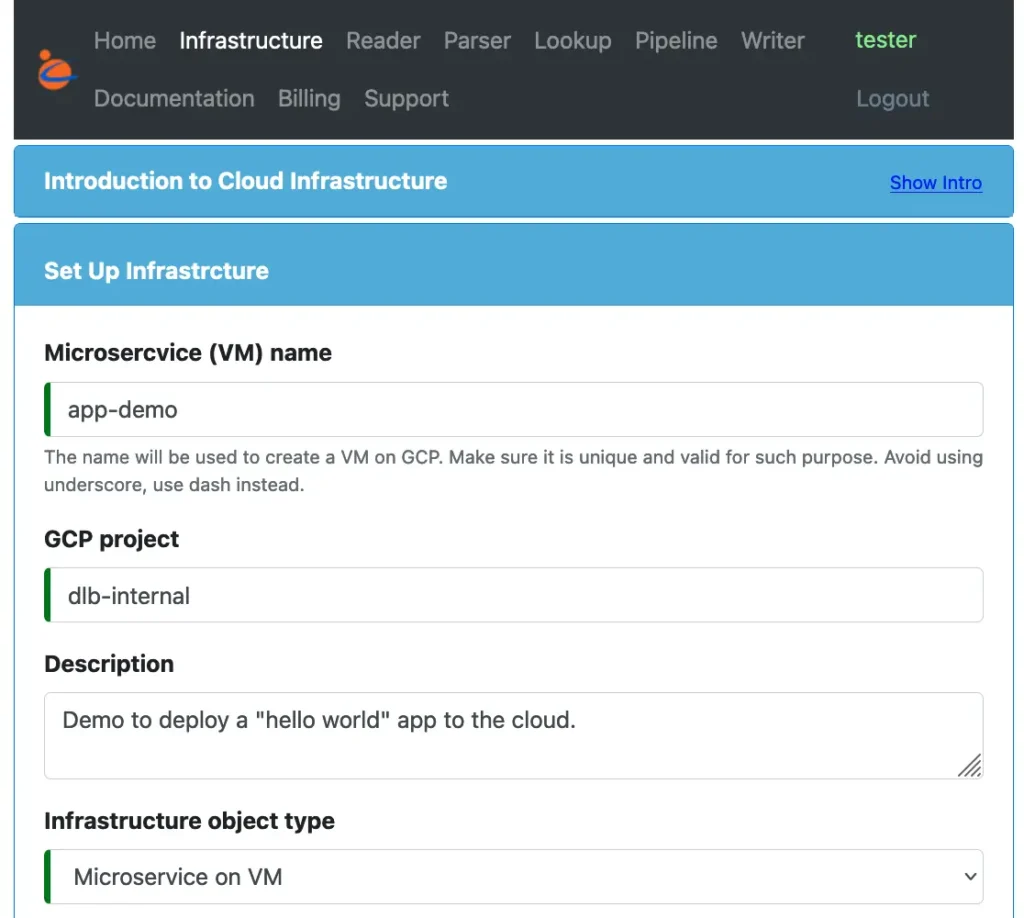
Set a name for the application, enter some description, and select the type of the infrastructure object as “Microservice on VM.” When Calabash CLI deploys this object, it will create a virtual machine to run the application container.
Next, we define where this VM should be created in the cloud, the type of machine we want to use, and how big the boot disk should be. These are the common properties of the hardware. It is unessential for the demo. In reality, you must set the configuration carefully because these properties determine how much you will pay.
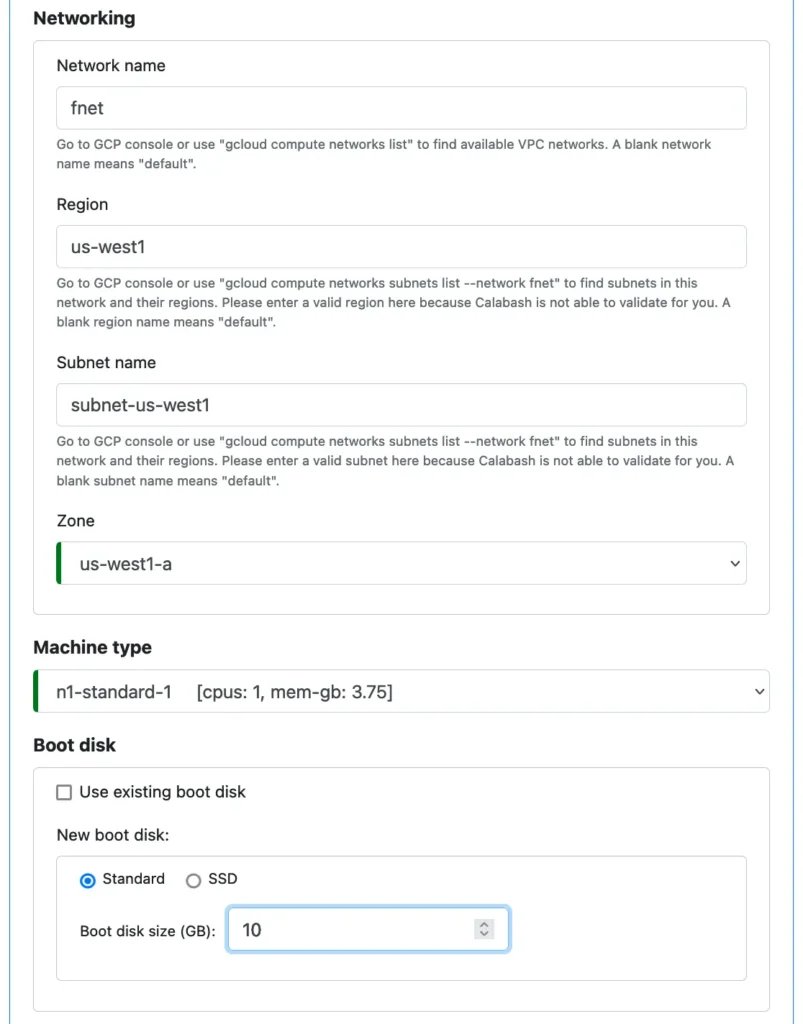
Next, we set properties for the software, i.e., our “helloworld” application.
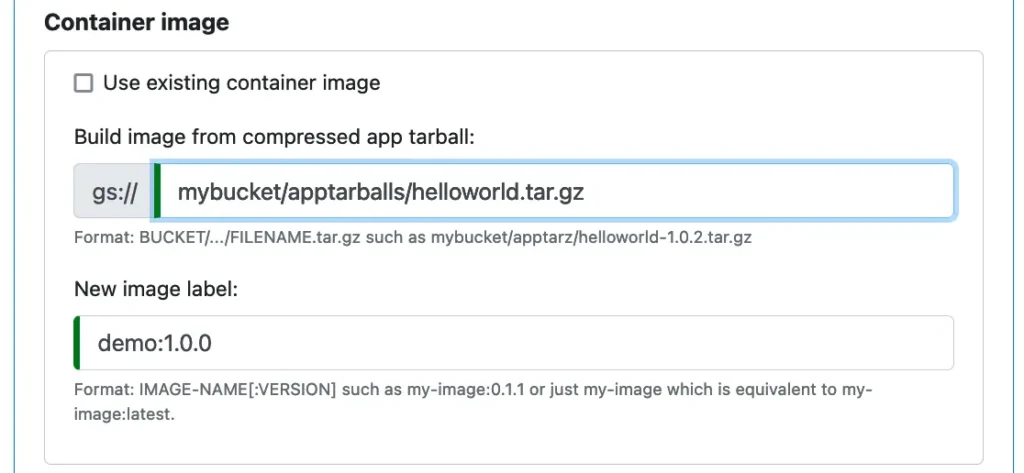
As of now, we do not have a container image in the cloud yet. The container image we created earlier is only in our own machine. We can ask Calabash to build it for us in the cloud. To that end, we need to pack up the content in the “container1” directory in a compressed “app tarball.” Then upload this compressed file to a cloud storage location. We will talk about the “app tarball” in more detail shortly.
We also need to refer to the image. So we add a label for it. When this microservice is deployed, Calabash will first retrieve the app tarball. Then the image will be built. When all is fine, the image will be labeled “demo:1.0.0.” The new container image will be stored in the container registry in GCP, ready for being shipped anywhere.
An “app tarball” contains all files needed for building an image. In our example, the following commands create the “app tarball.”
% cd helloworld/container1
% tar cvf helloworld.tar *
a Dockerfile
a app
a app/run.sh
a app/helloworld-1.0.2.jar
% gzip helloworld.tar
% ls
Dockerfile app helloworld.tar.gz
Notice that this tarball must also be compressed with gzip.
After that, we copy the app tarball to the cloud storage:
% gsutil cp helloworld.tar.gz gs://mybucket/apptarballs/helloworld.tar.gz
We are now all done preparing the software to run in the cloud.
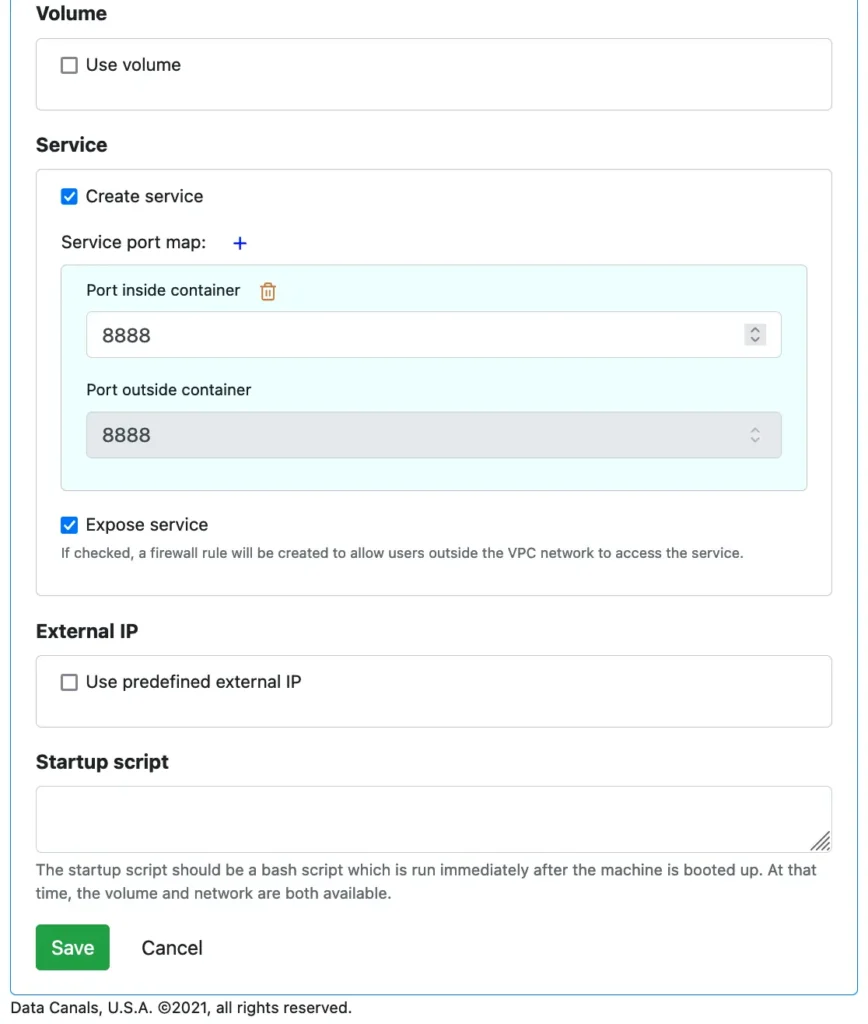
Next, in the Calabash GUI, we need to define the service port to allow connections to our application.
% cd calabash
% bin/calabash.sh
Calabash CLI, version 3.0.0
Data Canals, 2022. All rights reserved.

Calabash > connect tester
Password:
Connected.
Calabash (tester)> use ds lake_finance
Current ds set to lake_finance
Calabash (tester:lake_finance)> deploy i app-demo
Deploy to cloud? [y]:
Waiting #0 for image build...
Latest build: cdb31fcb-b452-4b7c-ada3-5e81784142d9, Started: 2021-12-15T04:49:27.584584166Z, Current status: SUCCESS
Got a successful latest build: cdb31fcb-b452-4b7c-ada3-5e81784142d9
Creating vm app-demo ...
Deployed to 10.138.31.219:8888 (internal) 35.197.68.25:8888 (external)
Calabash (tester:lake_finance)>
We assume the microservice we designed earlier is located in a data system named “lake_finance.” So we change the context to this data system. Then we issue the “deploy i” command. The image build task is kicked off first, and we wait until it completes. If the build is successful, a VM is created, and the container is launched in the VM. The IP addresses of the service are returned. Using a browser, we can see the service is working in the cloud.
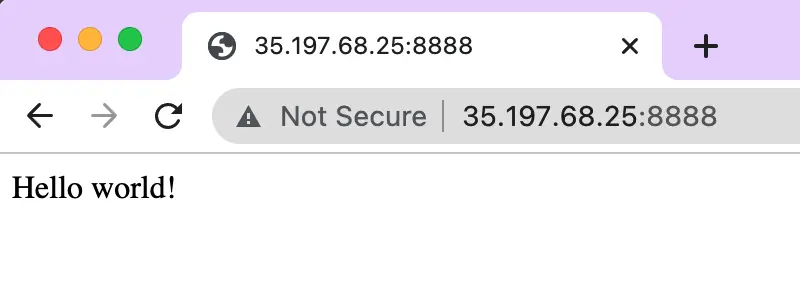
Finally, we can delete the microservice and return the computing resource to the cloud with one Calabash CLI command.
Calabash (tester:lake_finance)> undeploy i app-demo
Undeployed
The “undeploy i” command returns in a few seconds. It just kicks start the resource deletion process. The actual cleanup in the cloud may take a few more minutes.
In this section, you have seen the complete procedure for designing and deploying a microservice on a VM. The simple “helloworld” is just a representative of any application. You now have one extra degree of freedom when you need to run an application — run it in the cloud!
But as suggested in the above browser screenshot, this endpoint is not secure. In the next section, we will add security to it.
3. Run the App Securely
To secure the app, we need to use a Docker image provided by Data Canals to set up TLS (SSL) key and cert. Specifically, we need to modify the container build files to extend from that image. Also, we will tell Calabash GUI we are using this image so that the Calabash CLI will generate the necessary set-up files required by this image.
In the following, we will first look at the changes in our microservice in Calabash GUI. Then we will go over the details about how to modify the Docker build files for our app, followed by the changes in the “helloworld” application to enable TLS (SSL).
3.1. Change in Calabash GUI
In Calabash GUI, open the editor for the microservice we created earlier. In the “Container image” section, select the “Based on datacanals/pca-client” check box. See below.
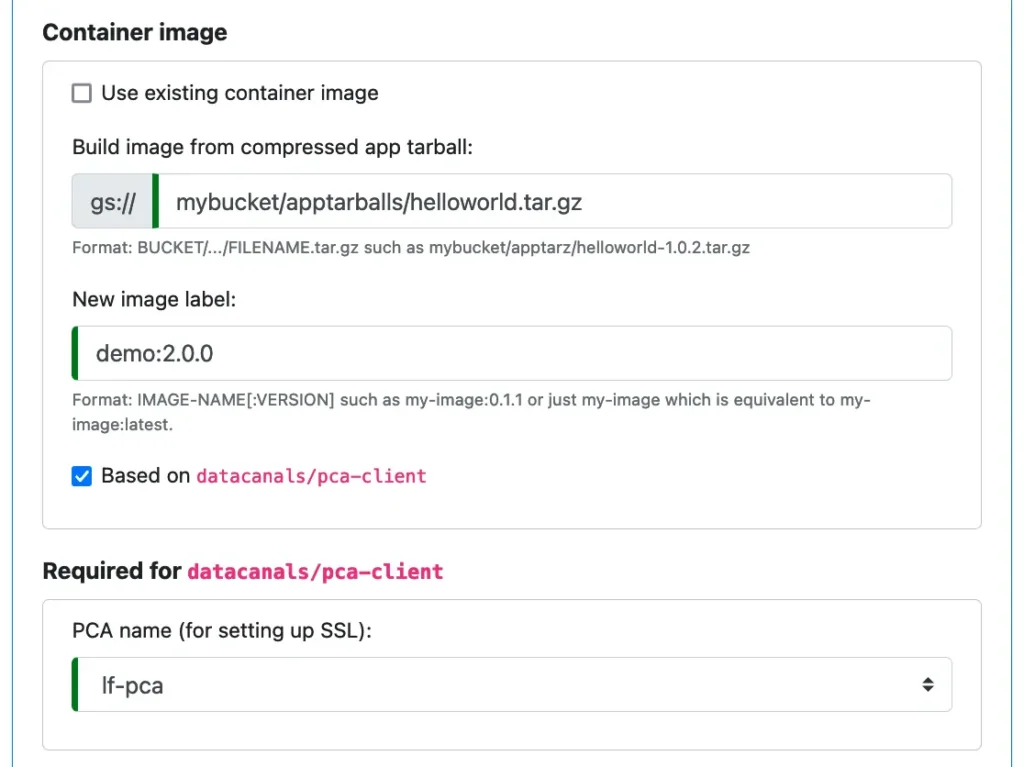
The Docker image “datacanals/pca-client” is provided by Data Canals, available to the general public. Our “helloworld” application will be built with it. (See details later.) In this Docker container, we can run the container-provided utility to get TLS (SSL) key and certificate.
The utility will need to contact a PCA. Therefore, we must select a previously designed PCA (such as “lf-pca” in the above screenshot).
Finally, we set the image label to guarantee the new image will not conflict with any existing image.
3.2. Change in Application Container
Go to the downloaded “helloworld” project. In the directory “helloworld/container2,” you can find all the modified files for TLS (SSL). The first change is in the Dockerfile. It now contains:
FROM datacanals/pca-client:latest
COPY ./app /app
CMD ["/app/run.sh"]
Only the first line is modified. It makes the application image an extension of the “datacanals/pca-client:latest.” As of this writing, this image is based on Ubuntu 20.04 LTS with JDK 11 installed.
The second change is in the “app/run.sh” file. It now contains:
#!/bin/bash
/app/set-up-ssl.sh
java -jar /app/helloworld-1.0.2.jar
We have added a call to the “set-up-ssl.sh” utility script provided by the “datacanals/pca-client” image.
After the “set-up-ssl.sh,” the TLS (SSL) key and certificate will be created in this directory:
/data/app-demo_security
In this directory, we can also find the so-called “cacert” file (i.e., the certificate used by the PCA), and the keystore and truststore files.
Next, we will modify the Spring Boot application to use the generated keystore and truststore.
3.3. Change in Application
Go to the downloaded helloworld project, modify the file “helloworld/src/main/resources/application.properties” to contain:
server.port = 8888
spring.profiles.active = dev
spring.webflux.hiddenmethod.filter.enabled = false

server.ssl.enabled = true
server.ssl.key-alias = app-demo
server.ssl.client-auth = NEED
server.ssl.key-password = changeit
server.ssl.trust-store-password = changeit
server.ssl.key-store = /data/app-demo_security/app-demo.jks
server.ssl.trust-store = /data/app-demo_security/trust.jks
In the original file, all the “server.ssl” properties are commented out. We can just uncomment them in.
Please note that the parameter “server.ssl.client-auth” is set to “NEED.” This means the TLS (SSL) connection to our app port requires valid keys and certificates for both server and client. We will see how to set up client-side TLS (SSL) environment later.
That is all we need to do. Our application is now TLS (SSL) enabled. We are ready to deploy it to the cloud.
3.4. Redeploy the Microservice
First, make sure the PCA with the name “lf-pca” is deployed to the cloud. We will skip the details about the PCA here. But you can find the information from another article about the PCA.
Follow the same procedure in Section 2: Run the App in the Cloud, we can get the app running in the cloud in a few minutes. The following is a transcript for the deployment session using Calabash CLI.
Calabash CLI, version 3.0.0
Data Canals, 2022. All rights reserved.

Calabash > connect tester
Password: tester
Connected.
Calabash (tester)> use ds lake_finance
Current ds set to lake_finance
Calabash (tester:lake_finance)> deploy i app-demo
Deploy to cloud? [y]:
Waiting #0 for image build...
Latest build: 8cc93559-8676-4a36-98fc-8961763538ac, Started: 2021-12-19T01:39:12.675837264Z, Current status: WORKING
Waiting #1 for image build...
Latest build: 8cc93559-8676-4a36-98fc-8961763538ac, Started: 2021-12-19T01:39:12.675837264Z, Current status: SUCCESS
Got a successful latest build: 8cc93559-8676-4a36-98fc-8961763538ac
Creating vm app-demo ...
Deployed to 10.138.31.223:8888 (internal) 34.82.110.193:8888 (external)
Calabash (tester:lake_finance)>
The deployment session first asks us if we want to deploy to the cloud. Hit return to take the default to go to the cloud. Another option is to deploy on-premise, which will be explained later.
The build process may take a while, depending on the complexity of the application. The current status of the image build process is displayed every few minutes.
When all is fine, the IP addresses of the VM running our app will be displayed. We can use the external IP (since our PC is outside the cloud) to access our app.
First, we can see the unencrypted HTTP protocol does not work anymore:
% curl http://34.82.110.193:8888
curl: (52) Empty reply from server
Second, we use HTTPS protocol and try to ignore the server-side validation. It still does not work:
% curl -k https://34.82.110.193:8888
curl: (35) error:1401E412:SSL routines:CONNECT_CR_FINISHED:sslv3 alert bad certificate
In the above, the “-k” option means to ignore the validity of the server-side certificate. So the “bad certificate” means the connection checked client-side for the certificate. But we did not supply one.
To get the client-side key and certificate on our PC, we can use the “set-up-ssl” command in the Calabash CLI. See below.
Calabash (tester:lake_finance)> set-up-ssl lf-pca
Is the PCA in the cloud? [y]:
Please enter a dir for the security files: /Users/jdoe/calabash
mkdirs /Users/jdoe/calabash/lake_finance__lf-pca/tester_security
SSL certificate supported by PCA lf-pca for user tester is created in /Users/jdoe/calabash/lake_finance__lf-pca/tester_security
All the client-side TLS (SSL) files are generated in directory “/Users/jdoe/calabash/lake_finance__lf-pca/tester_security.” We can use them to access the app now.
% cd /Users/jdoe/calabash/lake_finance__lf-pca/tester_security
% ls
rtca-cert.pem	tester-cert.pem	tester-key.pem	tester.jks	trust.jks
% curl --key tester-key.pem --cert tester-cert.pem \
--cacert rtca-cert.pem https://34.82.110.193:8888
Hello world!
Viola! We finally have an app with two-way TLS (SSL) working. A two-way TLS (SSL) validates the identities of both server and client (in addition to doing message encryption). It is safe against the “man-in-the-middle” attack.
4. Run the App in Kubernetes
Kubernetes is an operating system for containerized applications. It provides guaranteed processing capacity and automatic resume from system failures. Almost all modern microservices can benefit from Kubernetes.
For the demo purpose, we create a small Kubernetes cluster. It is straightforward in Calabash. Just fill a self-explanatory design form. The following screenshot is the top portion of the design form for the cluster.
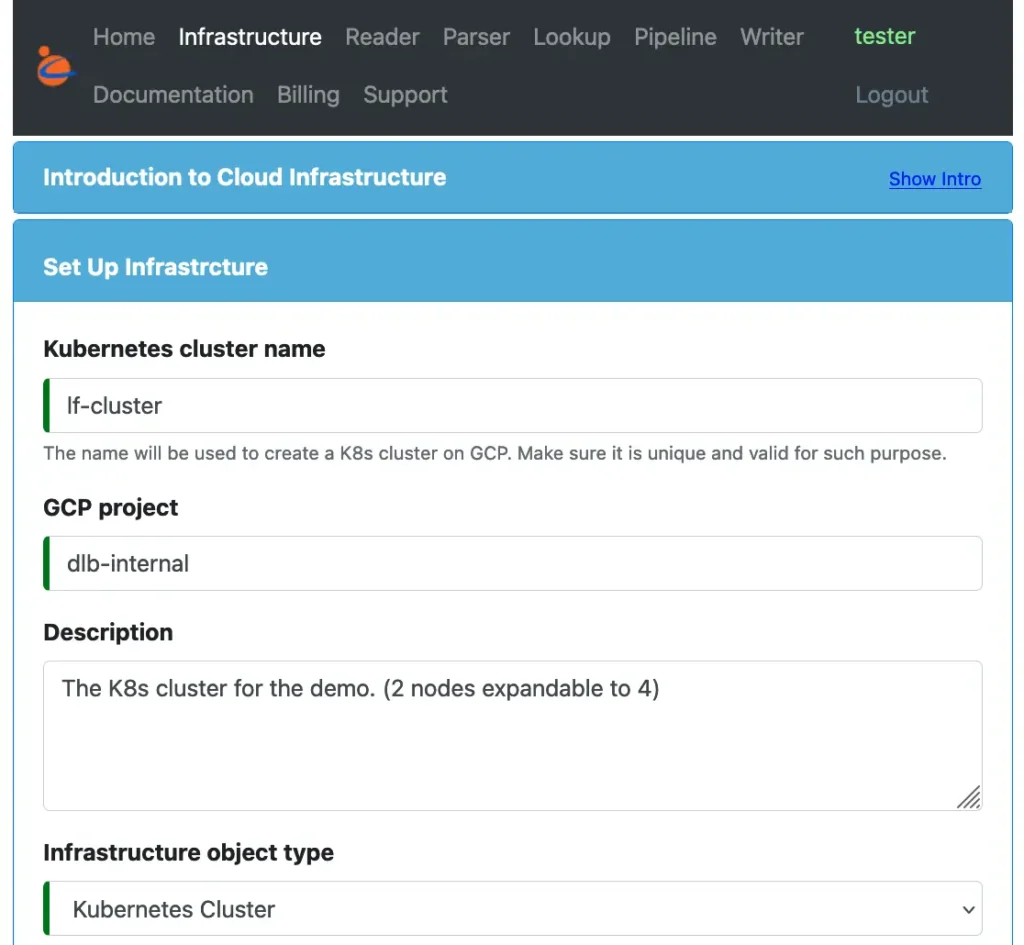
The cluster name will be “lf-cluster” and its object type is “Kubernetes Cluster.” The remaining properties for the cluster will be omitted since they are straightforward. This K8s cluster is a zonal cluster with 2 to 4 nodes
To deploy it, issue the “deploy i lf-cluster” command.
Calabash (tester:lake_finance)> deploy i lf-cluster
Cluster created, checking for K8s service endpoint...
Checking status of k8s api service... retries remain: 30
Deployed to 34.82.151.214
Calabash (tester:lake_finance)>
The IP address of the control plane endpoint is returned. We can use it to deploy applications to the cluster.
Next, we update the microservice “app-demo” to use this Kubernetes cluster.
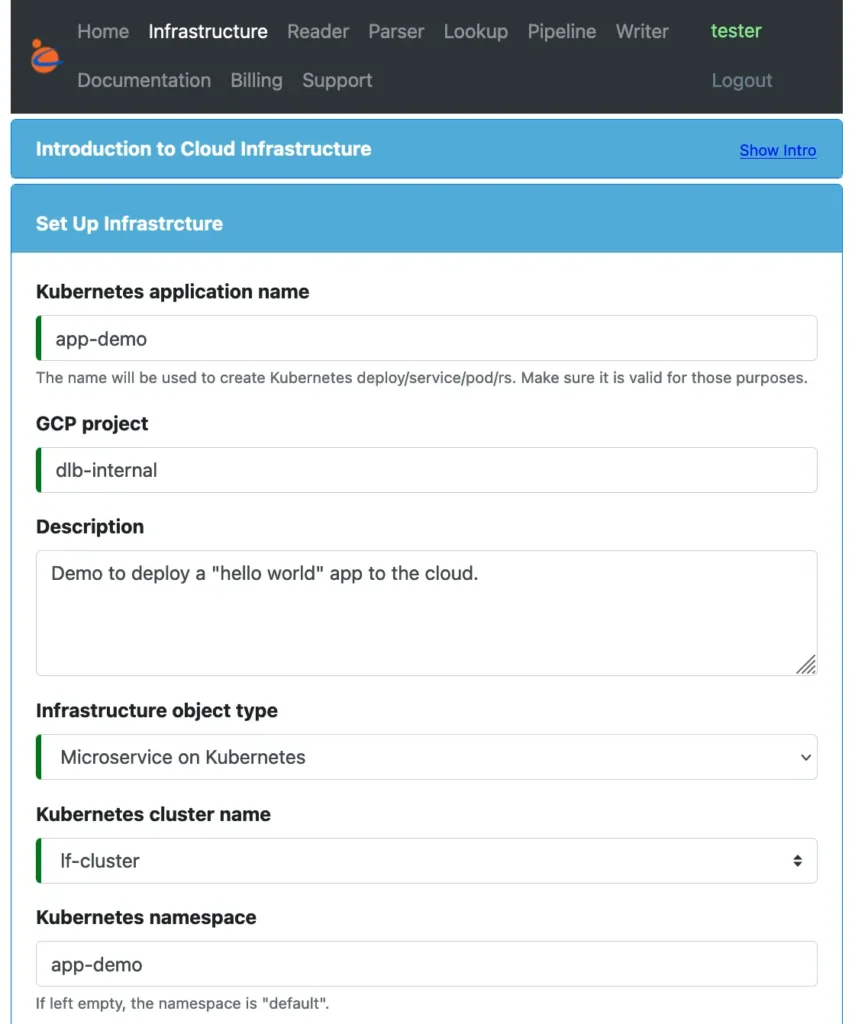
In this form, we changed “Infrastructure object type” from “Microservice on VM” to “Microservice on Kubernetes.” Then we selected the Kubernetes cluster to use. We also created a namespace for our application. The namespace is optional, but highly recommended.
That is all we need to do. Now our app is ready to be deployed to the Kubernetes cluster. It will have TLS (SSL) security, dynamic load balancing, and fault tolerance. These are the desirable characteristics for a production application.
Furthermore, once the deployment is successful, you may make any modifications in the design and redeploy it. There will be no interruption to the app from the redeployment. A rolling update will be performed which shuts down old nodes only when new nodes have been successfully created. This way, your app will provide continuous service.
The following is a transcript of the deployment using Calabash CLI.
Calabash CLI, version 3.0.0
Data Canals, 2022. All rights reserved.

Calabash > connect tester
Password: tester
Connected.
Calabash (tester)> use ds lake_finance
Current ds set to lake_finance
Calabash (tester:lake_finance)> deploy i app-demo
Deploy to cloud? [y]:
Deploying new ms on k8s ...
Deploying microservice app-demo in namespace app-demo ...
Namespace created: app-demo
Creating service ...
Creating new service app-demo
Service created: app-demo
Checking service status ... retries left: 19
Checking service status ... retries left: 18
Creating metadata lake_finance__app-demo__svcip = 35.197.28.152
Waiting #0 for image build...
Waiting #0 for image build...
Latest build: 3da04ccd-fbab-4ec1-afac-1bc7eb07c180, Started: 2021-12-31T07:22:10.261780951Z, Current status: SUCCESS
Got a successful latest build: 3da04ccd-fbab-4ec1-afac-1bc7eb07c180
Creating new secret app-demo-secret
Secret created: app-demo-secret
Deployment created: app-demo
HPA created: app-demo
Deployed to 34.127.0.27:8888 (external)
Calabash (tester:lake_finance)>
The deployment process creates Kubernetes namespace, service, secrets, deployment, and horizontal pod autoscaling (HPA). As before, it also builds our application docker image. When all is fine, the service URL is displayed. Here “(external)” means this service is open to the internet.
We can access our application from our PC outside the cloud:
% curl --key tester-key.pem --cert tester-cert.pem \
 --cacert rtca-cert.pem https://34.127.0.27:8888
Hello world!
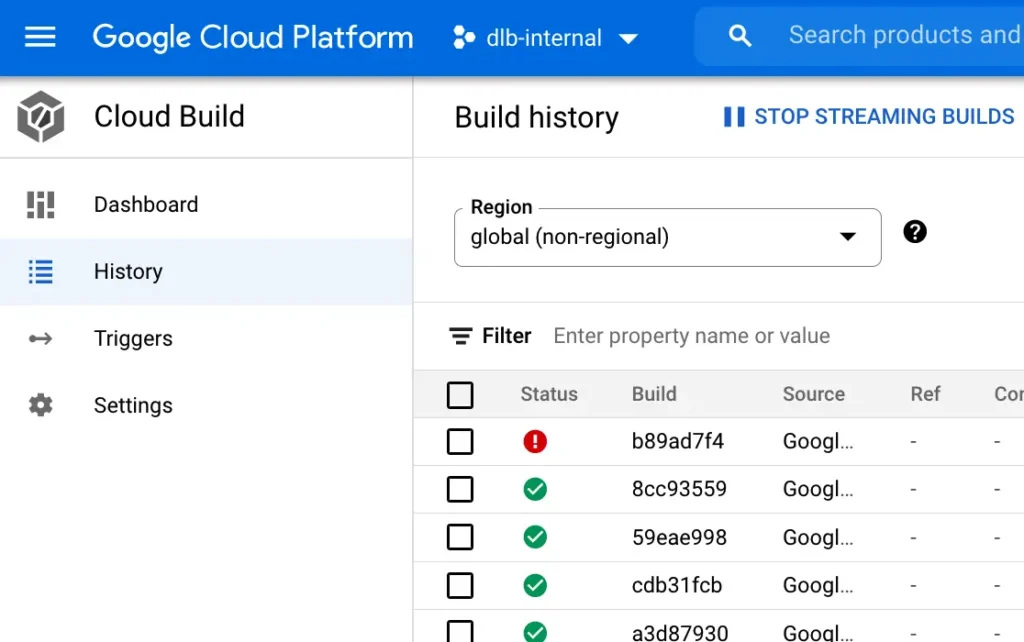
Finally, we should mention that if the image build fails, you can find the detailed error message from the cloud build history page from Google Cloud Console. The build history list looks something like the following.
5. Run the App Securely On-Premise
Nowadays, machines are getting powerful and cheaper. It makes a lot of sense to immediately process the data on-premise before sending them to the cloud. Furthermore, the delays of accessing the cloud services may be prohibitive to many applications.
Running real-time data processing as close to the data as possible is generally called “edge computing.” It has gained momentum in recent years. Calabash helps you in that effort as well.
To run an app securely on-premise, you need the Calabash PCA. The following diagram shows how to launch a PCA outside the cloud.
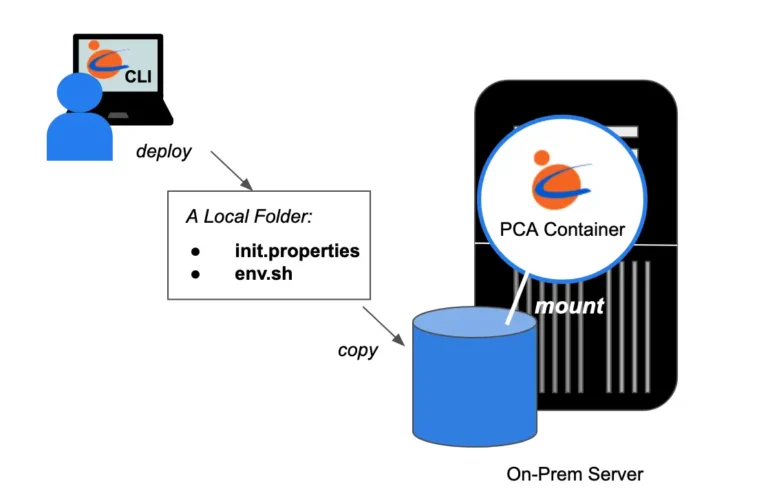
The PCA docker image is free from the Docker Hub at “datacanals/pca:latest.” You may launch it on any machine. All it needs is the following three files.
- “init.properties“: a property file for the details of the PCA
- “env.sh“: a script for setting up some environment variables
- “credentials.json“: a service account credential file from GCP
The first two files are generated by Calabash CLI when you select not to deploy a PCA to the cloud. See below:
Calabash (tester:lake_finance)> deploy i lf-pca
Deploy to cloud? [y]: n
Enter a directory for set-up files: /tmp/generated
mkdirs /tmp/generated
Setup files have been written to directory /tmp/generated
(Note: they will be valid for 10 days.)

You may launch the PCA on-prem in the following manner:
1. Download to the setup dir "credentials.json" file from GCP.
2. Use the docker image "datacanals/pca:latest".
3. Mount the setup directory to "/data" in the container.
4. Map container port 8081 to external 8081.
5. Back up "pca_security" dir regularly after launch.
Done
Calabash (tester:lake_finance)>
As shown above, at the time of deployment, you have the choice of not going to the cloud. In such a case, Calabash CLI will ask you for a folder for generating the two set-up files.
Since the users will have to take some manual steps after the set-up file generation, Calabash offers a detailed guideline.
The “credentials.json” is critical. It allows the PCA to access your project metadata in a GCP project. Calabash PCA uses the project metadata for the PCA service lookup. As soon as the PCA starts, it adds an entry. The entry looks something like this, on the GCP Console:

The metadata key is unique, identifying the on-prem PCA in your data system. The value is a long string, which includes an encrypted PCA access token and the IP address of the PCA service.
Applications can use the key to find the PCA access token and its IP. However, only authorized applications may be able to decrypt the access token. We will see how to run an authorized PCA client application.
A PCA client application will be able to decrypt the PCA access token. It will be able to access the PCA to get signed TLS (SSL) certificate. The following diagram shows how to launch a PCA client application.
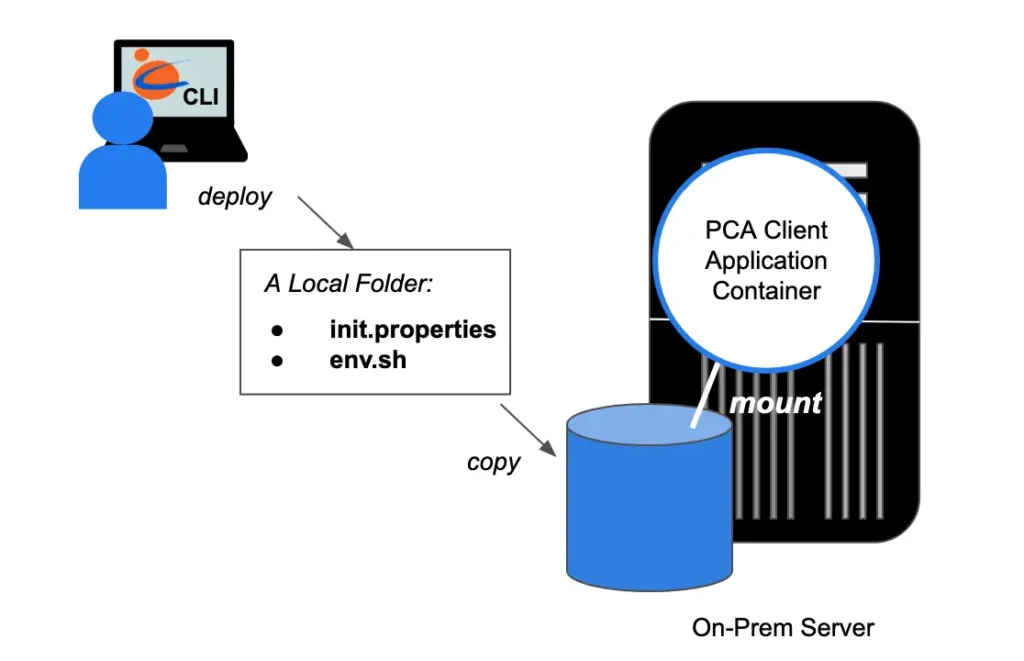
This appears not too much different from launching PCA on-premise. Indeed, the way those set-up files are generated goes similarly:
Calabash (tester:lake_finance)> deploy i app-demo
Deploy to cloud? [y]: n
Enter a directory for set-up files: /tmp/generated
mkdirs /tmp/generated
Setup files have been written to directory /tmp/generated
(Note: they will be valid for 10 days.)

You may launch the app on-prem in the following manner:
1. Download "credentials.json" from your GCP account.
2. Extend your docker image from "datacanals/pca-client:latest".
3. Mount the setup directory to "/data" in the container.
4. Run "/app/set-up-ssl.sh" or "/app/set-up-kafka-client.sh"
Done.
Calabash (tester:lake_finance)>
When deploying an application, you have the option of not to push it to the cloud. Instead, Calabash will generate set-up files for local deployment.
The instruction provides all the details you need to know. You will need to extend the container image “datacanals/pca-client:latest.” In this image, there is a script provided by Calabash to set up the TLS (SSL) environment. You will need to run this script before starting your application. For example:
#!/bin/bash
/app/set-up-ssl.sh
java -jar /app/helloworld-1.0.2.jar
The directory “helloworld/container2” contains a working example. It extends from “datacanals/pca-client:latest,” and it can be run in both cloud and on-premise.
Finally, for Kubenetes, the Calabash CLI will generate all the necessary Kubernetes object specs so that users may use “kubectl” to create them.
6. Conclusion
As you have seen in this article, Calabash helps you deploy any application to the cloud or on-premise. If you have any application running on your PC, and you would like to put it to run in the cloud, think about Calabash! It will launch your app in the cloud within 10 minutes.
To deploy to the cloud, Calabash takes the whole nine yards. Just type one “deploy” command, then your app is online in a few minutes. When you issue one “undeploy” command, it is gone instantly. It cannot be more convenient than that. The deploy/undeploy works for running apps on a single VM and a Kubernetes cluster.
You may issue deploy/undeploy as many times as you like because
- the metadata about your application is kept in the Calabash repository,
- the data disks are not deleted because of the undeploy.
Therefore, after an undeploy command, you may issue a deploy command, which gets the app back to the same environment last time.
For the on-premise case, the Calabash CLI generates set-up files for you. Then you, the user, transfer these files to your local machines. There, you launch Docker containers with images provided by Data Canals. Mount the generated set-up files to the container so that the Calabash runtime utilities can read them to set up an environment for you.
Calabash provides two public Docker images
- datacanals/pca:latest: for running PCA
- datacanals/pca-client:latest: for running apps requiring certificates from the PCA
Users will need these Docker images to secure their apps with TLS (SSL) security.
Finally, we mention an attractive benefit Calabash offers to the users. Calabash’s resumable deploy/undeploy command is like a sleep/wake-up button. Using this button, users can cut their cloud spending significantly.
7. Further Reading
Being able to help users launch their apps in the cloud and on-premise is not the primary goal of Calabash. The mission of Calabash is to help users create and maintain their data lakes without having to invest in exotic IT/development skills. In this effort, Calabash has created many easy-to-use tools. The “one button” launch of apps covered in this article is just one of them.
For a summary of all use cases of Calabash, please refer to the article Summary of Use Cases.
For product information about Calabash, please visit the Data Canals homepage.
The Calabash documentation site contains all the official articles from Calabash. The documentation includes extensive tutorials that lead readers in a step-by-step learning process.
For an introduction to the concept of data lake, please read What is Data Lake.