This article is the user manual on creating readers in Calabash GUI.
A reader is a real-time process that accomplishes two things.
- Identify new data records in a data source as soon as they appear.
- Extract the new data records and load them to a Kafka topic.
Readers intentionally avoid high-intensity processing.
- Readers do not parse input data unless the data must fit a schema to qualify as source data. (A typical example is an Avro source.)
- Readers do not deduplicate the data.
Calabash readers load data to target Kafka topics in serialized text form, i.e., each record value is a line of text. These are called the “raw data” in your data lake.
The reason for loading only raw data is that source data are usually the dirtiest. We may encounter human errors, format errors or variants, fake duplications, etc. At this early stage, loading source data into a data lake without a loss must be the only goal.
You will use more capable mechanisms, known as “data pipelines,” to tidy up the raw data later. You can use Calabash to create several data pipelines and put them in tandem to gradually make data cleaner.
There are many different types of readers in Calabash for various data sources. To find out all the supported reader types, click on the “Reader type” combo box in the create reader form. All the reader types are in the drop-down list. See below.
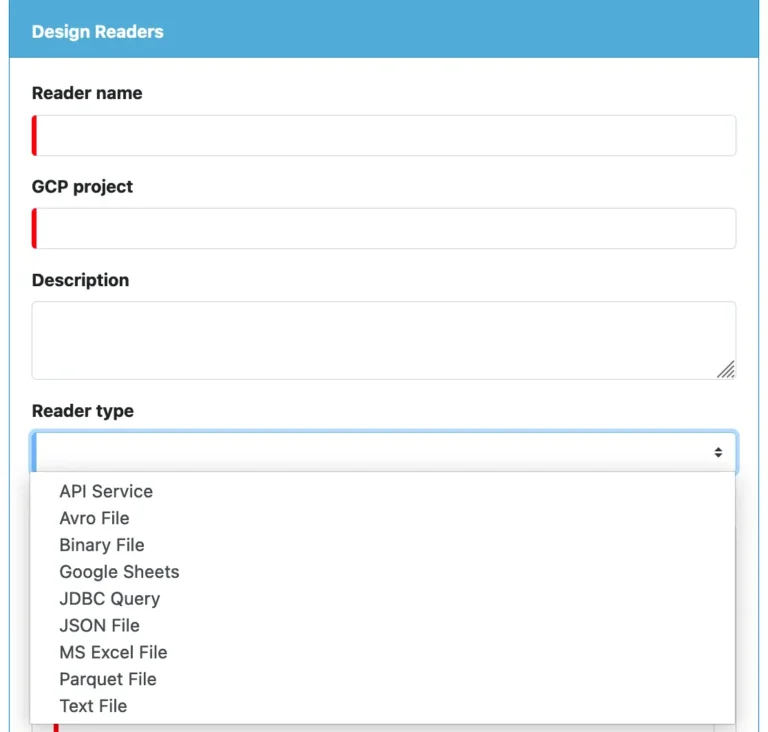
When you select a reader type, you will see specific properties associated with that type. We will examine details of the type-specific properties shortly. Now, let’s go over some properties common to all reader types.
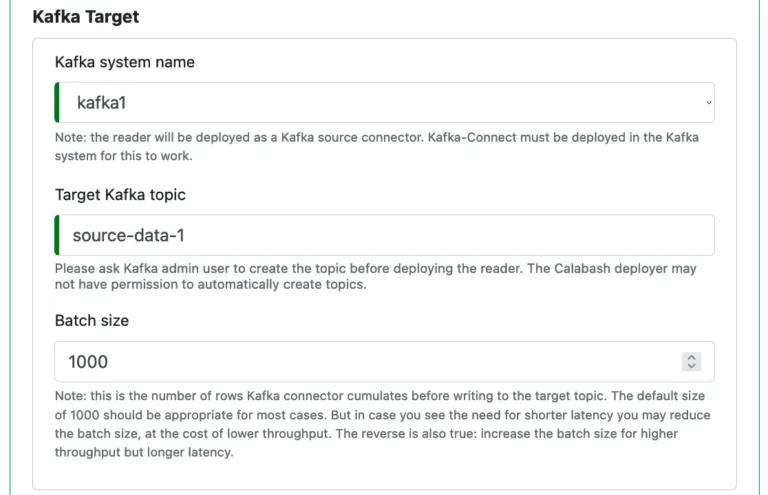
You must pick a Kafka system, and you need to enter the Kafka topic where the reader will load the source data.
There is a “Batch size” property, except for the “API Service” reader, because the reader writes to a Kafka topic in batches to reduce overhead. “Batch size” is the number of source records the reader collects before writing to Kafka. The reader sends the final set (may not be a full-size batch) to Kafka if it hits the end in the source.
An API Service reader does not cache a record batch. It sends to Kafka as soon as a record is received. Or, equivalently, we may say its batch size is always one.
Please read the hint in the above screenshot about setting the batch size.
Now let’s look at properties associated with each type of reader.
1. About "API Service" Reader
A reader of this type is a microservice, running either on a VM or a Kubernetes cluster.
The service listens to a port for POST messages and takes every message as a new data record. It then turns around to save the just received data record to a Kafka topic.
The API service must define a username to “personalize” the reader to the Kafka system. The Kafka ACL will check this name for authorization when the reader attempts to write to the topic. The username can be any string free of special characters. It does not have to be a Calabash login name. See below.
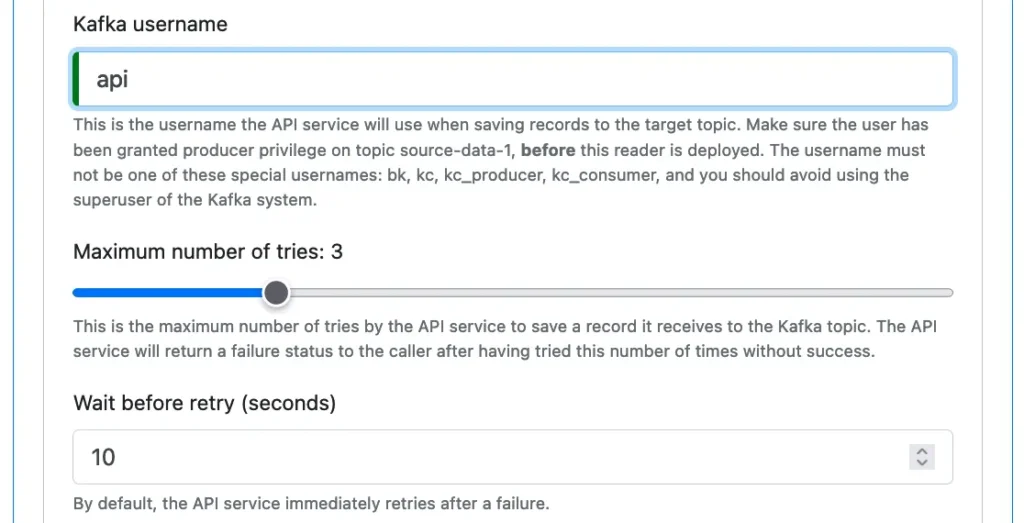
Please read the hint about the username and follow the best practice described therein.
There is no guarantee that any attempt to save to a Kafka topic will succeed. So there are couple more properties about retries. You can set a maximum number of tries before the API service gives up writing to Kafka topics, and you can define the minimum interval between adjacent attempts.
If all tries have failed, the API service returns a failure message with a status code not equal to 200. But if the save to Kafka succeeds, the return status code is 200. And the response body contains one text line similar to the following.
Successfully committed 1609287419851:d1294056-dc9e-4794-a630-334118e0dce2 in topic source-data-1 (partition:1, offset:5)
In the return message, the long string “1609287419851:d1294056-dc9e-4794-a630-334118e0dce2” is the record key (created by Calabash) committed in Kafka. Note that in a Kafka system, every record must have a key.
This key is historically unique among all data in your system in history. That means no two records from any time and anywhere in your system will have the same record key. Let’s see why this is true.
The first part of the key before the colon, i.e., “1609287419851,” is a timestamp (in milliseconds) for the record creation. And the second part after the colon, i.e., “d1294056-dc9e-4794-a630-334118e0dce2” is a UUID. Conflict on UUID may happen but is with an astronomically low probability. A UUID conflict ever happens in our system at the exact milliseconds in history? Probably never.
For the theoretically minded reader, you may argue the probability of conflict is still not zero. Indeed, it never can be zero unless you can see all the records a priori when assigning keys. What Calabash has offered is to cut the possibility of the clash to practically zero.
Making every piece of data traceable has been one of the challenges in enterprise data systems. The foundation is the unique id to every record entering the system. Calabash offers you such a foundation. There can be a lot of exciting applications making use of this feature.
Next, you make an important decision on whether to run this service on a stand-alone VM or to run it in a Kubernetes cluster.
The following screenshot is for opting to run it on a new VM. You enter the same properties for creating an infrastructure object as “Microservice on VM.”
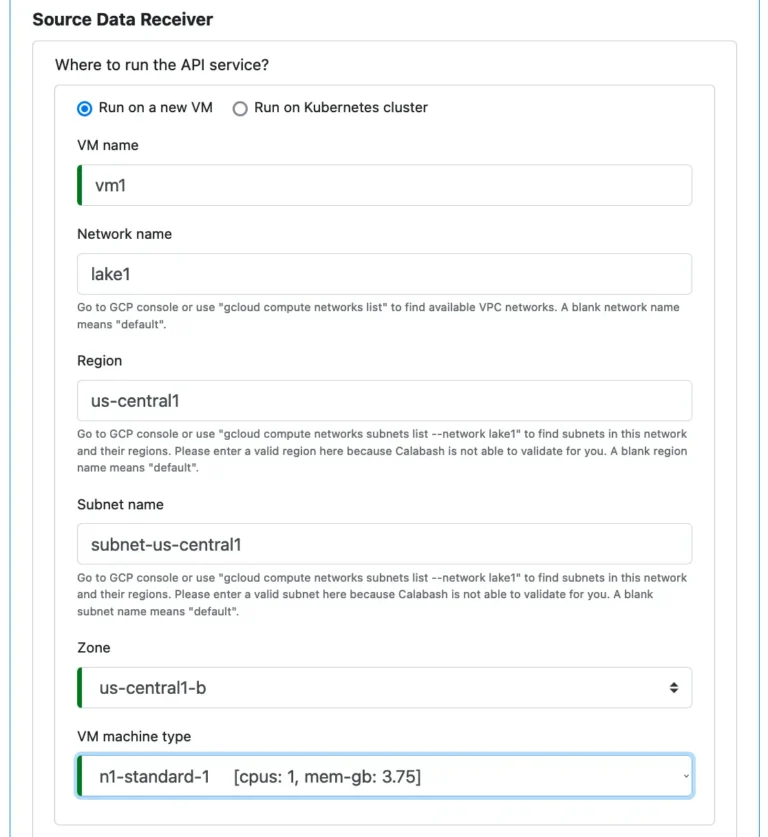
If you decide to run the API service in a Kubernetes cluster, click on the “Run on Kubernetes cluster” radio button. The UI changes to the following. (You see the familiar properties similar to creating an infrastructure object of “Microservice on Kubernetes.”)
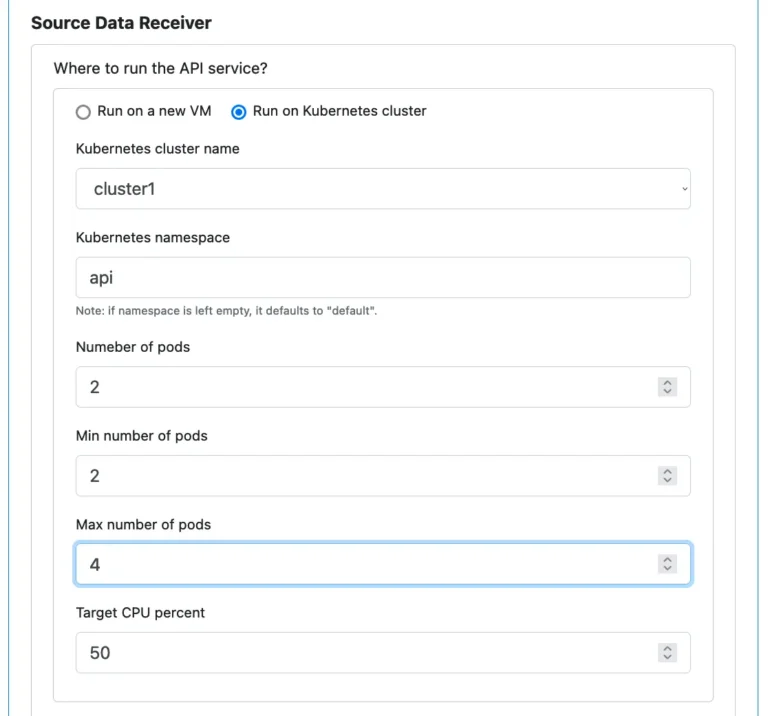
One property not found in creating “Microservice on Kubernetes” is the “Kubernetes namespace.” Why do we need that? First of all, we do not have to. We can use the “dafault” namespace in Kubernetes. However, we will share the Kubernetes cluster with potentially thousands of other applications. To avoid conflicts with them, you had better create a unique namespace. Make sure the namespace you enter is also self-explanatory.
Regardless of whether you use a stand-alone VM or a Kubernetes cluster, you have to define properties for the service. See below.
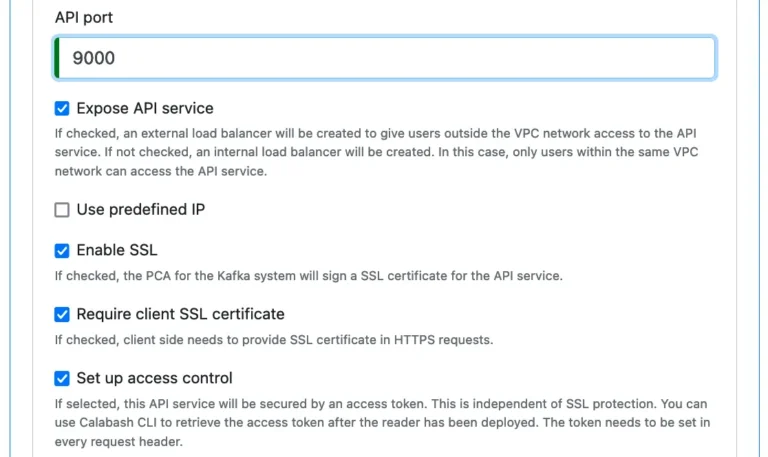
Most of these properties are self-explanatory, except perhaps the last two.
The “Require client SSL certificate,” if checked, will make this API service require an SSL certificate from the sender of the POST message, i.e., the client. That is known as “two-way SSL” and is the best SSL protection.
The PCA in your data system must also sign the SSL certificate for the client. For details about client-side SSL and how to get SSL certificates for the client, please read the article about Calabash CLI and Tutorial about creating microservice with PCA support.
The API service can also set up an authorization check. If the flag “Set up access control” is set, the API service will create a secret access token. All clients must specify this access token as a bearer token in their HTTP(S) headers. The deployer of the Kafka system may use Calabash CLI to retrieve the access token and share it with authorized clients.
In summary, the API Service reader provides you with a scalable, fault-tolerant, and completely secure real-time channel to a Kafka topic. All you need to do is fill out this form, then type one command to deploy the API service.
Important: You need to understand that the API service reader does not carry a guarantee. It does offer retries but failing all allotted retries is still a possibility. In the case of an eventual failure, it will return an error response with a status code not equal to 200. Therefore, your application using this API Service must be ready for errors.
Finally, all other readers Calabash offers have unlimited retries. So they can claim to be loss-free. However, they may suffer from the so-called “live lock,” i.e., working hard without progress.
2. About "Avro File" Reader
If you want to load data in an Avro file to a Kafka topic, you can create an “Avro File” reader. The Avro file must be on Google storage.
Here is how it works. The Avro File reader constantly scans the file on Google storage for new Avro records. The reader uses the record count as the yard mark for new data.
That means records appended to the file are considered new. Modified lines are not because they do not alter the total number of records in the file. Also, if you insert a new record in the middle of the file, the reader will load the last record again. But this record is a duplicate.
The Avro File reader requires a record schema. Without a schema, it cannot extract records from the file in the “Avro way.” So there is a schema editor for you to define the source record schema. See below.
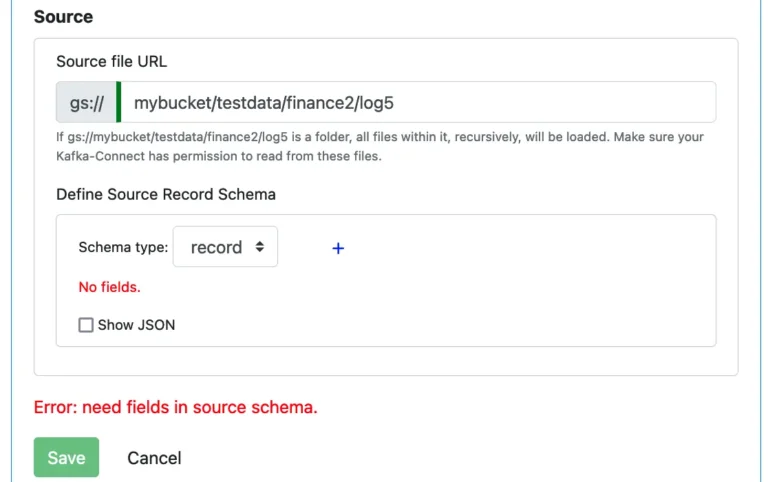
To add a field, click on the small plus sign to bring up the field editor.
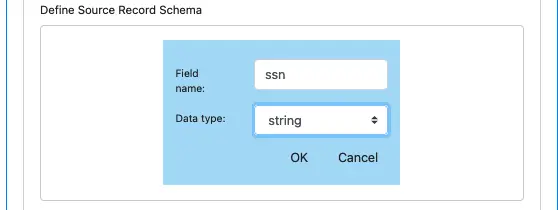
Click on OK to add this field and close the field editor. You can repeat this process to add all the record fields you need in the Avro schema. The schema definition looks something like this.
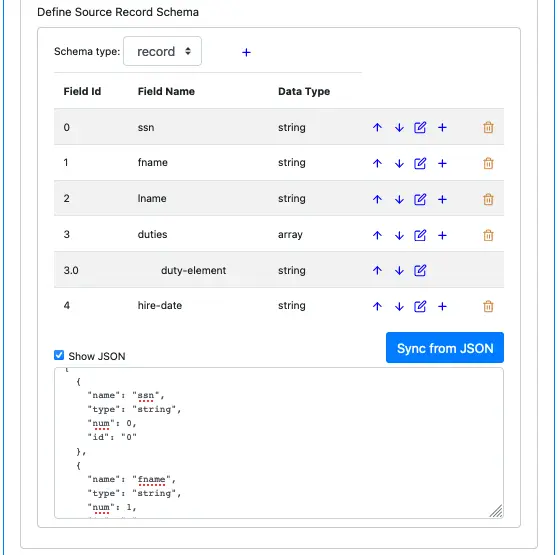
The above screenshot shows lots of bells and whistles of the schema editor in Calabash GUI.
First, you can see some buttons on each field. You can move a record field up and down in the list. You can delete a record field. You can edit it or add a new one immediately after an existing record field.
Second, you can add complex fields. The above screenshot shows an example of an array type. You can also add record or map types.
Third, you can display the JSON representation of the schema. The JSON schema text is editable. However, your change will not be immediately visible in the schema. You can click on “Sync from JSON” to synchronize the JSON string to the schema metadata. It is a quick way to make massive modifications to the schema.
The JSON editing feature can help you copy schema from one place to another. Here is how.
You can first display JSON for schema A. Then, copy the entire text to the clipboard. Move to another place in the GUI where a schema is needed and click on “Show JSON” for schema B. It will bring up an empty text box for schema B’s JSON string. In this box, paste the JSON schema from the clipboard. Finally, click on “Sync from JSON.” Viola, you have successfully copied schema A to schema B!
Finally, although Avro data sources must read data according to the schema, for consistency among all readers, the records written to the Kafka topic are still lines of text. They are JSON objects serialized to text form.
3. About "Binary File" Reader
A “Binary File” reader treats a file as containing a sequence of byte arrays. The reader takes each byte array as a separate record.
You need to define the location of the binary file on Google storage. You will also tell the reader how to break the file into byte arrays (i.e., records) by specifying the delimiters.
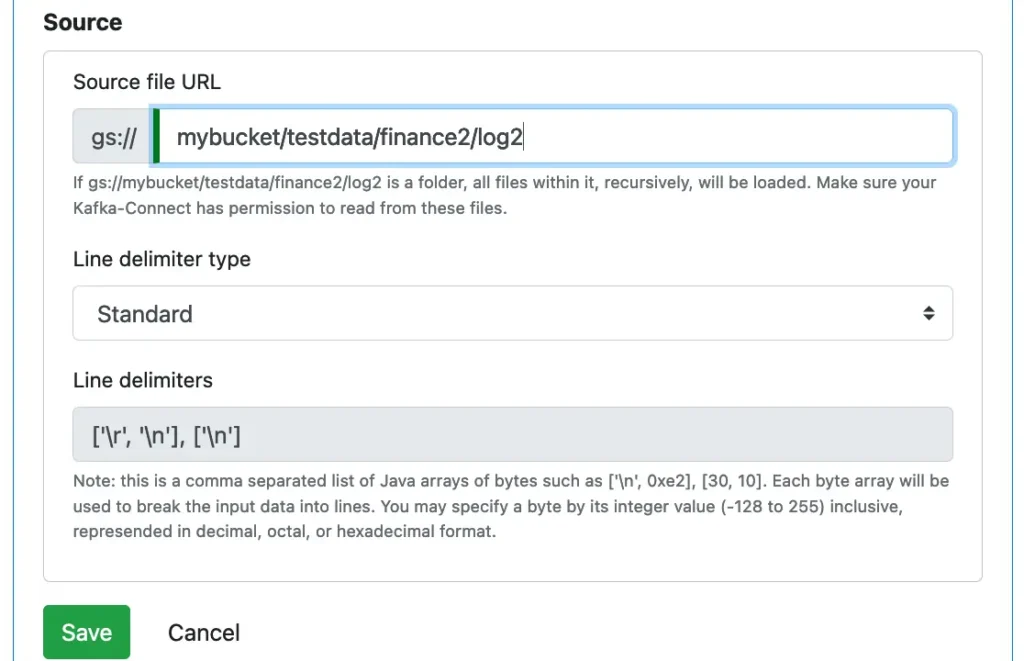
The standard delimiters are the usual RETURN byte followed by NEWLINE-byte or just a single-byte NEWLINE. Please pay attention to the syntax for specifying the delimiters.
You can also choose “Random Width” as the delimiter type. In this case, the reader will randomly cut the binary file into records.
Finally, you can define your own custom delimiter.

Please read the hint about “line delimiters.”
In the above example, the user entered two delimiters. Each is a sequence of two bytes. You can directly enter the numeric value for the bytes (must be between -128 and 255 inclusive) or Java char constant with single quotes, like ‘\n’ and ‘\t”.
The binary file reader uses the byte offset (starting from zero) as the yard mark for new data. That means only appended data are new data. So you should never delete, update, or insert bytes in the source file.
Important: The data values loaded to the Kafka topic are base-64 encoded to prevent misinterpretation over the network. This method is a de facto standard for handling binary data.
You can use Calabash offered scripts to check how far the reader has progressed in the file. For details, please read the articles about Manage Kafka System.
In summary, you can load any file into Kafka using the Binary File reader.
4. About "Google Sheets" Reader
A “Google Sheets” reader loads all lines of one sheet from a Google Sheets site. Each line in the sheet is a record.
To create a Google Sheets reader, you must enter the Google Sheets Id, the sheet name, and the number of lines to skip from the top.
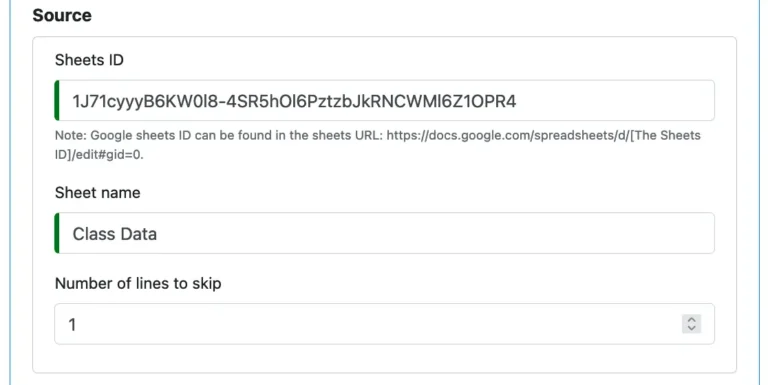
The above is for reading a sheet from a public Google Sheets site. The name of the sheet we want to load is “Class Data.” The first line in the sheet is a list of column names. Therefore, we ask the reader to skip one line.
The Google Sheets reader counts the number of data lines.
The line number starts from 1. Blank lines, i.e., lines with all columns blank, are taken as data lines, too. This behavior is different from the MS Excel file reader, which automatically skips blank lines.
You should avoid modifying the data lines already successfully loaded by the reader. You should also never delete any lines, including any blank lines. You should only append new lines to the file.
5. About "JDBC Query" Reader
A “JDBC Query” reader issues SQL query to get source data. You must specify the JDBC connection string, the user, and the password for the connection.
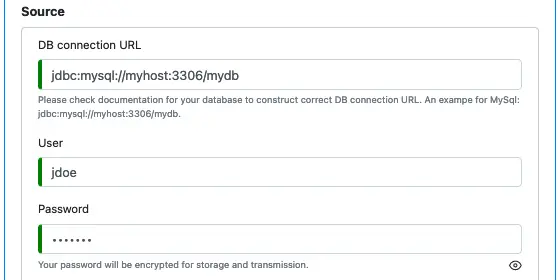
The format for the JDBC connection URL is database-dependent. The above example shows a URL for the MySql database. You should check the database you are using for the correct format.
Next, you must define a SQL statement and a key in the query result.
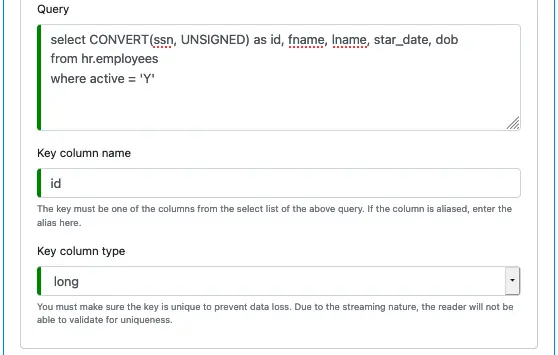
Here is how the JDBC Query reader works.
Every time a JDBC Query reader needs to check the data source, it issues a SQL query. The SQL query requires a “key column” in the select list. You specify the key column name when designing the reader. You can also use an alias as the key column.
After that, you must define the data type of this column. It can only be an integer or long, with non-negative values. See the above screenshot.
The JDBC reader uses the key column as the yard mark for new data. If the record key is greater than the current high watermark, it is a new record.
Some internals of the JDBC Query reader may be helpful. The reader saves the high watermark in the Kafka “offset store.” Each time the query needs to run, the high watermark is retrieved from the offset store. And the following predicate is added to the where clause of the SQL query.
KEY_COLUMN > HIGH_WATERMARK
This way, the already loaded records will not be loaded again. Furthermore, the query sent to the database has an added order by clause like this.
order by KEY_COLUMN asc
For the above example, the SQL statement the reader sends to the database is:
select CONVERT(ssn, UNSIGNED) as id, fname, lname, start_date, dob
from hr.employees
where active = 'Y'
and id > HIGH_WATERMARK
order by id
6. About "JSON File" Reader
A JSON File reader is for loading files on Google storage known to contain an array of JSON objects, similar to the following example.
[
{"sym":"ORCL","price":53.31,"ts":"1580755440000"},
{"sym":"ORCL","price":52.98,"ts":"1580760000000"},
{"sym":"MRK","price":88.89,"ts":"1580846400000"},
{"sym":"MRK","price":89.02,"ts":"1580859600000"}
]
Note that the content in the file is a JSON array, which requires a beginning and ending bracket in the file. There should also be a comma after each JSON object. The reader will fail if the content does not fit the JSON array format.
To define the JSON file source, you only need to enter its URL.

The reader counts the number of records successfully read, and it will not repeat work. Therefore, the JSON file should always be appended, not updated, deleted, or inserted.
7. About "MS Excel File" Reader
The “MS Excel File” reader is for loading an excel sheet into your data lake.
To define the source file, you need to specify its location on Google storage, the sheet name, and the number of top lines to skip (because they are just titles or column names). And that is all you need to do.
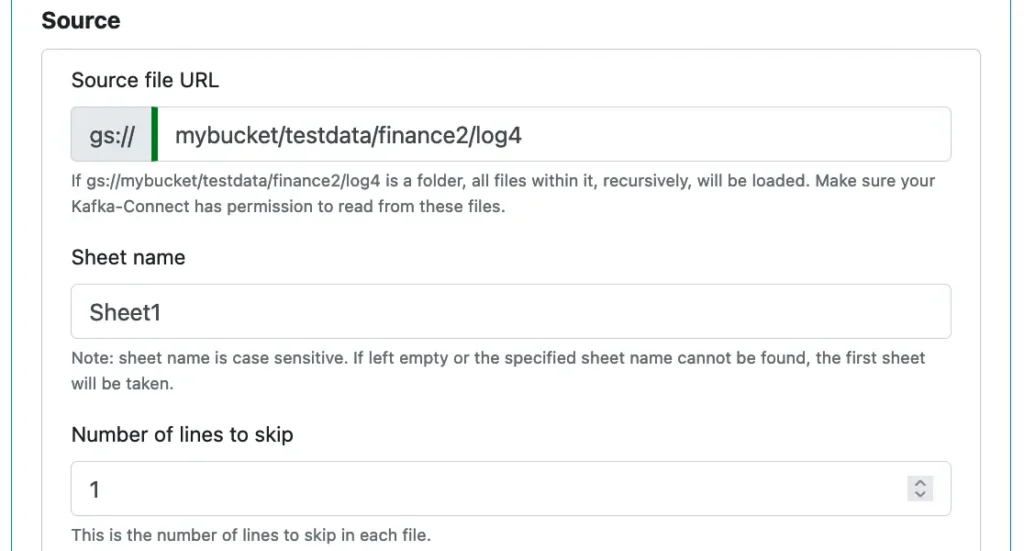
The MS Excel reader ignores blank lines, i.e., lines with all columns blank. This behavior is different from the Google Sheets reader, which takes every line as a record.
You can ask the reader to skip some beginning (non-blank) lines in every file. These are often the title lines.
The reader remembers how many lines it has successfully read and loaded to Kafka. It will never rewind to read below its “high water mark.” To stay in sync with the reader, you should avoid modifying the data lines already successfully loaded. You should also never delete any line. You can append new lines or insert blank lines anywhere.
Record values written to Kafka topic are CSV text lines.
8. About "Parquet File" Reader
If you want to load data in a Parquet file to a Kafka topic, you can create a “Parquet File” reader. The Parquet file must be on Google storage.
The following is how it works. The Parquet File reader constantly scans the file on Google storage for new Parquet records. The reader uses the record count as the yard mark for new data.
That means records appended to the file are considered new. Modified ones are not because they do not alter the total number of records in the file. Also, inserting a new record will result in the last one becoming the new record again.
The Parquet File reader requires a record schema. Without a schema, it cannot extract records from the file in the “Parquet way.” So there is a schema editor for you to define the source record schema. See below.
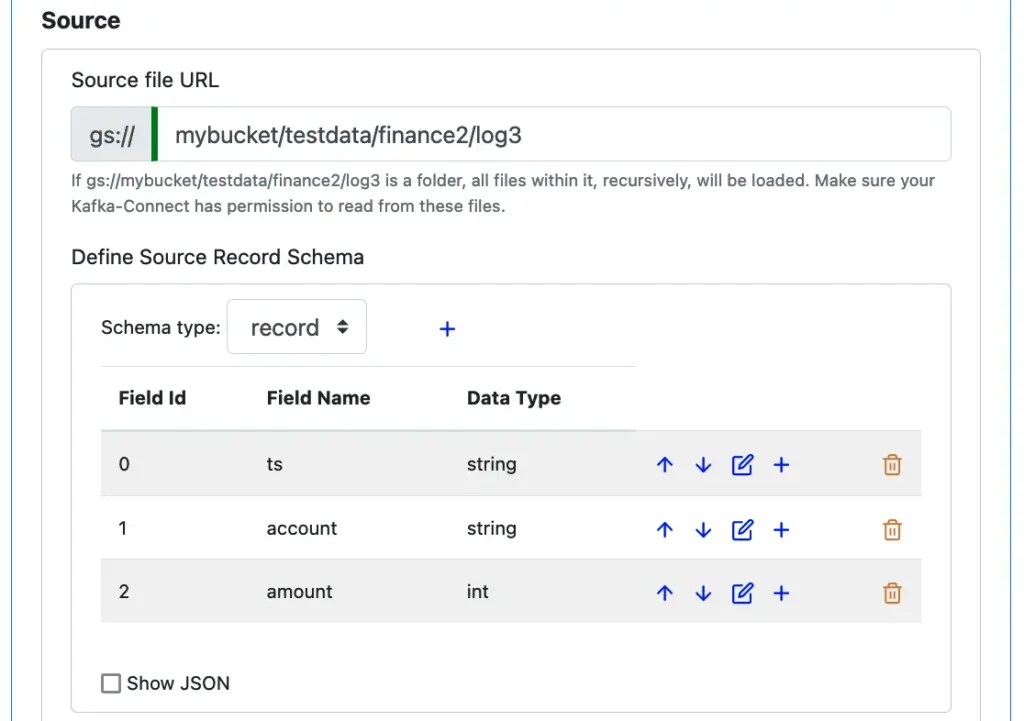
Please read the explanation in the Avro reader section about creating schema.
Finally, although Parquet data sources must read data according to the schema, for consistency among all readers, the records written to the Kafka topic are still lines of text. They have JSON objects serialized to text.
9. About "Text File" Reader
A “Text File” reader reads text files in characters using JDK11. The source file can be in one of the over 150 character encodings. To see which encodings are supported, please check the JDK11 Internationalization Guide.
To define the source, you must specify the location of the text file on Google storage and the character encoding of the file. See the screenshot below.
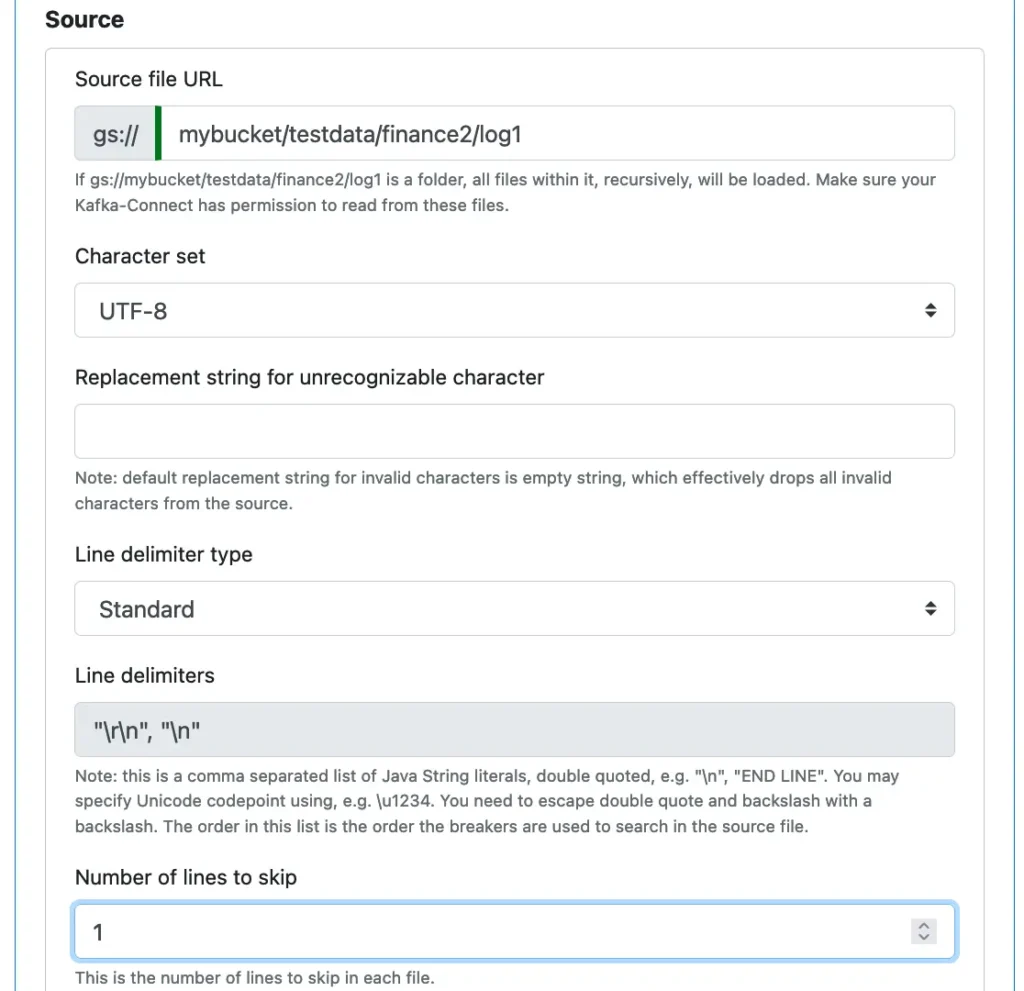
By default, the reader drops any character that is invalid in the encoding scheme. But you may define a custom replacement character string. To enter the replacement string, you can use any Java string without the surrounding double-quotes. You do not need to escape any double-quotes or backslash. You can also use Java Unicode notation such as \u0050\0041 in the specification.
The Text File reader identifies records using line delimiters. The standard delimiters are the RETURN char followed by NEWLINE char or a single-char NEWLINE.
You may also let the reader cut the file into record lines randomly by selecting “Random Width” for the “Line delimiter type.”

Or you may define you own custom delimiters.

Make sure you double-quote each delimiter. If there is a double-quote in a delimiter, you must escape it with a backslash. Two backslashes represent the backslash character itself.
A text file reader uses the character offset (starting from zero) as the yard mark for new data. That means only appended texts are new data. You should not delete, update, insert in the source file.