This article is the user manual on creating parsers in Calabash GUI.
A parser is a function that takes a string as input and produces a record object as output. Parsers are used in data pipelines to convert strings to records. Calling parsers is how we identify structures in an unstructured world. In a sense, parsers assign meaning to raw data.
To create a parser, go to the Parser page from the top menu. Then click on the “Create Parser” button. The form for the new parse will show. You must enter a unique name for your parser.
Calabash helps you create three types of parsers.
- CSV parser. The input string is known to be in CSV format.
- JSON parser. The input string is known to be in JSON format.
- Text parser. The input string is in plaintext format.
Create CSV and JSON Parsers
For CSV or JSON parser, you must specify the output schema, like in this screenshot.
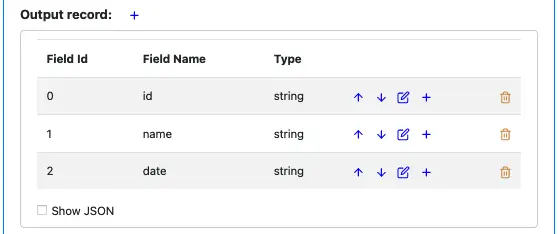
The Calabash schema editor gives you the capability to define any schema.
- You can add a field using the blue plus sign.
- You can edit each field.
- You can move a field up and down in the list.
- You can delete a field.
For CSV, there should be no embedded complex fields. All fields should be on one flat level. But for JSON, you may add complex fields.
At runtime, the parser call will throw an exception if the input does not fit the schema. The possible mismatches include not enough fields for CSV, not a JSON string for JSON parser, or the most frequent problem: data type conversion failures.
Create Text Parser
Defining a Text parser is a two-step process. The first step is to cut text lines into consecutive fields. A field can be of fixed width or delimited.
For example, in the following string, we want to define fields like this:
- Field 1: fixed width of 9 characters.
- Field 2: delimited by a comma, i.e., all characters before the next comma belongs to field 2.
- Field 3: terminated by the end-of-line

We can also consider Field 3 tries to end at a comma, but the end-of-line forces it to terminate earlier.
Let’s now define these fields in the create parser GUI. As soon as you have selected “Text” as parser type, you can see an empty field definition.

Click on the small blue button to add the first field. The field definition dialog is displayed. You can add a field name and select “Fixed Width” as the field type. Then you type the length.
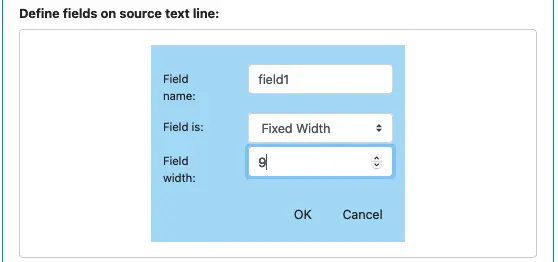
Click on “OK” to add the first field. The field definition now likes like this.

We now add field2 below field1 by clicking the blue plus sign on the field1 line (not the first plus button). The first plus button will always create the first field.
Add both field2 and field3, and select “Delimited” in the field creation dialog for both. After that, the field definition should look similar to this.
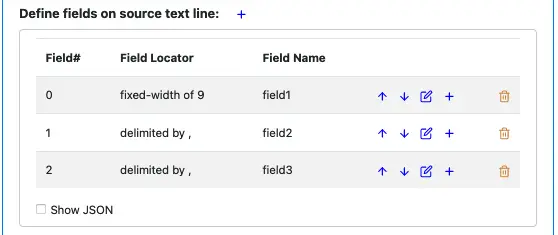
The next step is to define the output schema. In this process, we create output fields and define the mappings between the input and output.
Right now, the output record definition is empty.
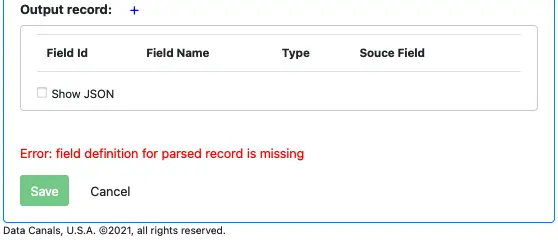
Click on the blue plus button to add the first field. The output field definition dialog is shown.
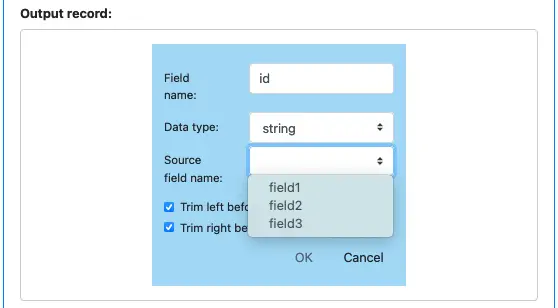
Enter the field name (“id” in this example), and select data type. Click on the “Source field name” drop-down box. You can see the input field names are all listed. Let’s pick “field1,” which means the first output field maps to the input “field1.”
There are two flags for “Trim left before parsing” and “Trim right before parsing.” These flags tell Calabash whether to trim white spaces before converting the string to the required data type.
When you set “Data type” in the above dialog, you ask Calabash to convert data from string to that type. In case such conversion is impossible, there will be a runtime exception.
In readers and pipelines, you will have a chance to define “error topics” to capture the exception. Interestingly, this is perhaps the only way you could “see” the “dirt” in your input data.
Click on the “OK” button, the field definition dialog disappears, and the output record definition looks like this.

Suppose we want to add a field after the “id” field. You can use the blue plus button on the “id” field line. The first blue plus is for creating the first field. After adding two more output fields, the output record definition looks like this.
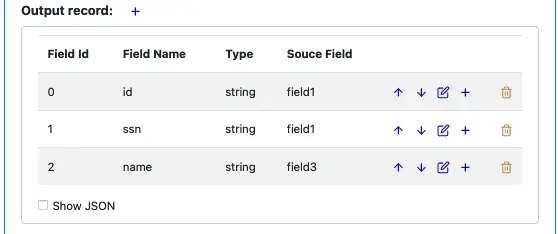
Something is interesting in this example. You can see the input field “field1” is used as a mapping source twice: it is the source for both output fields “id” and “ssn.” Also, the input field “field2” is never used. So you can see, there is no restriction on how you map input fields to output fields.
Finally, for pointers on using schema editors, please read this explanation in the doc for readers.