This article is the user manual for creating infrastructure objects.
On the Infrastructure page, click on the big green button labeled “Create Infrastructure Object,” you will bring up the form for a new infrastructure object. After entering the name of the infrastructure object and the GCP project name in which you want this object to reside, you can select the type of object you want to create. The following screenshot shows the available object types,

Click the link below to jump to the section you are interested in:
1. Create VPC Network
If you select VPC Network as the object type, you will have the option to create custom subnets. If you opt for the default, automatically created subnets, you are all done. The “Save” button is enabled. See below.

The best practice, however, is to create custom subnets. Uncheck “Automatically create default subnets,” you will see the create custom subnets button in the shape of a plus sign.
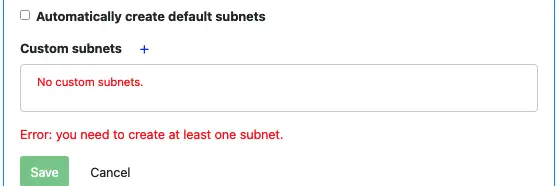
Click on the plus sign to add a new subnet. The new subnet properties box looks like the following.
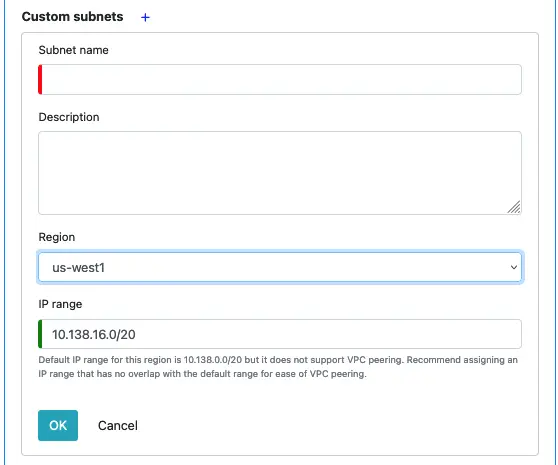
For each subnet, the name, region, and IP range are the required fields. As stated in the hint above, the IP range should not intersect with the default IP range for the region. Calabash automatically calculates such a range for you as soon as you select a region. Recommend you use the one generated for you.
Click on OK to add the new subnet to the custom subnet list. You may add as many subnets as you like. When done, click on the Save button to create the VPC network object.
2. Create Private Certificate Authority (PCA)
You need one PCA per data system for all resources to communicate through TLS. The following is a screenshot of creating a new PCA.
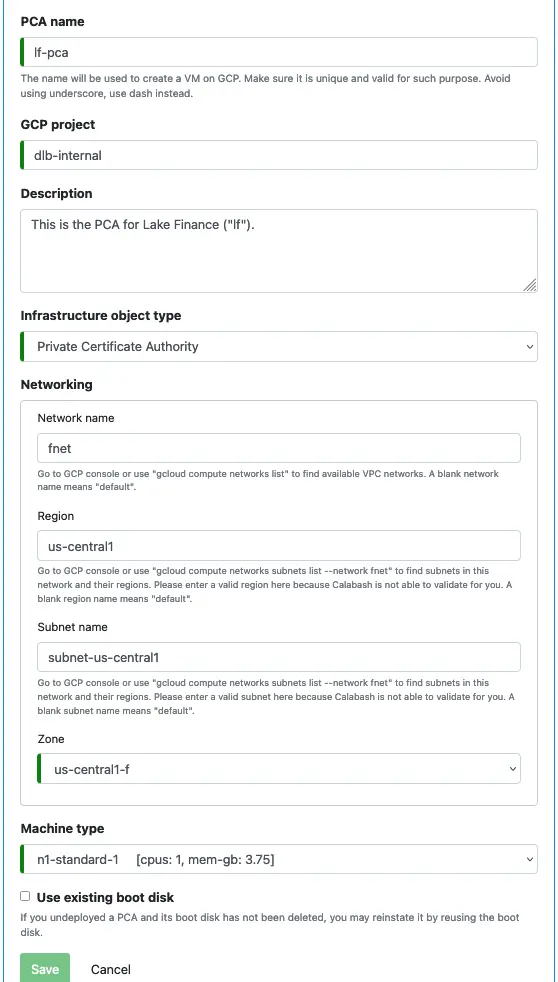
If you use a custom VPC network and subnet, you must enter the correct network name, region name, and subnet name where you want this PCA created. There are hints on how to find this information. Please read.
Calabash will launch PCA on a stand-alone VM. It does not consume much CPU and storage resources. So the minimum configuration, as shown above, will be sufficient.
The PCA will host a private key on its boot disk. You can consider the boot disk of a PCA and its private key to be synonymous. You may check “Use existing boot disk” to reuse a previously created boot disk. This way, the previous private key continues to function, and all certificates issued by the old PCA continue to be valid. Otherwise, Calabash creates a new boot disk and a new PCA private key. All components in your system must get new TLS certificates issued by the new PCA through redeployment using Calabash CLI.
Finally, the private key of the PCA is encrypted when stored on the boot disk. But this is the last line of defense. You must beef up the security around the PCA VM, for example, by adding a firewall rule to restrict SSH access (on port 22).
3. Create VM
In creating VM, you need to specify the network, region, subnet, and zone. Once you have set these, a list of machine types is available. Then the form asks you to decide on the boot disk. See below.
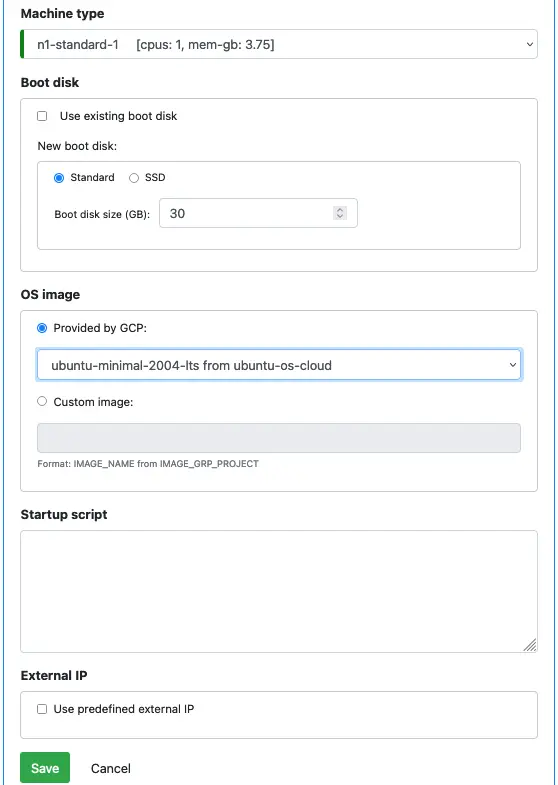
You also need to select the OS image. You can use a cloud-provided OS, or you can use a custom image if you have one. See here for instructions on building custom OS images.
The startup script is a shell script. It has to be runnable on the OS you selected. You must ensure it is error-free because Calabash GUI cannot check its validity. The startup script runs when file systems are mounted, the network is ready, and the machine is just about to run normally. Example commands you may put in the startup script include: creating directories, echo something to a file, downloading something from the internet, etc.
Finally, by default, the cloud platform will assign an external ephemeral IP to the VM. If you want to use a reserved fixed IP address, you can click on “User predefined external IP.” Then enter the IP address. Calabash will help set up your external IP address.
To learn how to apply for a fixed IP, please check this.
4. Create Microservice on VM
A cloud platform is a great place to run microservices because of its flexible resource allocation. But as a user, you also need a tool to help you deploy and undeploy your microservices with ease. Calabash offers such capability — anyone with minimum technical exposure can create and deploy a microservice in minutes. This section describes how to create a microservice on a VM.
Start with creating an infrastructure object, and select its type as “Microservice on VM.” You will enter the usual properties: the name, network, subnet, region, zone, and machine type.
Specify Or Build Container Image
Next, you specify the container image.

This screenshot is for using an existing container image. Don’t forget the image version when entering the container image spec. The container image must already exist in Google Container Registry when you deploy the microservice to the cloud, or the deployment will fail.
Check this for how to push a container image to Google Container Registry manually.
If you do not have a container image, you can ask Calabash to build one for you. To that end, you must create an “application bundle” and place it on Google cloud storage. The application bundle is a compressed tarball of all the files needed for building the container image. The files include a Dockerfile and anything it needs.
The following is an example of how to create an application bundle for building a container image.
% cd <the dir where Dockerfile is located>
% tar cf myapp.tar *
% gzip myapp.tar
Please test to make sure you can do “docker build” in this directory to build the image locally. You may also want to launch the container on your local machine to verify it works.
The result of the above commands is a file named “myapp.tar.gz.” This is the application bundle. Now you must upload this to Google Cloud Storage, like this.
% gsutil cp myapp.tar.gz gs://mybucket/myapp.tar.gz
After that, you can set properties in Calabash GUI to ask Calabash to build the container image before launch.
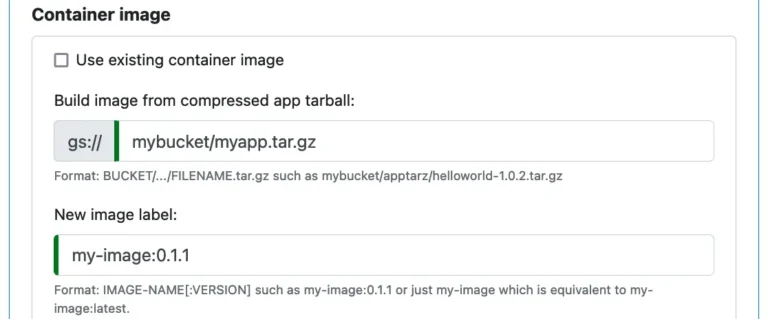
Note that the “Use existing container image” is unchecked. With the information in this form, Calabash will first build the image, creating image “my-image:0.1.1” in Google Container Registry. Then it launches containerized app in a VM using this new image.
Create a Volume
Next, we will see an optional feature — mount a volume to the container. You can mount a disk or a host directory to the container. This way, you will have a chance to share data with your container. Click on “Use volume” to enable defining volumes.
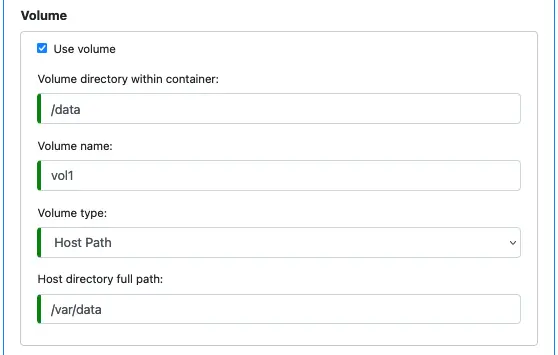
Note that if the host directory does not exist, Google will try to create it automatically. You must make sure you have permission to create directories on the host, or the launch of the container will fail. Hint — the directory “/var” is a good place for creating host directories.
Create and Expose Service
You need to create a service on a port to allow the outside world to access your microservice. Otherwise, your microservice only runs without being able to interact with others. To create a service, check the “Create service” box.
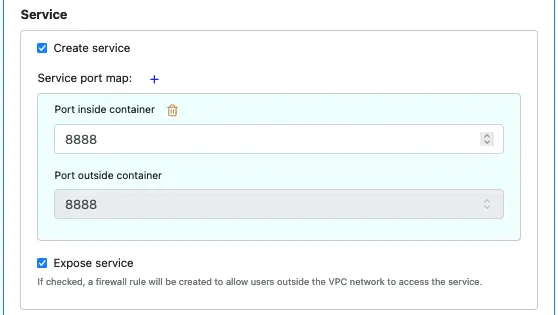
For a microservice on a VM, the internal port within a container must be the same as the external port. That is why the field “Port outside container” is not editable.
If you check the “Expose service” box, the service is accessible from outside the VPC network. Otherwise, it is internal. For an external one, internet traffic can reach the service from anywhere. You may want to add firewall rules to restrict access.
The Startup Script
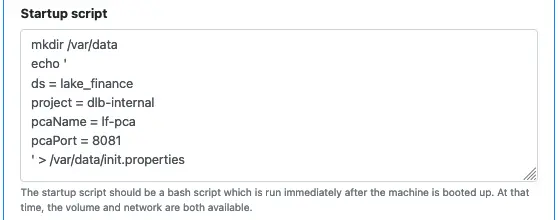
Finally, you can enter a bash script as a startup script. Note that only bash script works. That is because Calabash uses Ubuntu-based Container Optimized OS (COS).
Some Final Words about Microservice on VM
Some interesting points you may want to know.
- You can launch any containerized application on a VM. It does not have to provide a service endpoint.
- You can maintain a web server on a VM using this feature.
- Launching a microservice on a stand-alone VM is not resilient to failures, and it cannot adapt to load changes. Therefore, you do this only for testing. For production, you should consider launching it in a Kubernetes cluster.
5. Create Kubernetes Cluster
A Kubernetes (K8s) cluster provides scalability and error-resilience to microservices. It can be either regional or zonal. The screenshot below shows properties for a regional cluster.
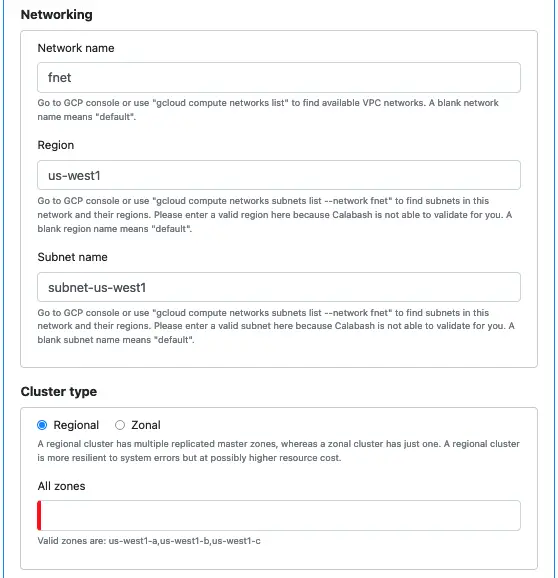
Please also read the hint in the GUI to understand what you are creating.
Calabash offers some help to you — it figures out all the valid zones for a regional cluster. (Please see the hint at the bottom of the screenshot.) You can decide which zones to use, then cut and paste them from the hint.
You can alternatively create a zonal cluster, as shown below.
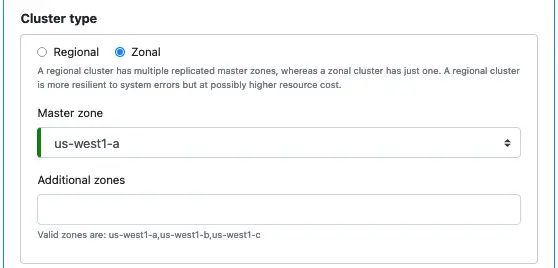
A zonal cluster has only one master zone. You can add additional non-master zones.
There are some more properties for a K8s cluster. These all appear self-explanatory.
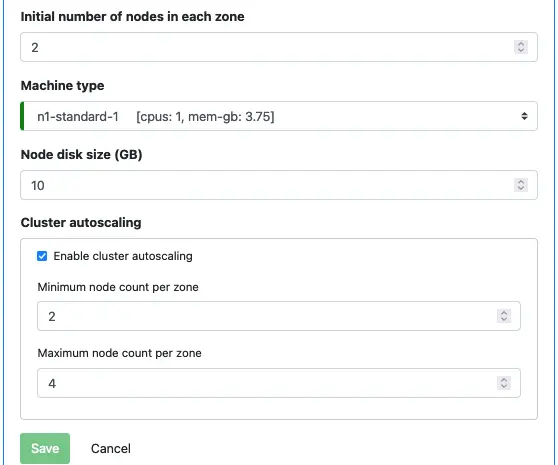
Note that this autoscaling is a cluster-level feature. Later, when you deploy an app to this cluster, you can configure application-level scaling, known as Horizontal Pod Autoscaling (HPA). These two are different but for the same purpose, i.e., keeping your app sharp and healthy.
Once you have created a K8s cluster, you can deploy microservices to it.
6. Create Microservice on K8s
To create a microservice on K8s, the first thing you must do is select which K8s cluster you want to use.

Optionally, you may define a namespace for your app. The Kubernetes cluster is shared by a large number of applications. To avoid naming conflicts, you have better create a unique namespace.

If the namespace is empty, Kubernetes will use the default (named “default”) namespace.
Horizontal Pod Autoscaling
Next, you specify the number of pods and their autoscaling properties. The feature is called Horizontal Pod Autoscaling (HPA). It is for coping with dynamic load challenges.
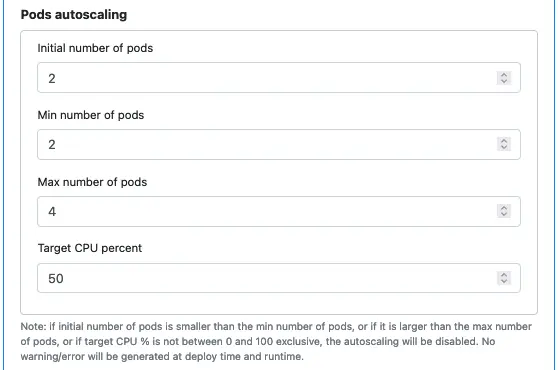
A pod is an instance of a microservice. You can launch multiple instances to share the load. When the CPU utilization exceeds the target, Kubernetes will create more pods, provided you do not violate the “Max number of pods” restriction.
As stated in the hint above, if the autoscaling properties are not meaningful, you effectively turn it off.
Specify or Build Container Image
This part is the same as in Create or Build Container Image for Microservice on VM.
Secrets
A Kubernetes secrets object is an encrypted volume. You can have it mounted to pod containers, which allows pods to share the same data secretly. Example files that you may want to share secretly include the credential file for accessing another user’s resource, such as Google Bigquery tables, access tokens to third-party API, or any sensitive business data your app needs.
Calabash helps you define a Kubernetes secrets object and its content.
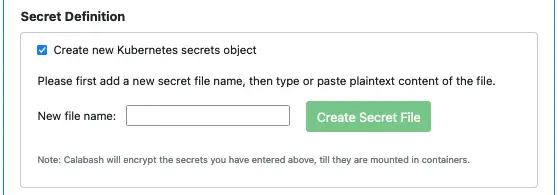
After checking the box for “Create new Kubernetes secrets object,” you are ready to add files to the secrets object. In the above screenshot, you can enter the name of the first file. Suppose we enter “credential.json” as the filename and click the “Create Secret File” button. The GUI adds the file content box for us. See the screenshot below.
The file content should be in plaintext form. The plaintext is only on your screen for your convenience. Internally, Calabash encrypts it until it appears in the container. You need not worry about adding sensitive content.
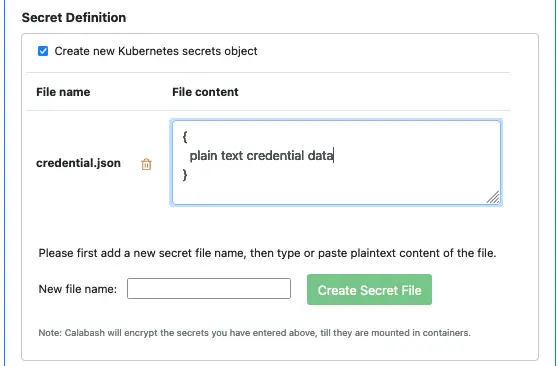
You may add as many secret files as you like.
The name of the Kubernetes secrets object is not very important. By convention, it is in the format of
MICROSERVICE NAME-secretNUMBER
such as “lake1-msk8s-secret2,” where “lake1-msk8s” is the microservice name.
The number in the suffix is for avoiding name conflict. Calabash watches for name conflicts with existing secrets and increments the suffix for a new secret until it gets a unique name.
Next, you enter the mount point for the secrets object within the container. You must provide a full path as the mount point.

Finally, using secret is optional. You may uncheck “Use secret” if you don’t need it.
Create a Volume
The GUI for creating volume is similar to Create a Volume for Microservice on VM.
Service
In the most common use case, you create a microservice for establishing a REST service point. But there are also cases where you want to run an app (such as a monitoring app that logs events to a database) without offering a REST service. Calabash allows you to create both.
If “Create service” is selected, you need to set internal and external ports. The external port number for a service defined on K8s can be different from the internal port number. In the following example, the internal port 8081 maps to 9000 outside.
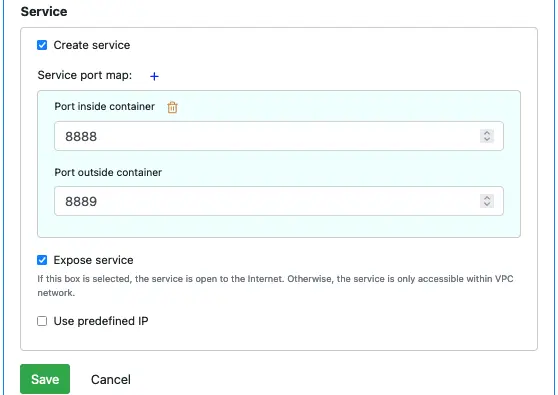
You can add as many port mappings as you like.
Calabash creates a load balancer if the “Create service” is checked. The load balancer can be internal to the VPC network or external. In the latter case, your service is available to the outside world.
You can also ask Kubernetes to use a fixed static external IP for the load balancer. By default, Kubernetes creates a dynamic external IP.
7. Create Kafka
Using Calabash, you can easily create and deploy a very sophisticated Kafka system. A Kafka system is the core component of your data lake. Select “Messaging Storage (Kafka)” as the object type when you create an infrastructure object.
Define Network Properties for Zookeepers and Brokers
After entering the name and project of the Kafka system, you need to define the network, region, and zone for zookeepers and brokers in your Kafka system.
Zookeepers and brokers will all be in the same zone to maximize network performance.
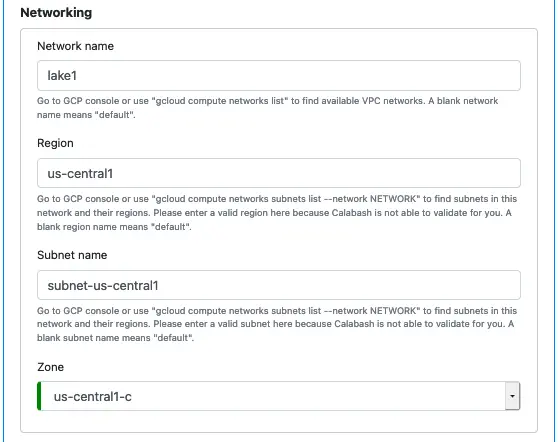
Roughly speaking, zookeepers keep the dynamic configuration of the Kafka system, and brokers keep the actual data and their metadata.
Once zookeepers and brokers are up and running, you have gotten a functioning Kafka system already. It can store data in topics and power pipelines. But it cannot easily exchange data with the outside world. That is the job for an optional subsystem called Kafka-Connect. We will configure Kafka-Connect shortly.
Select PCA
Next, you must select a PCA. If you have not yet created one, the drop-down list for PCAs is empty, and your creation of the Kafka system will not go through.

The PCA enables two levels of security.
- It enables connection encryption using TLS (SSL).
- It enables the use of Access Control List (ACL) in Kafka. Calabash builds Kafka user names into SSL certificates. Once a TLS (SSL) handshake is successful, the username in the certificate goes through the ACL authorization.
Configure Zookeepers
Next, you must specify the number of zookeeper nodes and their machine type.
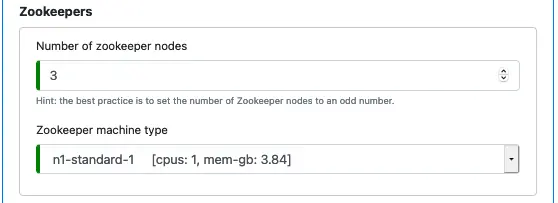
Calabash will always deploy zookeepers with SSD boot disks since zookeeper nodes require extremely fast persistence. As said in the hint, the number of zookeeper nodes should be odd. It cam help speed up voting for leaders among zookeeper nodes.
You do not need to use powerful machines for zookeepers.
Configure Brokers
Next, you must specify properties for brokers.
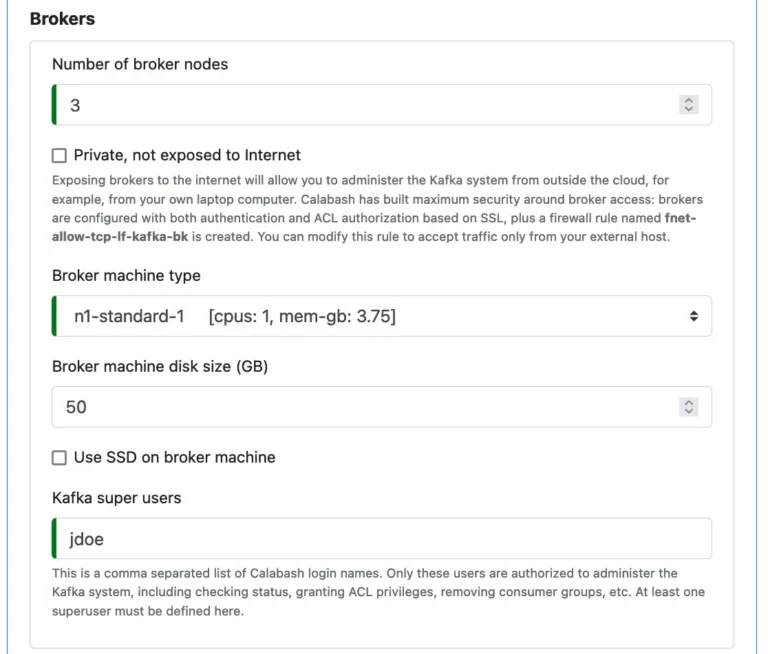
You can manage your Kafka system from your laptop computer. But it requires public brokers, i.e., the checkbox “Private, not exposed to Internet” not set. Calabash builds tight security around brokers to give you peace of mind using the public brokers.
In general, the more brokers, the better throughput on topics and better fault tolerance. But it may generate overhead, particularly in dedup and aggregate processors, resulting in longer latency. Finding the optimal number of brokers requires experiments. You may start small and gradually increase the number of brokers. Using Calabash, you can increase the “Number of broker nodes.” Then deploy the Kafka infrastructure object again without undeploying it first.
The CPU speed is not extremely important since the brokers do not do heavy computations.
The disk size is critical because Kafka persists the topic data on disks. Exhausting disk space in a broker is disastrous. You must estimate your data load for seven days and calculate the size of each broker disk, adding 30 to 50% extra for possible load spikes. Another method we saw was to estimate the total load for ten days. That is roughly a 43% oversizing.
You must take disk oversizing very seriously. In case of disk exhaustion, merely adding more broker nodes will not immediately release the pressure. The new nodes will not help until it receives partition assignments. You will have to move partitions manually into the new nodes.
Finally, you define a superuser for the broker. This property is required. A superuser is a registered Calabash user who will have permission to manage the Kafka system. Make sure the superuser name is a valid Calabash login name.
The superuser can assign access privileges to other (non-superuser) users using Calabash offered scripts. A non-superuser username can be anything. It does not have to be a Calabash login name.
For example, suppose a user only needs to write data to a topic. The superuser can assign this user the producer permissions on this topic. The superuser can also revoke privileges at any time.
Please read the article on Manage Kafka System for all the details.
Configure Kafka-Connect
Kafka-Connect is optional. It is a service for managing the running of Kafka connectors. And Calabash relies on Kafka-Connect to run reader and writer connectors.
If you decide to skip deploying Kafka-Connect, you have reached the end of definitions for the Kafka system. You should see the “Save” button enabled.

You will need Kafka-Connect for two reasons.
- To deploy Calabash readers and writers. Calabash readers and writers are mostly Kafka connectors.
- To run your own custom Kafka connectors. In this case, Calabash can also help you upload and install your custom connectors without restarting Kafka-Connect.
Kafka-Connect requires a Kubernetes cluster. Make sure you have created the Kubernetes cluster before defining the Kafka system.
The Kafka-Connect itself is also a service in the Kubernetes cluster. So you can specify the Horizontal Pod Autoscaling (HPA) properties for Kafka-Connect. See below.
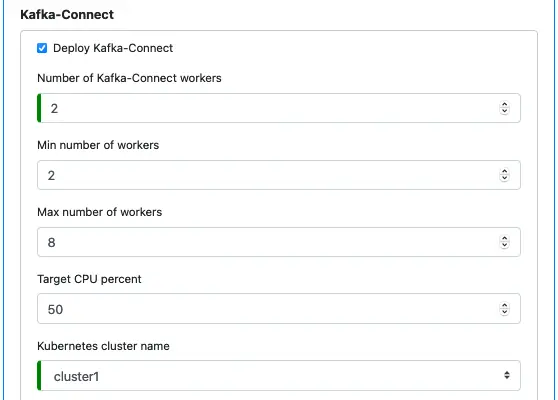
Next, you decide if the Kafka-Connect service can be accessed from outside the VPC network, i.e., to expose Kafka-Connect to the internet or not.

Expose Kafka-Connect is preferred since it allows you to manage Kafka connectors from your local computer, such as your laptop. The only concern may be security. Calabash has implemented maximum protection around the Kafka-Connect service, as explained in the hint above.
The Kafka-Connect service listens at port 8083, which is not configurable. By default, the service IP is a dynamic IP assigned by Google Container Engine. It may not be what you need. But you have an option to specify a predefined static IP.
Next, you define a cloud storage folder for uploading custom connectors and another folder for custom Java libraries.
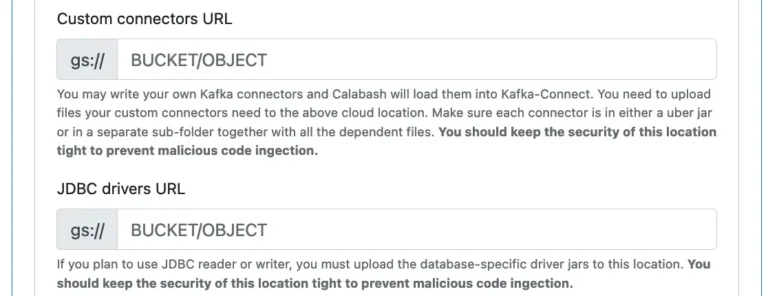
Calabash will scan the custom connectors folder (i.e., the “gs://mybucket/myconnectors” in the above screenshot) every 5 minutes. It will examine all the new connector jar files and add new connectors to its connector list. To install your custom connector, upload your custom connector jar file to this cloud folder. It may take a few minutes for Kafka-Connect to detect the new connectors.
You can use the Calabash offered script to check the current list of connectors in Kafka-Connect. When your connector appears in the list, you can start it by POSTing a message to the Kafka-Connect service API at port 8083. You should check Kafka-Connect documentation for the exact syntax for the body of the POST message. There is also an example in the Calabash tutorial you can use as a reference. Calabash has made it easy for you to deploy your custom connectors.
Calabash support JDBC-based databases. If you have designed readers or writers to access such databases, you must provide the JDBC driver jar file in GCS. Kafka-Connect will examine and load new library files from this folder every 5 minutes.
Performance note. These two cloud folders had better not be the same. It will save Kafka-Connect time when it scans files for connectors.
Security Warning: you must protect the two custom folders with maximum security to prevent malicious code injection. You must also verify the validity of the jar files uploaded to these folders.
Finally, there is one last property for Kafka-Connect. You may optionally enter a definition for user credentials (in JSON format). These credentials are needed if, for example, your connector must write data to a Bigquery table owned by the user. Providing the other user’s credentials will make cross-user resource access possible. By default, Kafka connectors assume the credentials of the Kubernetes cluster.
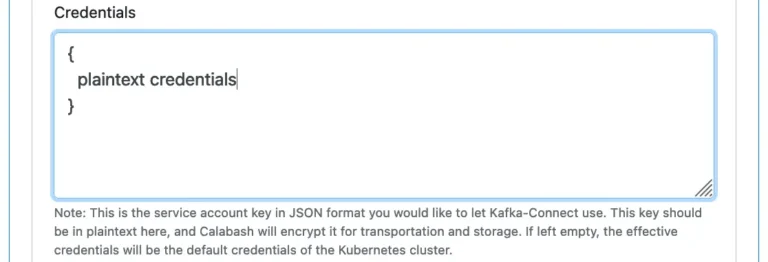
The credentials specification should be in plaintext. But it is only so on screen. Everywhere else, it is automatically encrypted.
8. Create an Internal Kafka Client Environment (KCE)
An internal Kafka Client Environment is a container running on a VM. Inside this container, you can find the following three things:
- SSL certificates for all the users who need to access the Kafka system,
- Kafka client property files for all those users to connect to the Kafka system,
- a set of scripts for managing the Kafka system, writing/reading a Kafka topic.
You need a KCE infrastructure object if your Kafka brokers are private. An internal KCE will be able to access the private Kafka in the same VPC network.
There are three unique parameters you need to set.
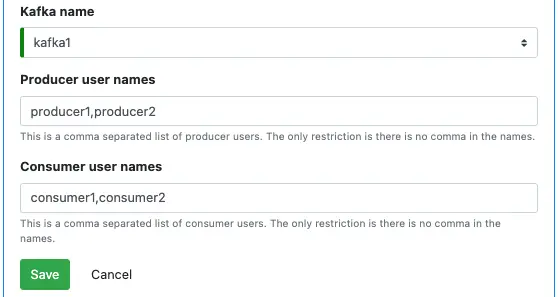
A KCE is for one Kafka system. The parameters for “Producer user names” and “Consumer user names” are lists of users the KCE will support as producer and consumer, respectively. A user name is just an arbitrary string. Except for having no comma in it, there is no other restriction. A user may appear in both lists.
Important. If the logged-in user is not the superuser of the Kafka system, the deployed KCE will not have an admin option. The KCE will only support producers and consumers to access topics. But you cannot manage the Kafka system. If the logged-in user is the superuser, the deployed KCE will be with the admin option enabled.