This article is the user manual on creating writers in Calabash GUI.
A writer is a real-time process that writes data from a Kafka topic to persistent media. The writings happen as soon as the records appear in the Kafka topic.
Saving data from the data lake to persistent media usually means you have reached a significant milestone where the data have become clean enough. As such, a Calabash writer writes data in a strictly structural way:
- You will need to define a source schema.
- You will need to define a target schema, e.g., DBC table, Google Bigquery table, etc.
- You will need to define schema mappings which are the mappings between source fields and target fields.
In short, the writer will keep the output structured.
Depending on the nature of the target, there are several different types of writers in Calabash. In the create writer form, click on the combo box “Target type,” you can see all currently supported writer types in the drop-down list.

All these writers are Kafka sink connectors. To use these writers, you must deploy a Kafka system with Kafka-Connect enabled.
1. Define Data Source
Next, you need to define the source. It includes selecting the Kafka system, specifying the source topic, and defining the source record schema. The following is a screenshot of all these.
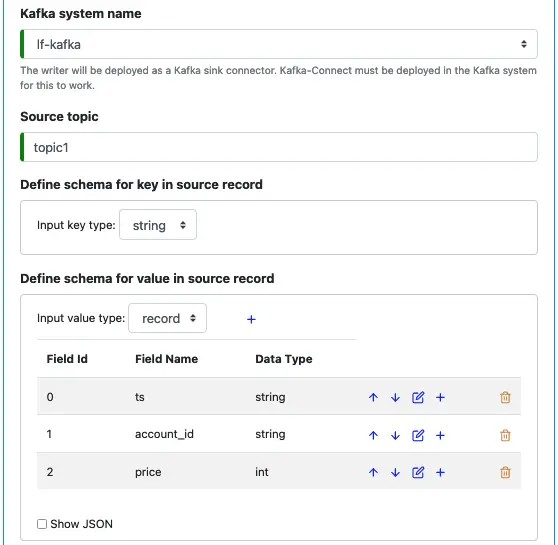
Internally, records in a topic are in the form of the serialized JSON string. The Writer will try to deserialize them based on the above schema. If deserialization hits any issue, there will be a runtime exception. You need to make sure the source schema above accurately describes the source to avoid unnecessary runtime exceptions.
2. Define Output Record Schema
The output record is not a key-value pair as in Kafka topics. So you only need to define one record schema.

Click on the blue plus sign to display the field editor, enter the field name, and set its data type. Each output field needs an expression to map it to the source. See below.
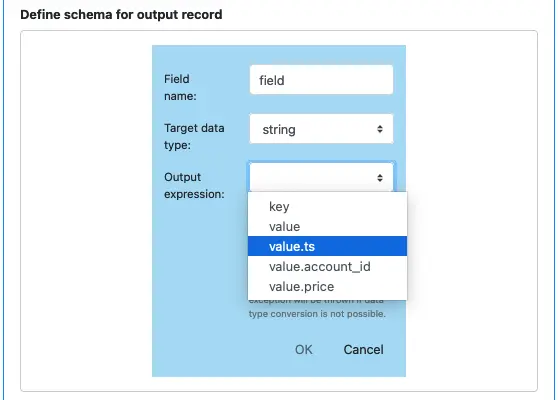
You can map an output field to any source field or the serialized key or value (represented, respectively, by “key” and “value” in the drop-down list). You can map the same source field to multiple output fields, and it is also ok to leave some source fields unused.
The data type of the expression must be convertible to the target data type you set above. For example, it is ok to convert from int to string. It is also ok to convert from a string of digits to int. But it will fail in runtime to convert a string containing special characters to int. There will be a runtime exception if data type conversion fails.
3. Shared Properties
There are three properties shared by most writer types.
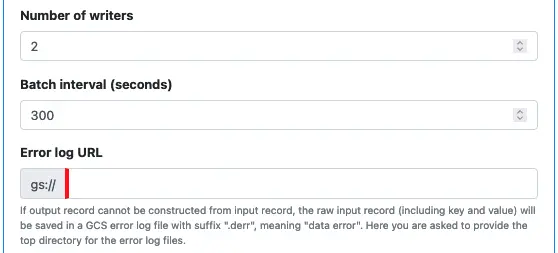
- Number of writers. You can launch multiple writers to share the load.
- Batch interval. To reduce overhead, writers write data in batches. “Batch interval” is the duration of time the writer will spend collecting records before writing to the target. In the cloud platform, the rate of write may be subject to a quota. For example, in Google Bigquery, increasing batch intervals can reduce the write rate, which will help you cope with the quota restriction.
- Error log URL. If any record hits an error, the writer will log the error in an “error file” on Google Cloud Storage. In this error file, you can find error messages, as well as the records that caused those errors. The “Error log URL” is the folder for all the error files.
4. File Writer
Starting from this section, we look at properties specific to each writer type.
Here is the screenshot for File writer.
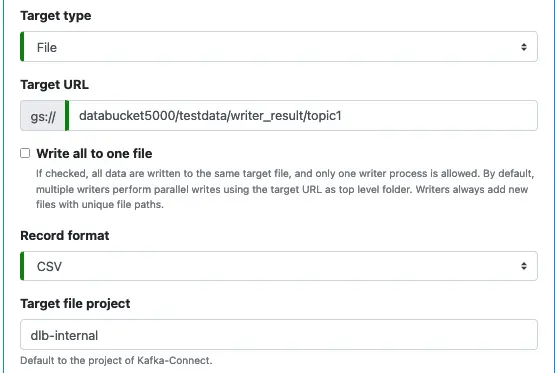
You need to specify where the target file is on Google Cloud Storage using the “Target URL” property.
If “Write all to one file” is checked, the writer will write all records to the same target file.
If “Write all to one file” is unchecked, each time the writer must write a batch, it creates a new file. The “Target URL” property is, therefore, the folder for these files. The file URLs will have the following format.
TARGET_URL/yyyy/mm/dd/WID/yyyymmdd_HHMISS.csv
where “yyyy,” “mm,” “dd,” “HH,” “MI,” and “SS” are the digits for the year, month, day, hour, minute, and second, respectively. They are components from the timestamp for file creation. The “WID” in this format is the writer id. You can ask Calabash to launch multiple writers to parallelize writing. Writer ids are consecutive integers starting from zero.
Side Note 1. Some background information may be helpful for fully understanding the writer’s behaviors and performance.
Cloud storage is immutable, which means once you have created a file, you cannot modify it. This immutable storage is the fastest and most scalable in a big-data system.
But if all records must go into the same target file, the file is recreated in its entirety every time there is a need to write into it. The old file before the write gets deleted. This way of writing will be painfully slow and wasteful.
To achieve the best writing performance, you must launch multiple writers to output in parallel. Each writer will write one batch to a separate file. There will be no conflict among writers.
The property “Target project” is optional. It is the project that owns the Google Cloud Storage bucket.
Side Note 2. You need to understand the implication of specifying the “Target project” property.
The writer is a Kafka connector that runs in Kafka-Connect, and Kafka-Connect runs in a Kubernetes cluster. By default, the writer’s credentials are the credentials of the Kubernetes cluster. But it may not have permission to write to the target location. You may hit runtime permission exceptions.
You have two ways to solve this problem.
- Ask the admin to permit the Kubernetes cluster to write to the target URL, i.e., grant permission to the owner of the Kubernetes cluster. But in that way, you allow every app deployed to the Kubernetes cluster to access the target storage.
- Give this permission only to Kafka-Connect in which the writer runs. This method appears more accurate and safer.
You have to do two things to use the latter strategy.
- Supply the credentials of the target storage to Kafka-Connect. You can do this by modifying the “Credentials” property in the Kafka infrastructure object. (Please read the Credentials property in Kafka-Connect.) Since this is a property of the Kafka system, you have to redeploy the Kafka system if you have already deployed it.
- Set the “Target project” property on the writer. It must be the name of the project that owns the target storage.
With these setups, the writer will not use the default credentials. Instead, it will use the third-party credentials in Kafka-Connect for the target project.
Finally, you can choose the record format from four options:

If you choose JSON, each saved target file contains an array of JSON objects.
5. JDBC Writer
To create a writer for JDBC target, you need to define the usual parameters for JDBC.
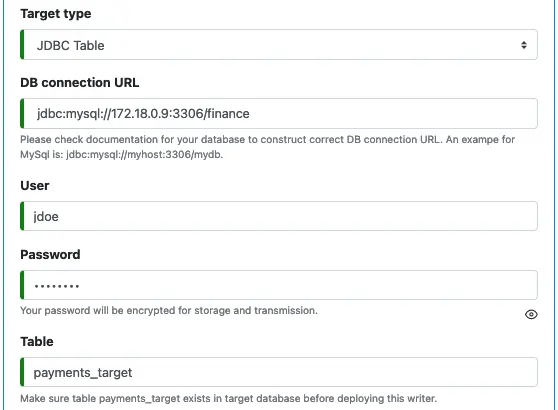
The JDBC driver JAR file is a library file needed by the writer at runtime. For example, in the above screenshot, we see a MySql connect string. Then we will need to supply the JDBC driver file for MySql to the writer. We do this by uploading the driver file to the Custom Library URL folder defined for Kafka-Connect.
6. Google Bigquery Writer
The following screenshot shows all the properties for Google Bigquery writer.
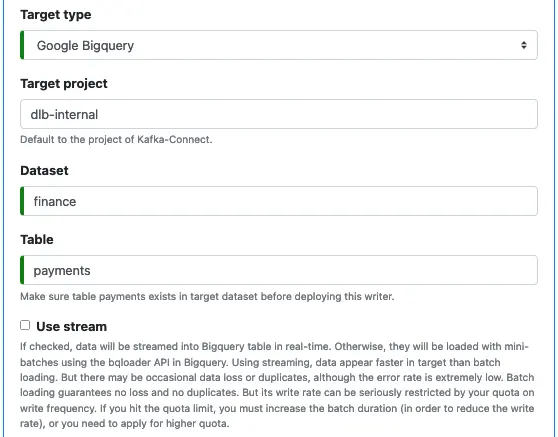
The “Target project” is optional. It is the project that owns the Google Bigquery dataset and table. Please see Side Node 2 for the impact of setting the “Target project.”
Next, you need to enter the names for the dataset and the table. These are required. Also, you must create the table manually in Google Bigquery before deploying the writer.
Finally, there is an optional check box “Use stream.” If checked, the writer will use Google Bigquery streaming to write data to the target table in real-time. Otherwise, it will use the bqloader API in Google Bigquery to write data in mini-batches.
Side Note 3. There are some sharp differences between using Google BigQuery streaming and loading by bqloader.
Using Google Bigquery streaming, data appear faster in target than batch loading. But there may be occasional data loss or duplicates. Although the error rate is low, it is not negligible from our experiences. Batch loading guarantees no loss and duplicates. But its write rate can be seriously hampered by your quota on write frequency. The default Google Bigquery quota can quickly become an issue. If you hit the quota limit, you must increase the batch duration (which reduces the write rate). Or you need to apply for a higher quota (not suggested).
The “Batch interval” property does not apply to streaming write. It disappears from GUI if you check “Use stream.”
7. API Target Writer
An API Target writer is a real-time process that sends all records in a Kafka topic to an API endpoint. You can set the HTTP method to either POST or PUT.

You need to enter the URL of the API endpoint. Omit the “http://” or “https://” prefix in the URL. You will have a chance to add protocol when you define security properties for the connection later.
In the URL, you can add placeholders for parameter values. A placeholder is a square bracket enclosed parameter, such as “[p0]”. You can define the replacement values for the placeholders with “Parameter Value Expression.” See the following example.
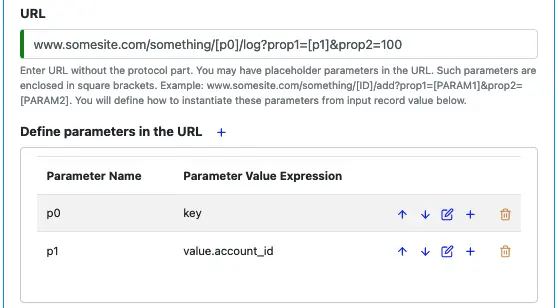
Click on the plus sign to add a parameter value expression for a parameter name. The GUI interaction is self-explanatory.
Next, you choose between using HTTP (not using SSL) or HTTPS (using SSL). The optional CA Certificate is for “Use SSL” only.
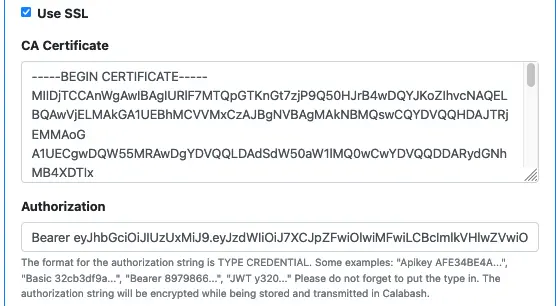
The “Authorization” property is for setting the “authorization” header field in the HTTP(S) request. If your API service requires an access token, you can enter it here. Be sure to include the token type, such as “Bearer,” “JWT,” etc. Calabash will internally encrypt the authorization string.
Next, you may need to set an optional “Request body format.”

There are three major encoding schemes for the request body. These are
- application/x-www-form-urlencoded
- application/json
- text/plain
Which one you should select is determined by your API service. The majority of services use “application/x-www-form-urlencoded,” so it is the default value for this property. But you had better find out exactly which format your API service expects.
Most API services impose request rate restrictions. If you send requests to them too fast, they will return failures. If you are using this kind of service, find out the maximum permitted request rate from the provider, then calculate the minimum interval between two requests. Enter the number in milliseconds in the “API request interval” property. See below.

Finally, you may want to set another optional property — “Success log URL.”

If you set this property, every time a REST request is successful, the writer logs the key for the record in this folder. Recall that you can also set an error log on Google Cloud Storage. This “success log” is just the opposite of the error log.
Here is why the success log may be necessary. The API service may be a third-party service. Querying their internal log database is often out of the question. In this case, a success log could prevent a lot of frustration. In other words, in this situation, you’d better keep self receipts.